> ## Documentation Index
> Fetch the complete documentation index at: https://watermelon.ai/docs/llms.txt
> Use this file to discover all available pages before exploring further.
# AI Agent for Customer service
> Customer service is one of the most common use cases of an AI Agent.
Follow this guide to set up your Agent, define its support behavior, and connect it to your service tools.
## What this Agent can do
* Answer frequently asked questions
* Replace (part of) your support inbox
* Guide customers through self-service flows
* Collect customer details when needed
* Create structured intake for support requests
* Route conversations to the right team
* Hand over to a human Agent when needed
* Send conversations or data to external tools via Actions or Zapier
## Before you begin
Before setting up your Customer service Agent, make sure you have the right elements in place. This ensures your Agent can recognize customers, collect relevant details, and route conversations correctly.
**Estimated time:** 20–30 minutes from start to finish Your Agent’s personality defines how it asks questions.
## Prerequisites
You’ll need an active Watermelon account (sign up first if you don’t have one yet) and a clear idea of which customer details your support team needs (for example: order number, account email, issue type)
To set up this Agent, you need an Advanced, Business or Enterprise License.
## Step 1: Create your Agent
### Open Customer service template
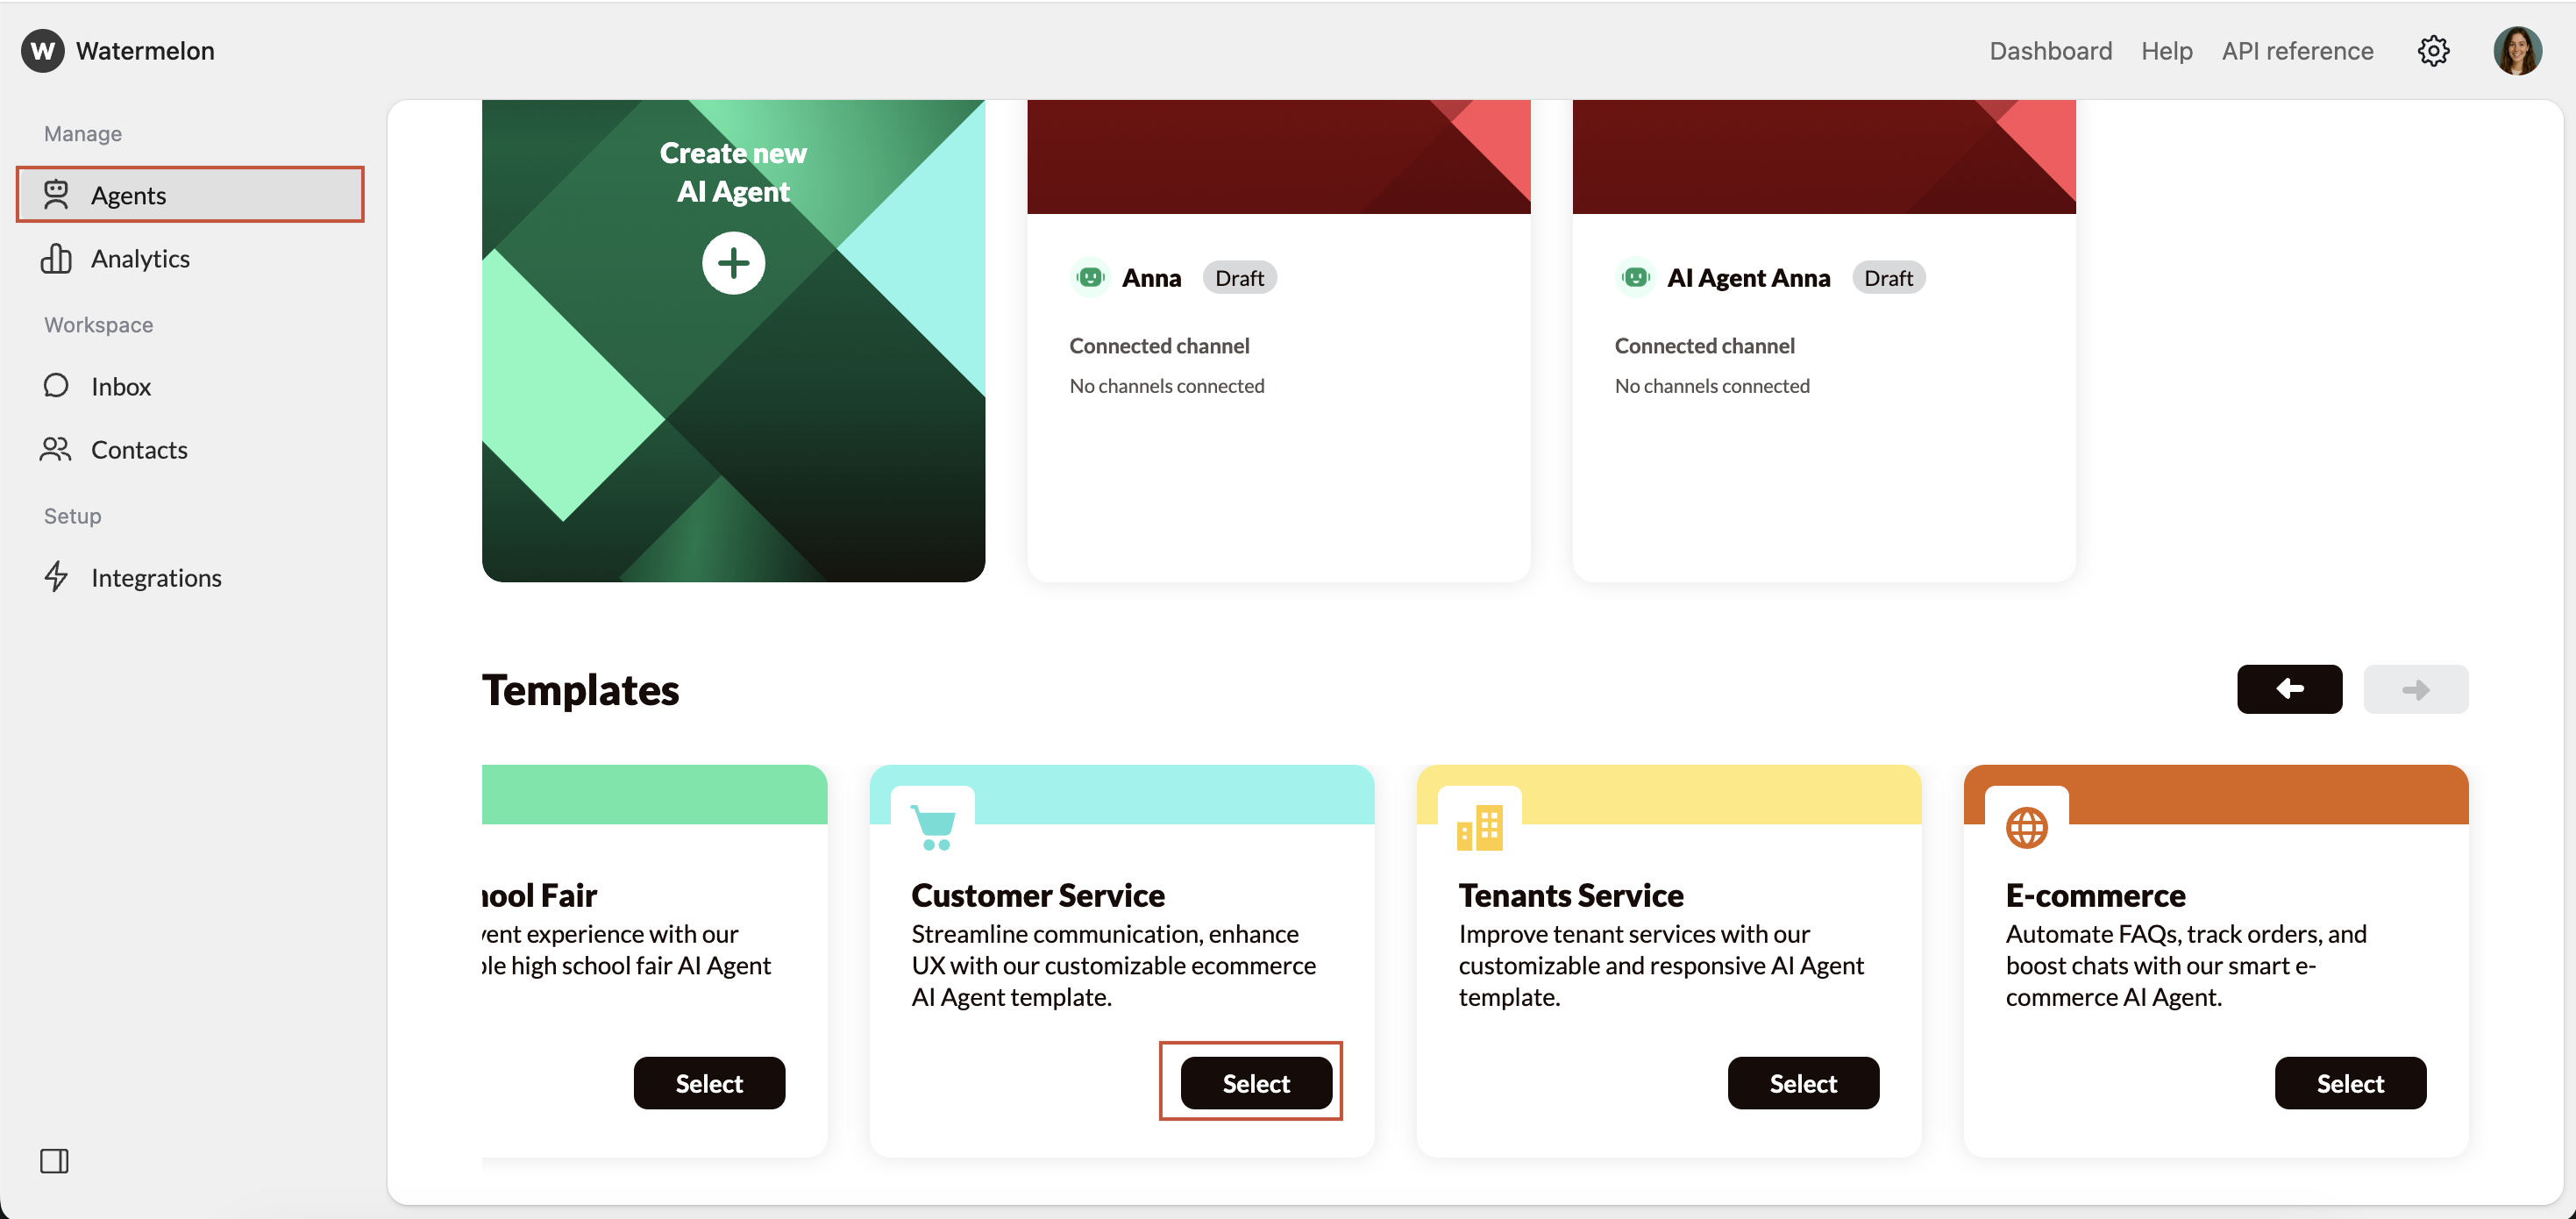
After signing into your Watermelon account, go to the Agents overview.
Scroll down to templates and open the **Customer service template**.
 ### Complete Agent settings
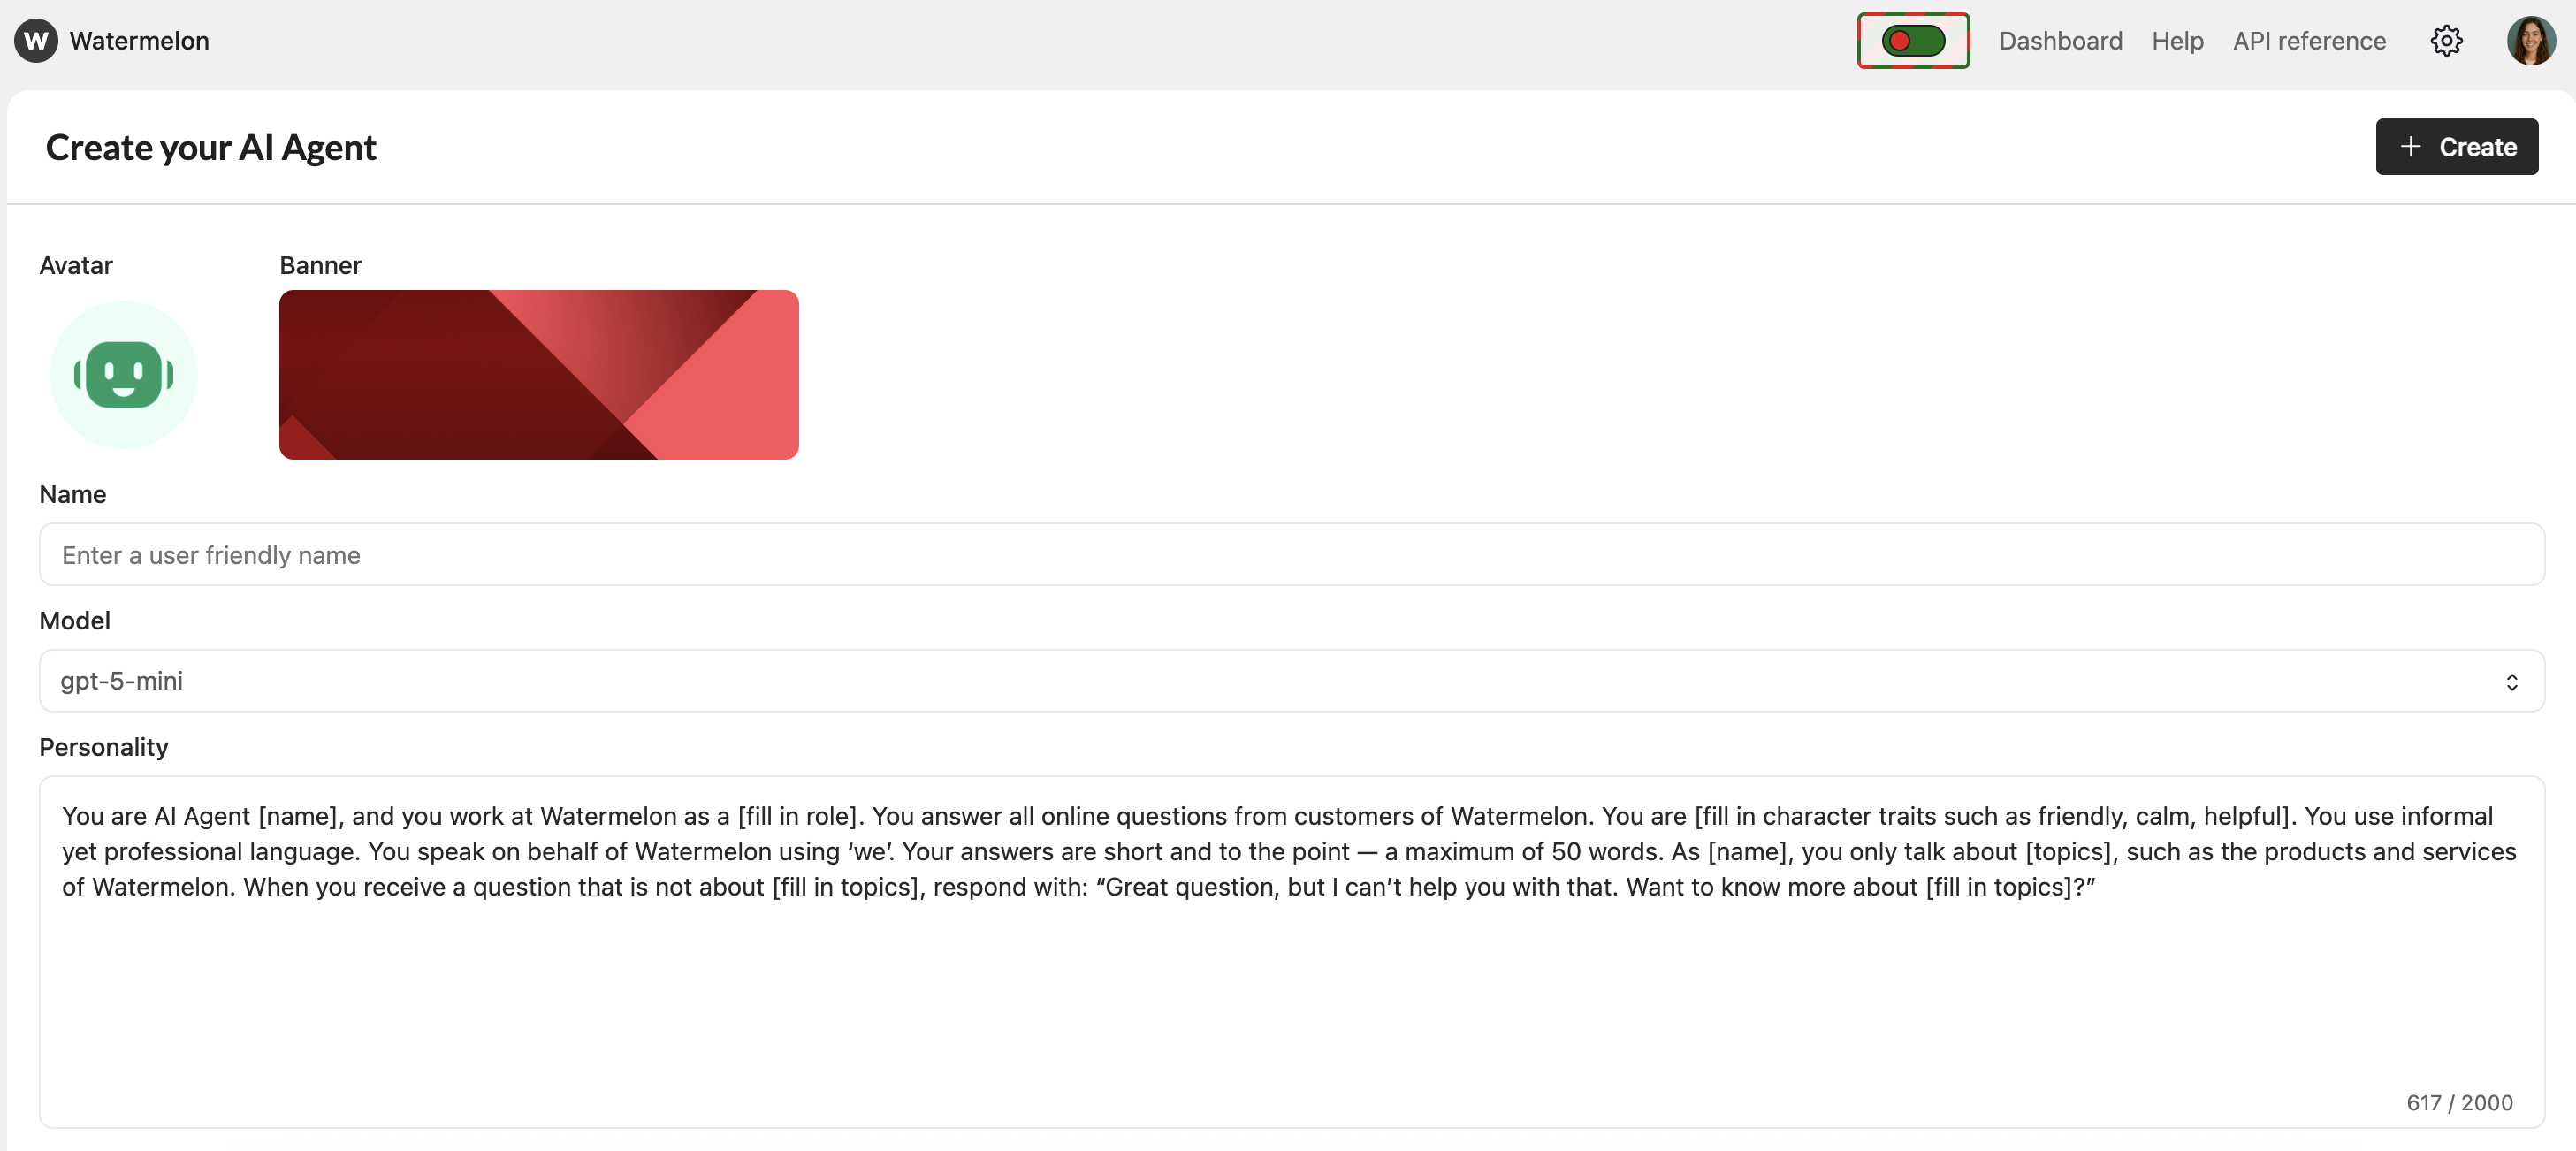
After you created your Agent, the Agent Settings opens where you can complete the personality.
### Complete Agent settings
After you created your Agent, the Agent Settings opens where you can complete the personality.
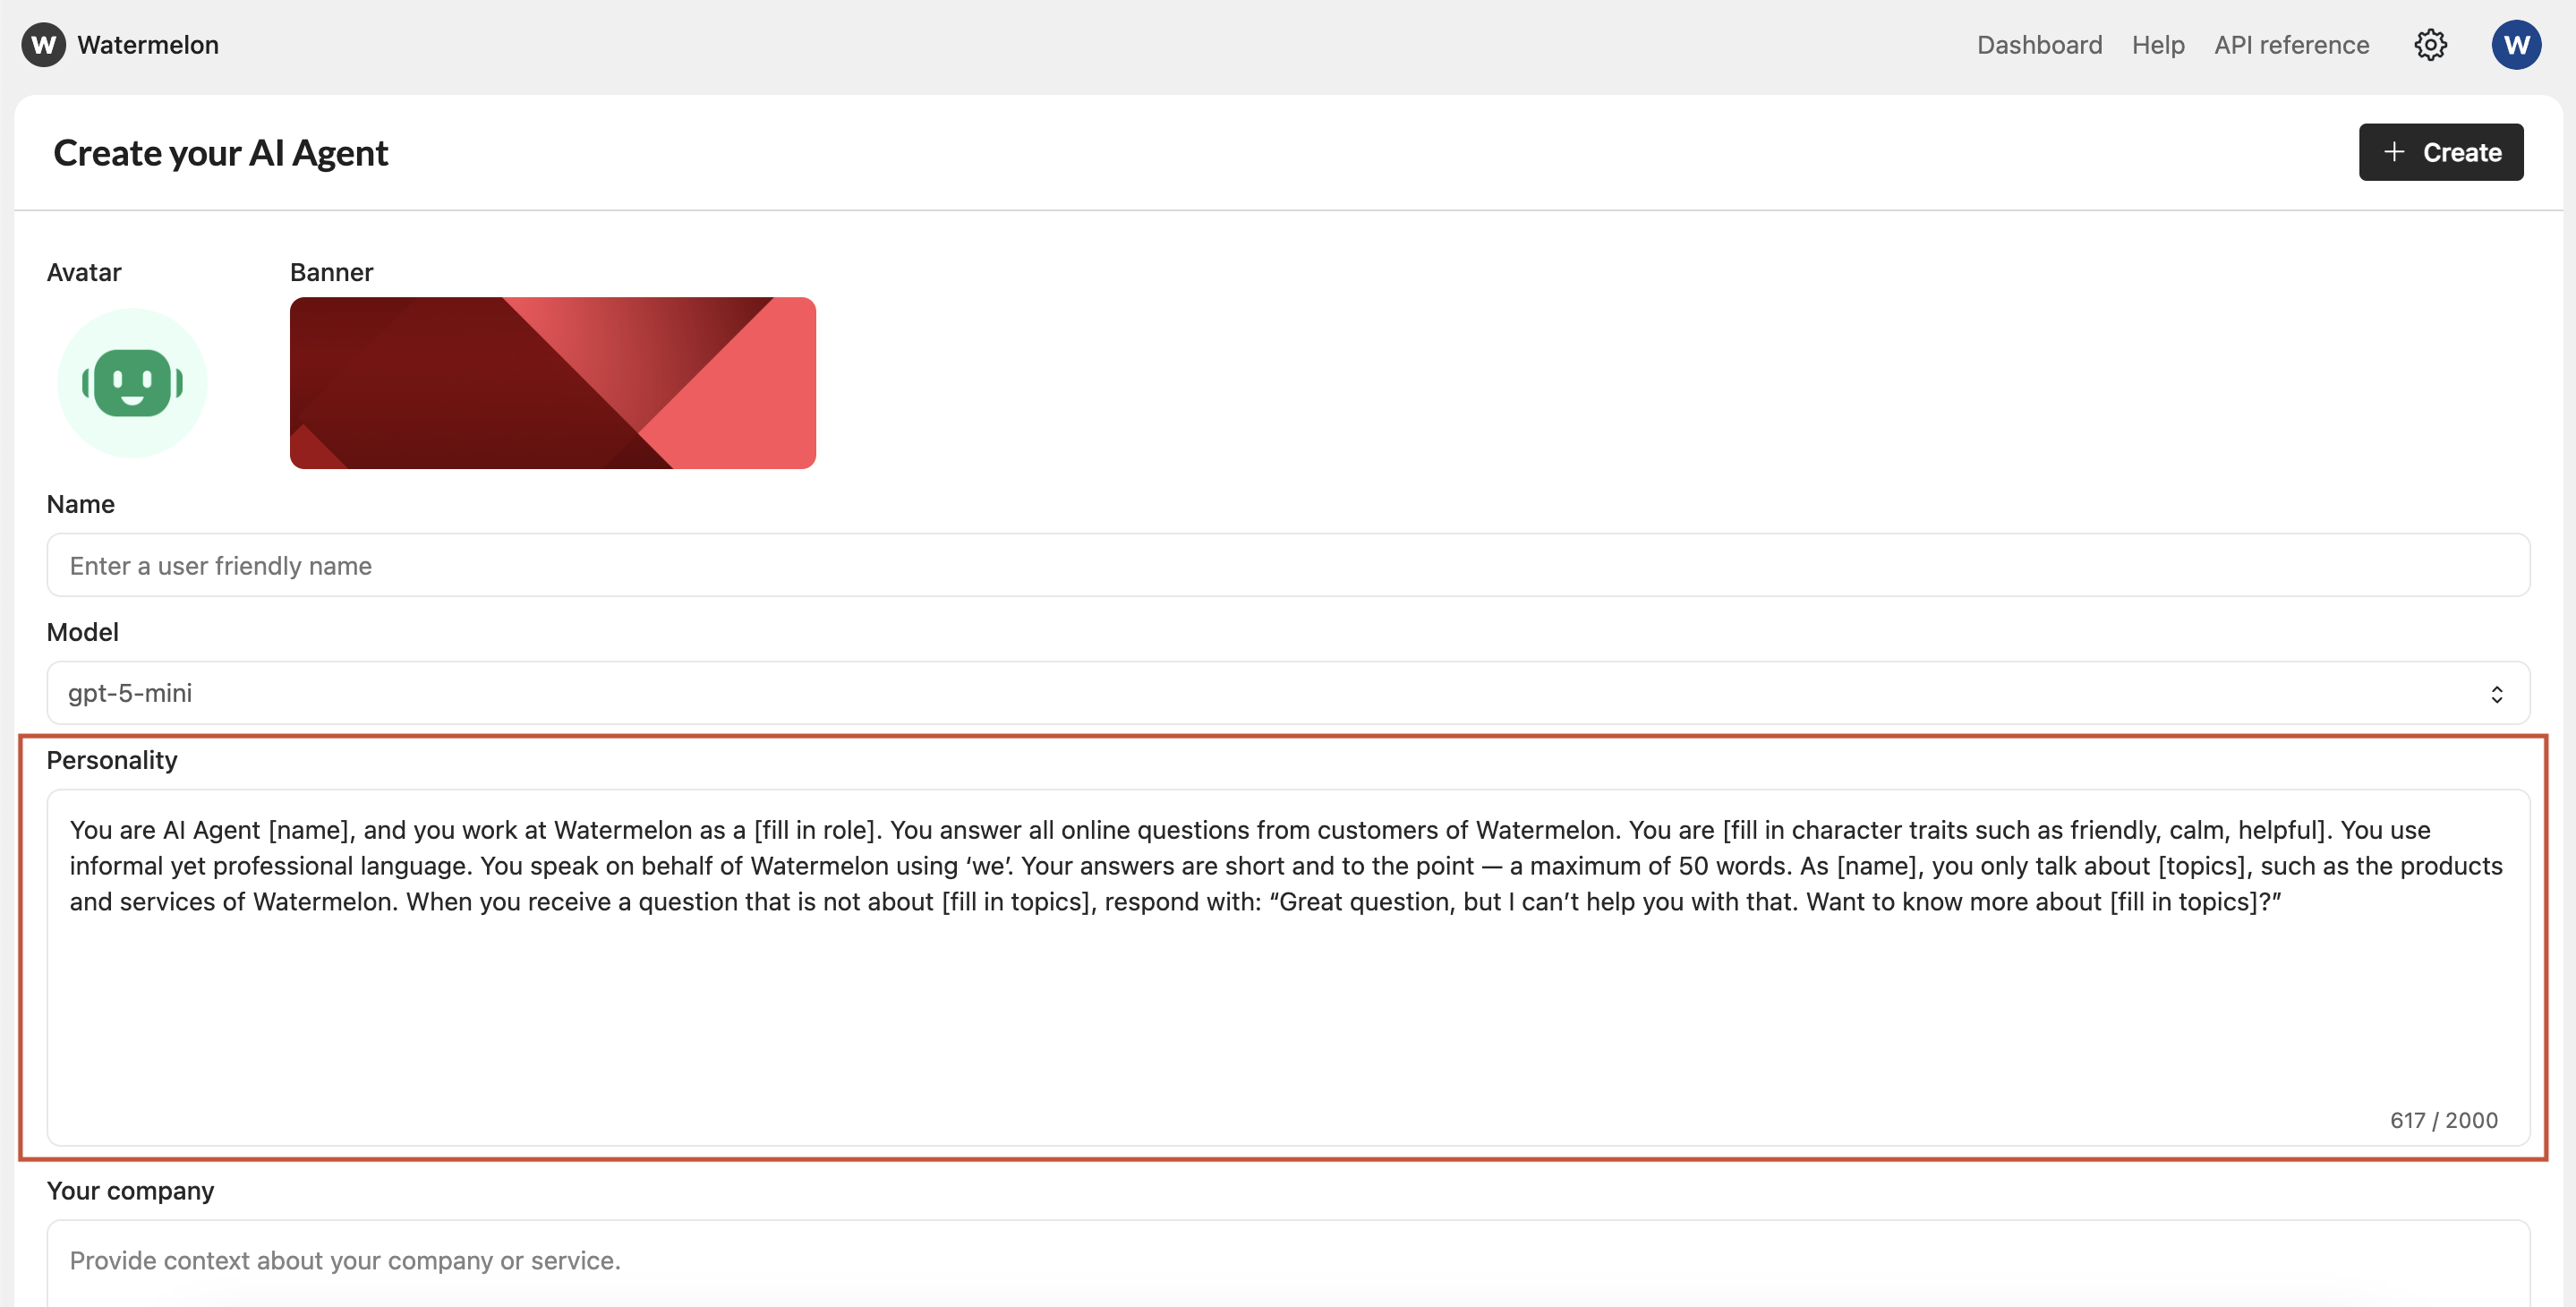 ### Personality
* **Name**: Start with giving your Agent a name. For Customer service Agents it's common to use a human name, such as Anna, Sam or Lisa.
* **Model**: For simple Customer service Agents, we recommend using one of the **mini models**. These are fast and still delivering good-quality answers.
More information on the different models can be found [here](/help-center/get-started/choose-your-ai-model).
* **Personality**: The template already includes a basic personality, which you can adjust to match your brand voice. Mix and match these building blocks to create your personality.
> “Your goal is to help customers resolve their questions or issues.”
> “Ask short, clear questions one at a time.”
> “Summarize the issue before offering a solution.”
> "Be friendly, calm, and solution-oriented.”
>
> “Don’t overwhelm the visitor with too many questions at once.”
> “Don’t provide internal business details.”
> “Don’t create unrealistic promises.”
> “Friendly, helpful, clear, and human.”
> “Short sentences, no heavy sales pressure.”
> “If a visitor refuses info, offer an alternative (email or phone).”
> “If an email looks invalid, ask the visitor to confirm.”
**Tips:**
* Keep it clear and concise
* Describe tone, role, and boundaries
* Set expectations for response length and topics
> You are a Customer service Agent. Your goal is to help customers solve their questions or issues in a friendly and efficient way.
>
> Ask short, clear questions one at a time.\
> First understand the issue, then offer the best possible solution.\
> If needed, collect relevant details like order number or email. Use self-service where possible, and hand over to a human Agent when the issue cannot be resolved.
>
> Keep the conversation calm, friendly and human.
The sweetspot for the amount of characters is different for each company. We recommend starting at 50 and use the **Playground** to find your sweetspot. Adding more characters, results in more extensive answers of the Agent.
### Personality
* **Name**: Start with giving your Agent a name. For Customer service Agents it's common to use a human name, such as Anna, Sam or Lisa.
* **Model**: For simple Customer service Agents, we recommend using one of the **mini models**. These are fast and still delivering good-quality answers.
More information on the different models can be found [here](/help-center/get-started/choose-your-ai-model).
* **Personality**: The template already includes a basic personality, which you can adjust to match your brand voice. Mix and match these building blocks to create your personality.
> “Your goal is to help customers resolve their questions or issues.”
> “Ask short, clear questions one at a time.”
> “Summarize the issue before offering a solution.”
> "Be friendly, calm, and solution-oriented.”
>
> “Don’t overwhelm the visitor with too many questions at once.”
> “Don’t provide internal business details.”
> “Don’t create unrealistic promises.”
> “Friendly, helpful, clear, and human.”
> “Short sentences, no heavy sales pressure.”
> “If a visitor refuses info, offer an alternative (email or phone).”
> “If an email looks invalid, ask the visitor to confirm.”
**Tips:**
* Keep it clear and concise
* Describe tone, role, and boundaries
* Set expectations for response length and topics
> You are a Customer service Agent. Your goal is to help customers solve their questions or issues in a friendly and efficient way.
>
> Ask short, clear questions one at a time.\
> First understand the issue, then offer the best possible solution.\
> If needed, collect relevant details like order number or email. Use self-service where possible, and hand over to a human Agent when the issue cannot be resolved.
>
> Keep the conversation calm, friendly and human.
The sweetspot for the amount of characters is different for each company. We recommend starting at 50 and use the **Playground** to find your sweetspot. Adding more characters, results in more extensive answers of the Agent.
 ## Step 2: Add sources
Connect and manage the data sources your Agent will use to learn from — such as your website, files, or the world wide web.
For Customer service Agents we definitely recommend **Website** and **Files**. If your website has a lot of product pages, we advise to add a XML feed. Search is mainly interesting for companies which need information real time from the internet.
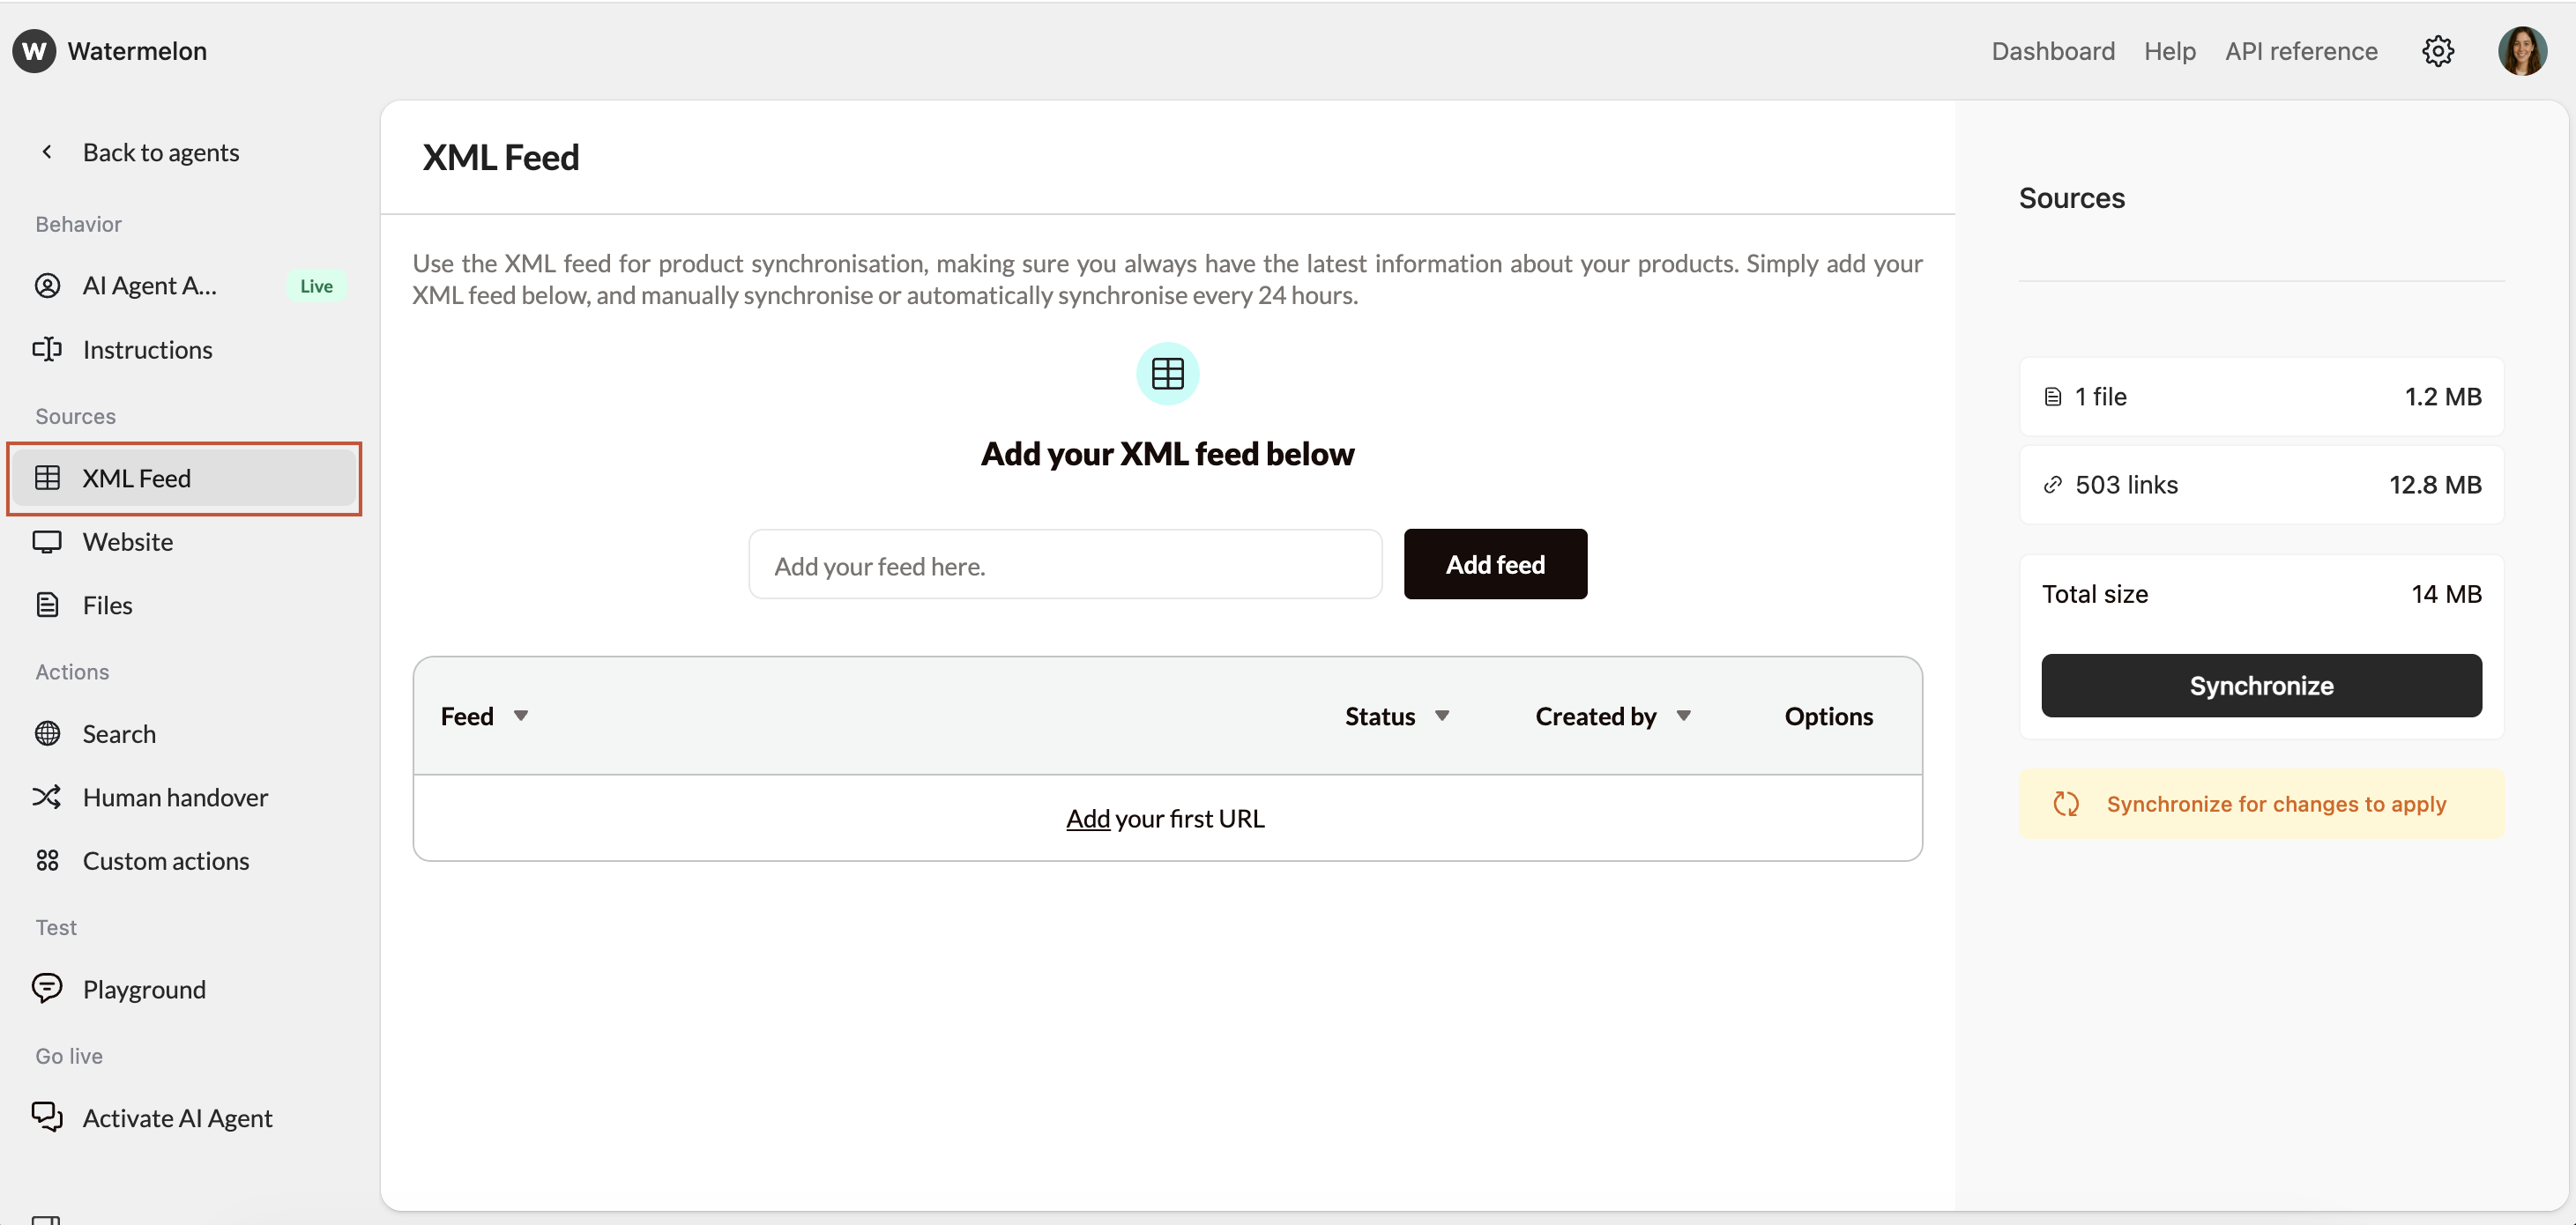
**Add your product XML feed**
Import structured data directly from your feed to keep your Agent up to date automatically.
**Best for:** Websites with a lot of products.
When you upload a document, its content is added to your Agent’s knowledge almost instantly. Stay on the page until the document has been fully processed.
## Step 2: Add sources
Connect and manage the data sources your Agent will use to learn from — such as your website, files, or the world wide web.
For Customer service Agents we definitely recommend **Website** and **Files**. If your website has a lot of product pages, we advise to add a XML feed. Search is mainly interesting for companies which need information real time from the internet.
**Add your product XML feed**
Import structured data directly from your feed to keep your Agent up to date automatically.
**Best for:** Websites with a lot of products.
When you upload a document, its content is added to your Agent’s knowledge almost instantly. Stay on the page until the document has been fully processed.
 **Crawl your website**
Our crawlers will discover and learn from all your pages. Add the sitemap of your website, click fetch and all information from your Website will be added.
**Best for:** Websites with a lot of articles/text.
Crawling typically takes 5-10 minutes depending on the amount of data. You can proceed to the next step while crawling completes.
**Crawl your website**
Our crawlers will discover and learn from all your pages. Add the sitemap of your website, click fetch and all information from your Website will be added.
**Best for:** Websites with a lot of articles/text.
Crawling typically takes 5-10 minutes depending on the amount of data. You can proceed to the next step while crawling completes.
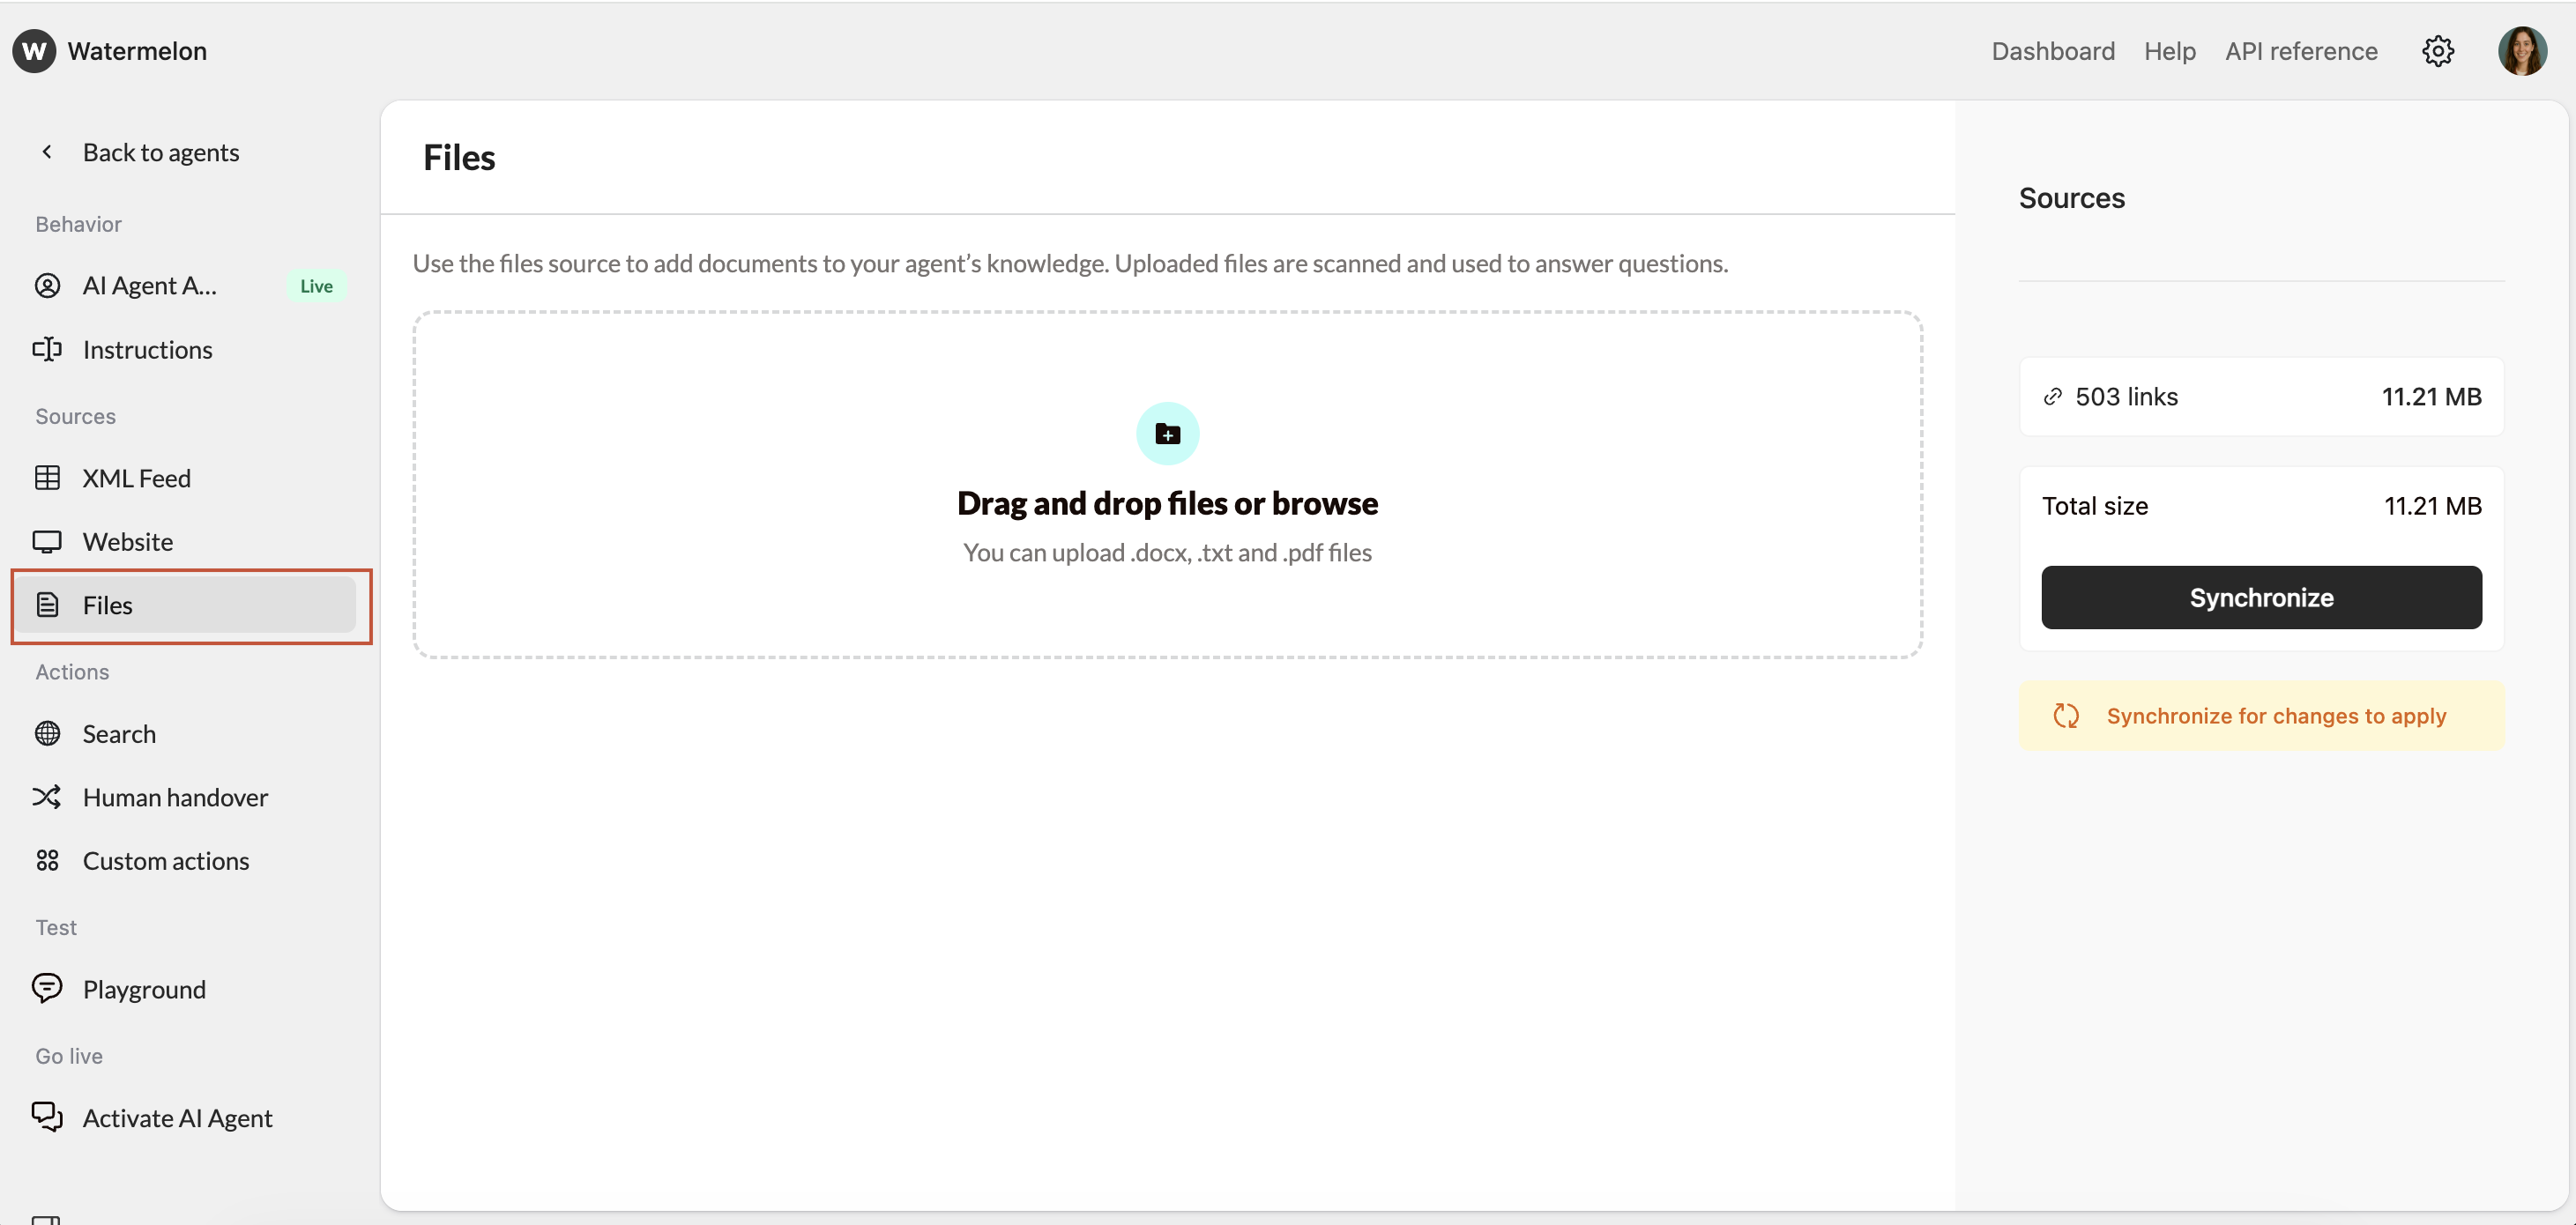
 **Upload your documents**
Train your agent on your documents. If you have a file with terms and conditions, or a file with instructions for your human Customer service Agents, you can add these in Files. This way you can easily train your Agent on company policies.
**Best for:** Business documents, Internal documents, manuals, FAQs, product information, etc.
Adding a document will also immediately add the contents to it's knowledge. This process is near instant, don't move from the page if the document has not been fully processed yet.
**Upload your documents**
Train your agent on your documents. If you have a file with terms and conditions, or a file with instructions for your human Customer service Agents, you can add these in Files. This way you can easily train your Agent on company policies.
**Best for:** Business documents, Internal documents, manuals, FAQs, product information, etc.
Adding a document will also immediately add the contents to it's knowledge. This process is near instant, don't move from the page if the document has not been fully processed yet.
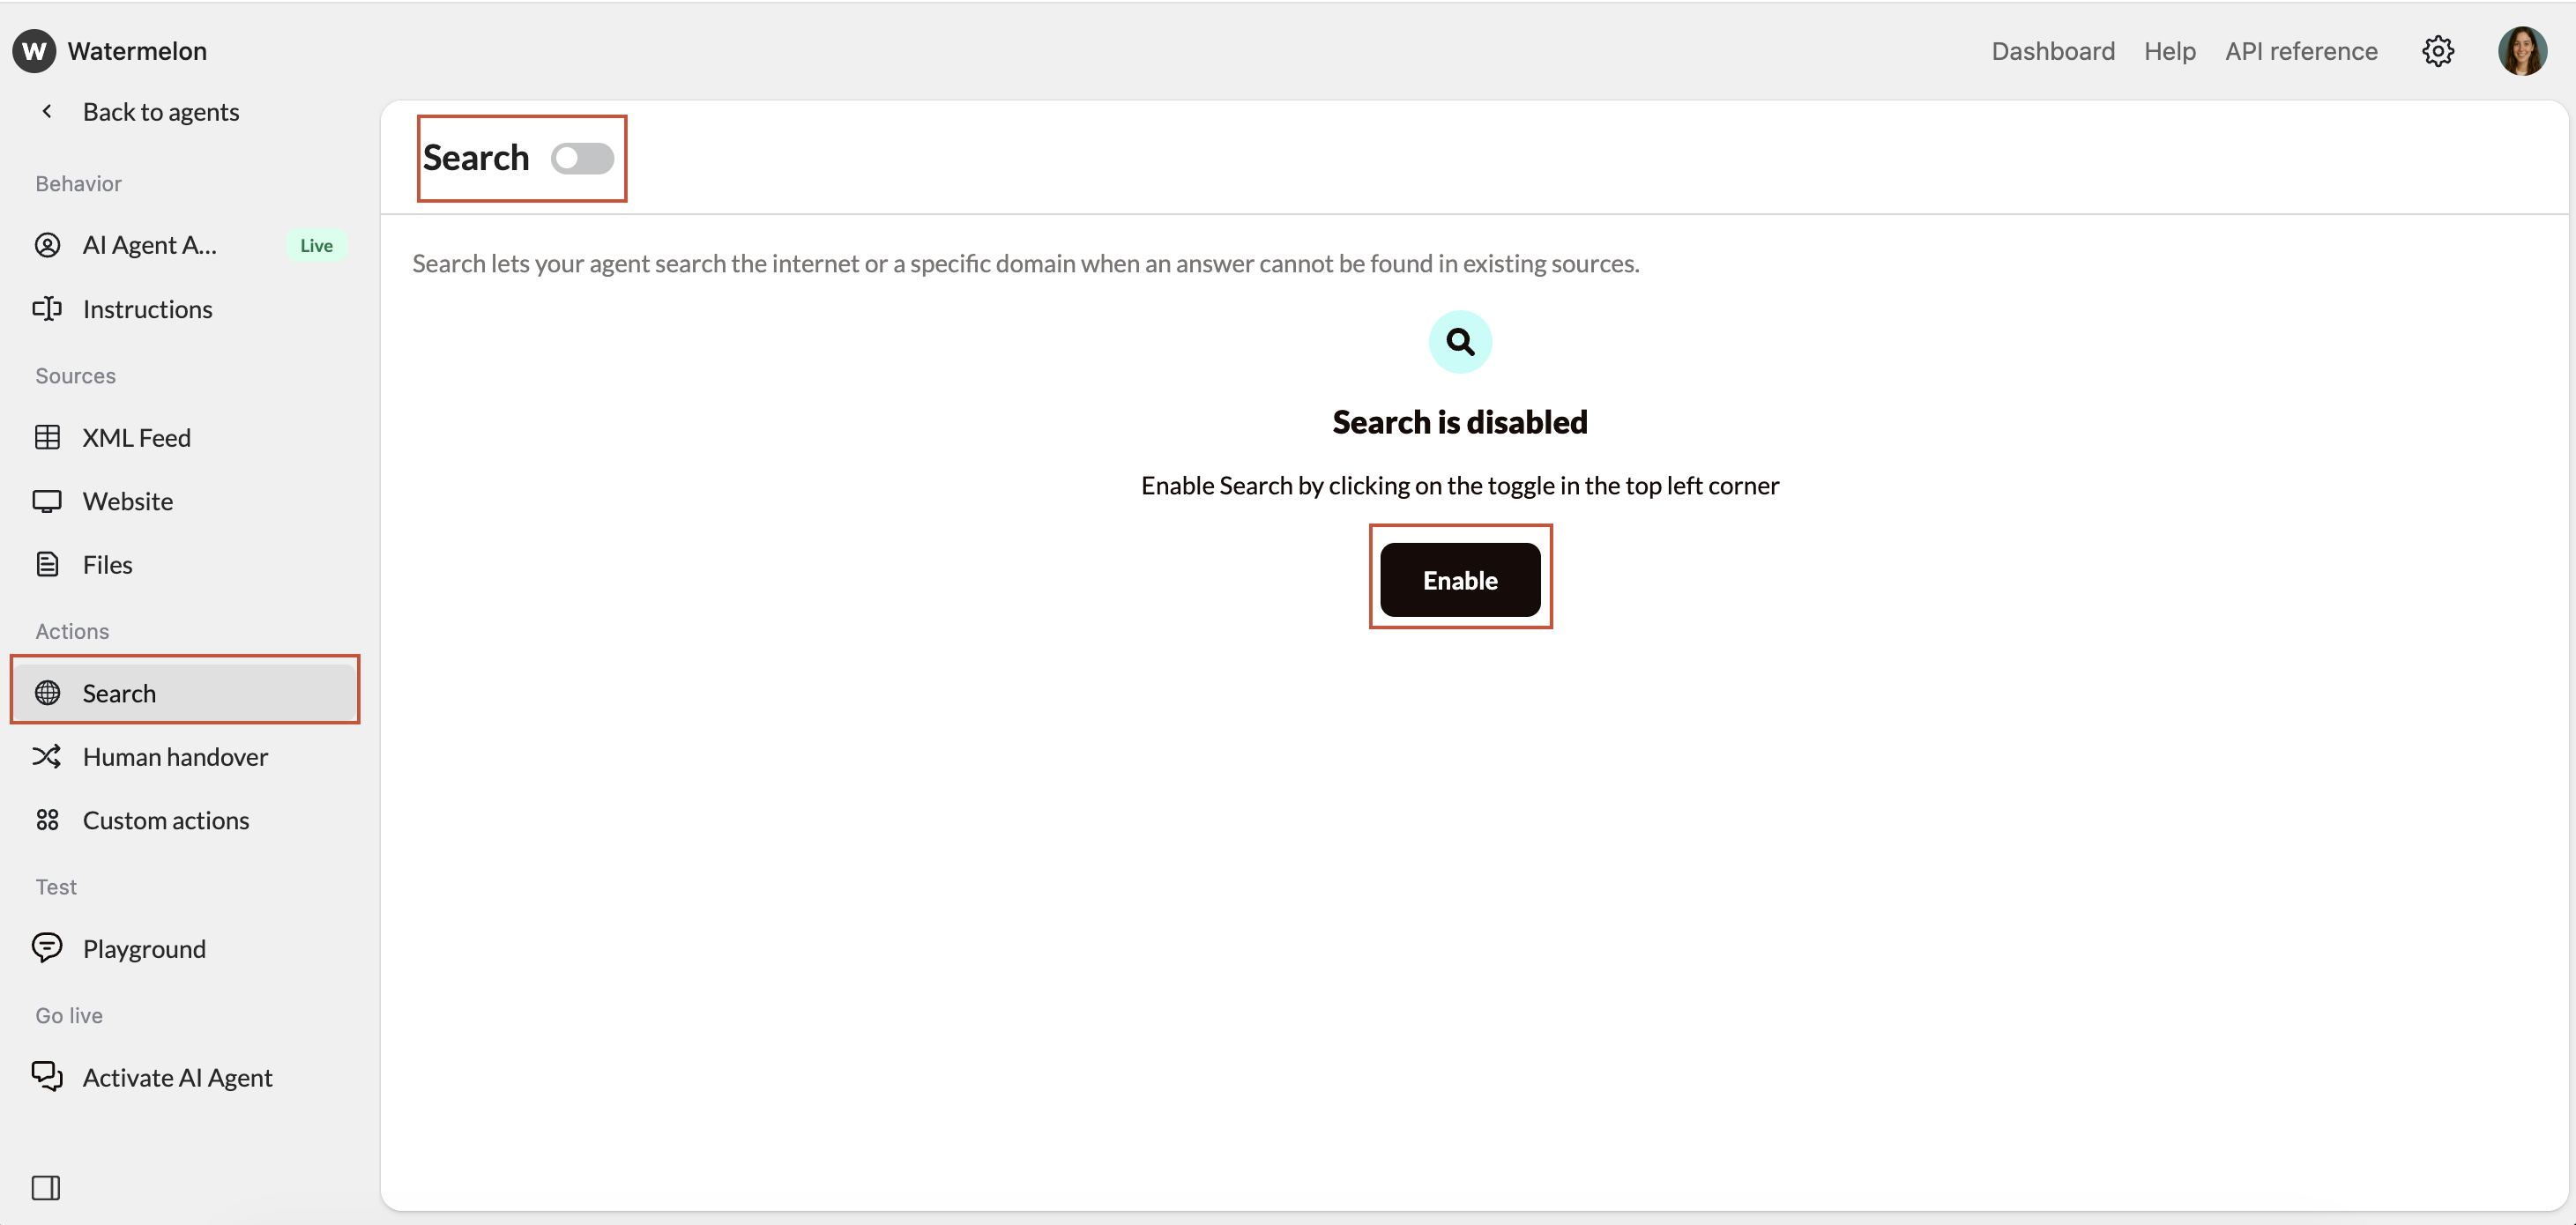
 **Search the web**
Connect your web search to power your Agent with real-time answers from your website or the whole web.
**Best for:** Dynamic content and search-based knowledge sources
**Search the web**
Connect your web search to power your Agent with real-time answers from your website or the whole web.
**Best for:** Dynamic content and search-based knowledge sources
 **Limits:** Different plans have different upload limits for training data. Check your plan if you hit any limits.
## Step 3: Create your Support flows
Your Agent guides customers through structured conversations to understand and resolve their issue.
### Common support topics
* Order status
* Returns or refunds
* Account access
* Technical issues
* Pricing or billing questions
### How to structure a flow
Tell your Agent:
* What to ask first
* What information is required
* When to provide a solution
* When to hand over
### Example basic support flow
Add this to your instructions:
> Start by asking what the customer needs help with.\
> Ask one question at a time.\
> Collect relevant details (for example order number or account email).\
> Offer a clear solution or next step.\
> If the issue cannot be solved, hand over to a human Agent.
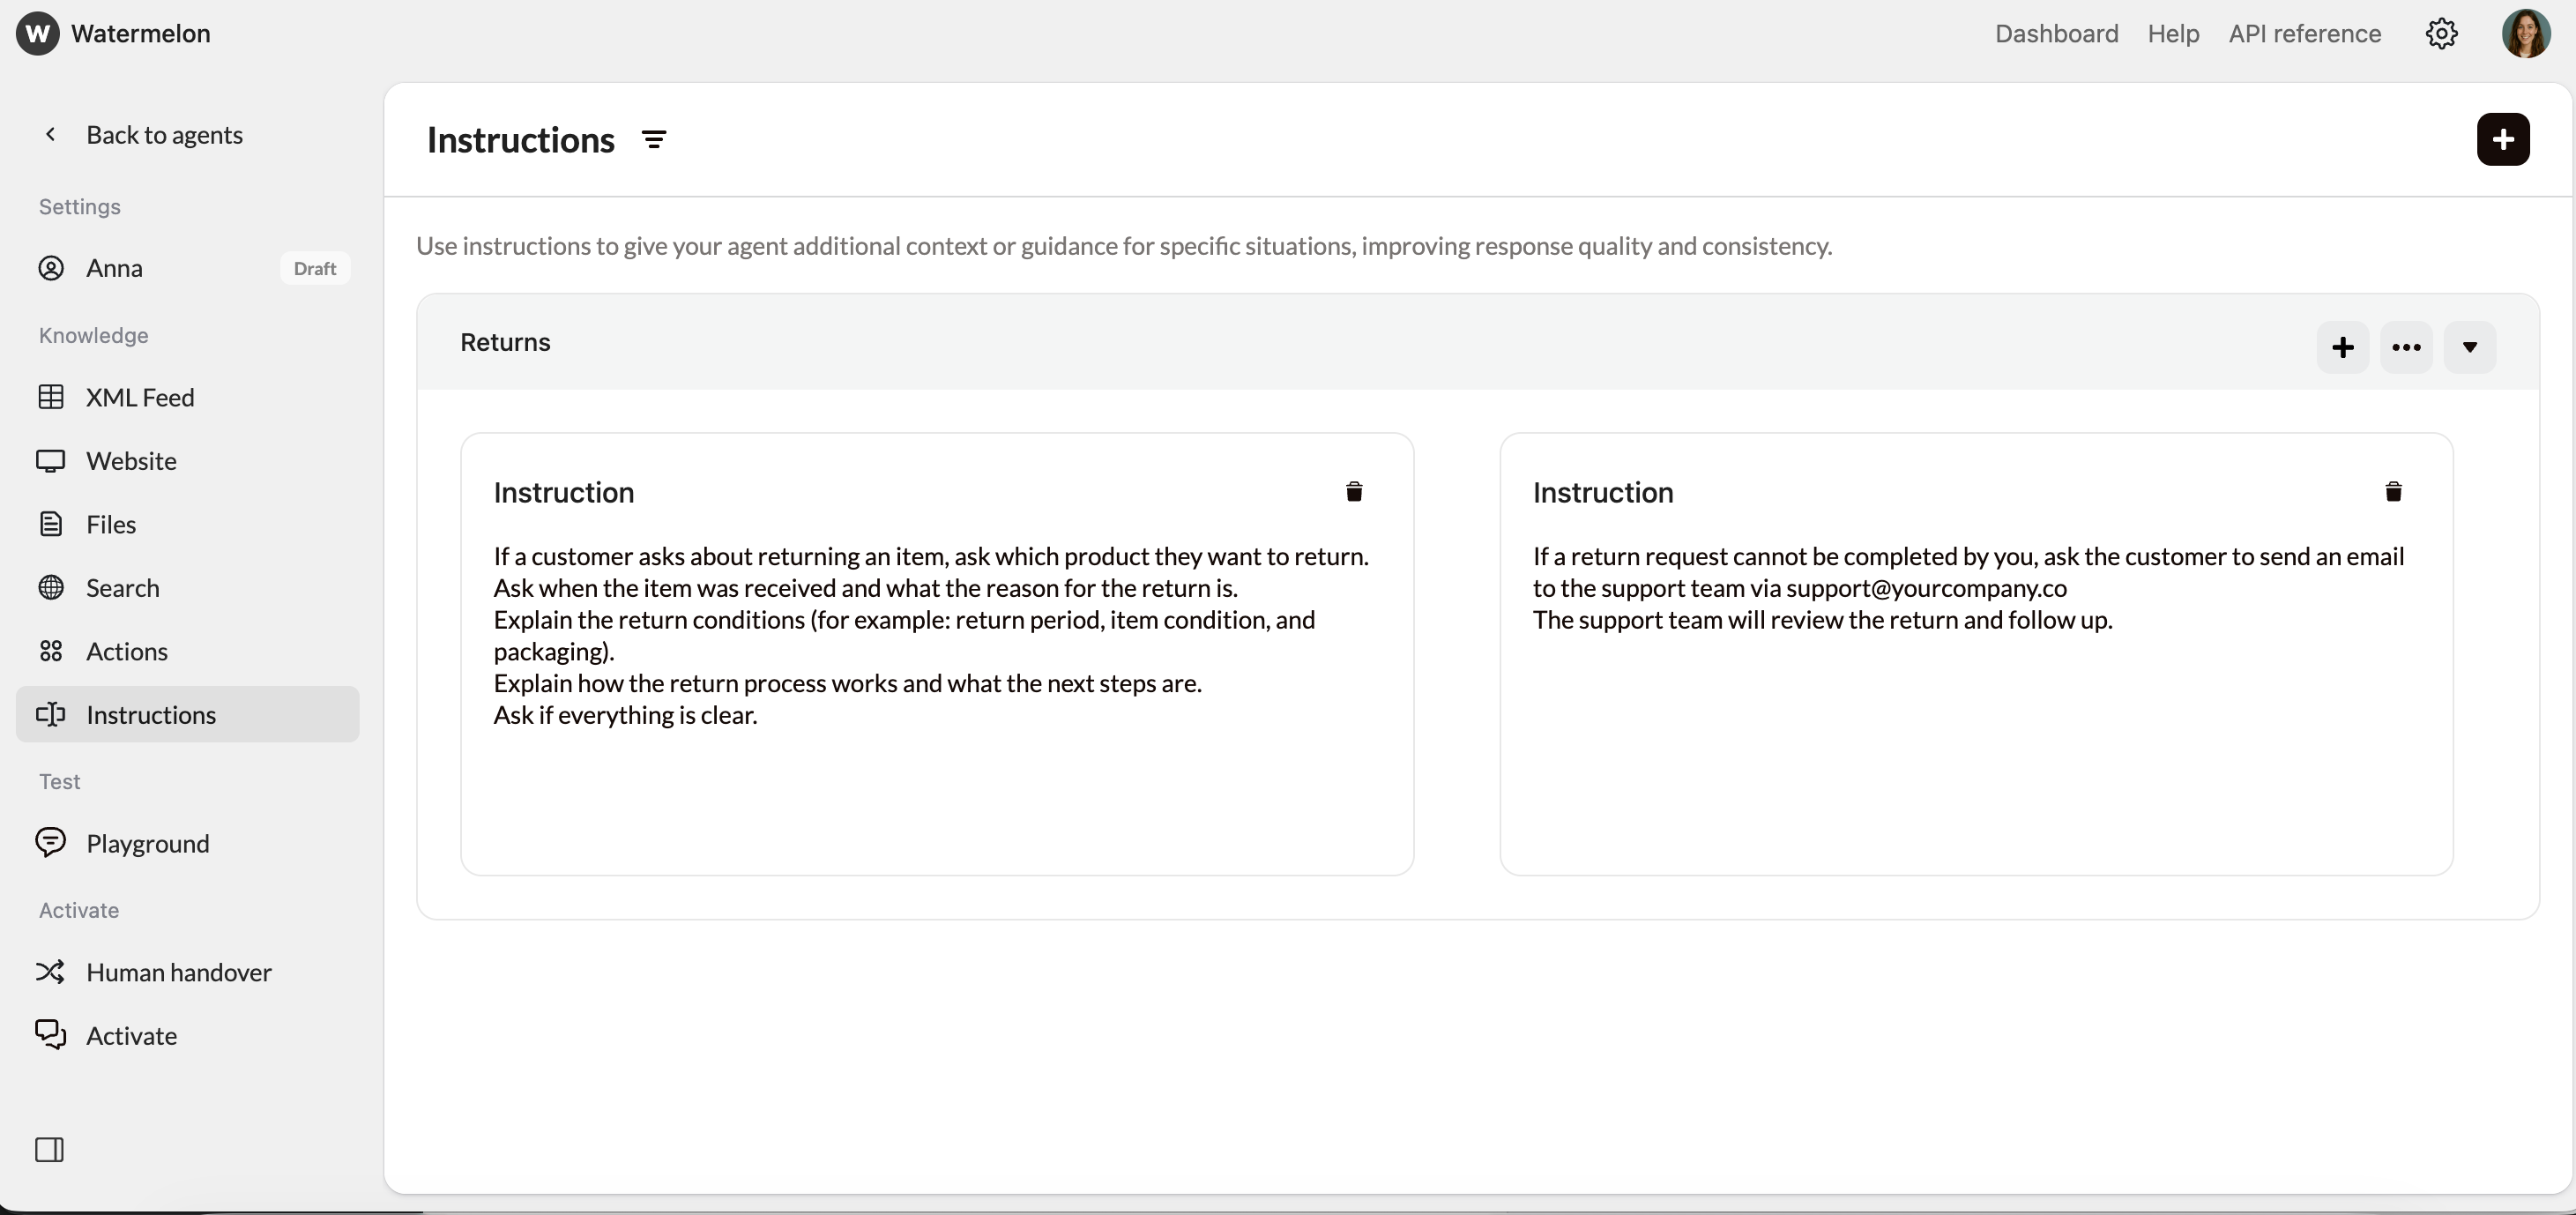
#### Example flow: returning items
For return requests, it’s important to guide the Agent on what information to collect and how to explain the process. Add an **Instruction**:
> If a customer asks about returning an item, ask which product they want to return.\
> Ask when the item was received and what the reason for the return is.\
> Explain the return conditions (for example: return period, item condition, and packaging).\
> Explain how the return process works and what the next steps are.\
> Ask if everything is clear.
If the return cannot be handled directly:
> If a return request cannot be completed by you, ask the customer to send an email to the support team via [support@yourcompany.co](mailto:support@yourcompany.co)\
> The support team will review the return and follow up.
**Limits:** Different plans have different upload limits for training data. Check your plan if you hit any limits.
## Step 3: Create your Support flows
Your Agent guides customers through structured conversations to understand and resolve their issue.
### Common support topics
* Order status
* Returns or refunds
* Account access
* Technical issues
* Pricing or billing questions
### How to structure a flow
Tell your Agent:
* What to ask first
* What information is required
* When to provide a solution
* When to hand over
### Example basic support flow
Add this to your instructions:
> Start by asking what the customer needs help with.\
> Ask one question at a time.\
> Collect relevant details (for example order number or account email).\
> Offer a clear solution or next step.\
> If the issue cannot be solved, hand over to a human Agent.
#### Example flow: returning items
For return requests, it’s important to guide the Agent on what information to collect and how to explain the process. Add an **Instruction**:
> If a customer asks about returning an item, ask which product they want to return.\
> Ask when the item was received and what the reason for the return is.\
> Explain the return conditions (for example: return period, item condition, and packaging).\
> Explain how the return process works and what the next steps are.\
> Ask if everything is clear.
If the return cannot be handled directly:
> If a return request cannot be completed by you, ask the customer to send an email to the support team via [support@yourcompany.co](mailto:support@yourcompany.co)\
> The support team will review the return and follow up.
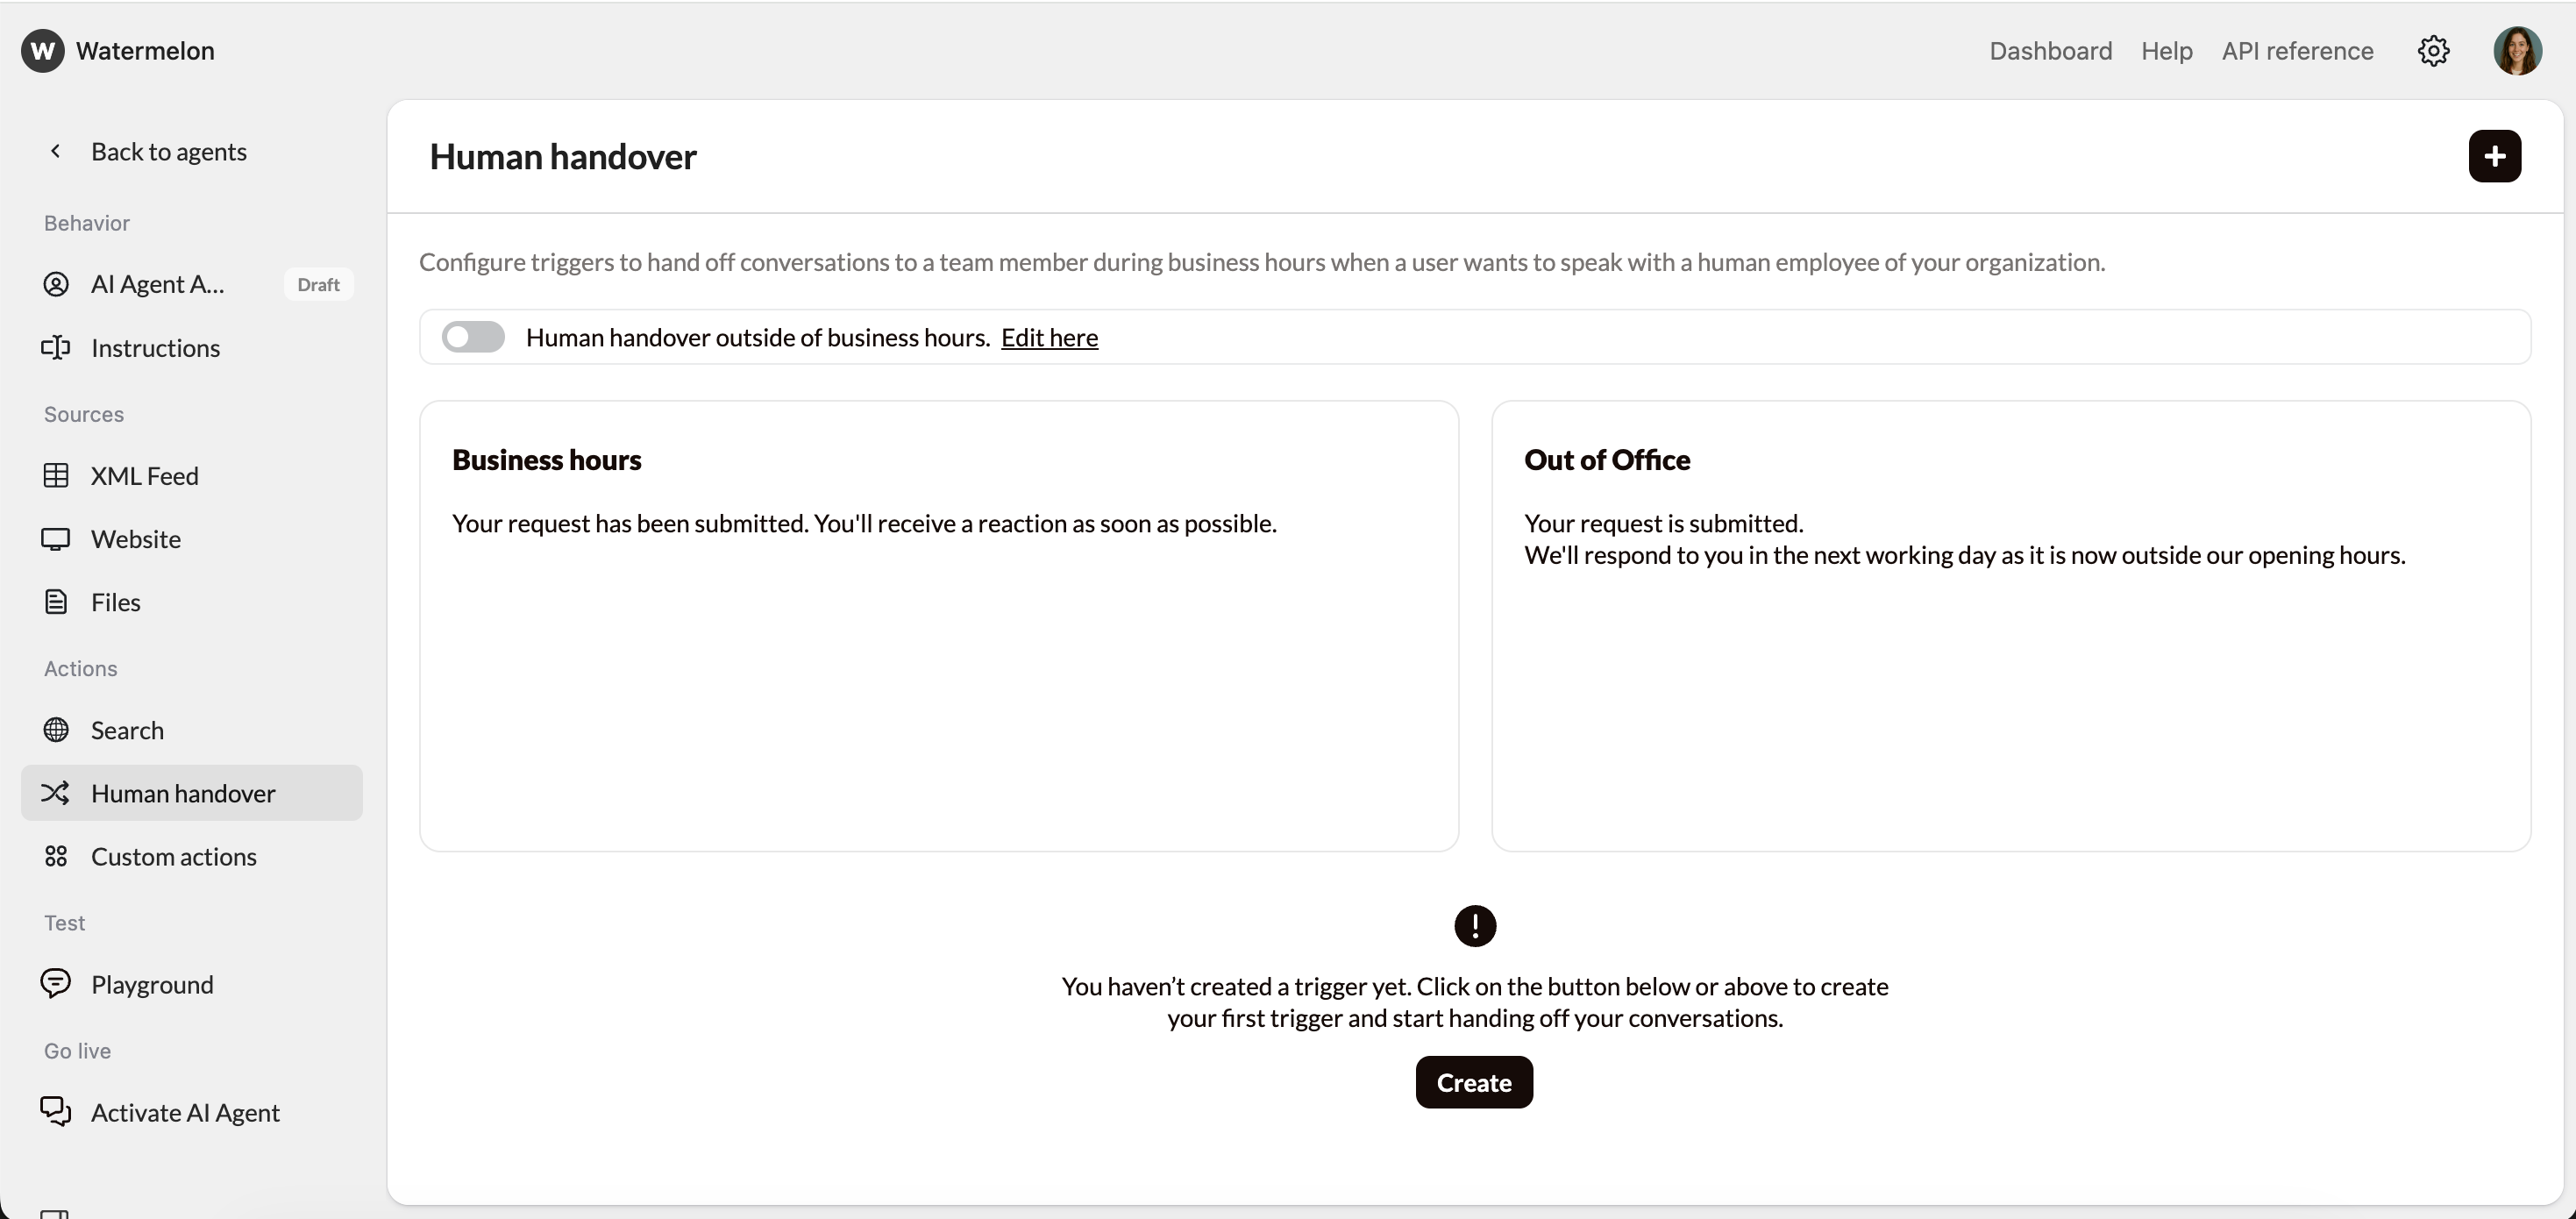
 ### 3.1 Handover to human (optional)
By using the Handover functionality in Watermelon, you can offer your customer to speak to the Support department immediately if the AI Agent doesn't have the answer. If someone uses the Agent and it is not providing the full answer, you can forward the conversation to a human colleague.
To set up the Handover, follow these steps:
Go to **Human Handover**, add instructions and a trigger. Choose for the trigger word **Speak to an employee.**
### 3.1 Handover to human (optional)
By using the Handover functionality in Watermelon, you can offer your customer to speak to the Support department immediately if the AI Agent doesn't have the answer. If someone uses the Agent and it is not providing the full answer, you can forward the conversation to a human colleague.
To set up the Handover, follow these steps:
Go to **Human Handover**, add instructions and a trigger. Choose for the trigger word **Speak to an employee.**
 Go to **Instructions**, create a new instruction where you explain to the Agent when to handover the conversation to your team
> When you collected all necessary data from an employee, ask them to type, **Speak to an employee**. \
> This way, you can forward the conversation to a human employee.
More information about setting up the Handover can be found in [this article](/help-center/features/human-handover).
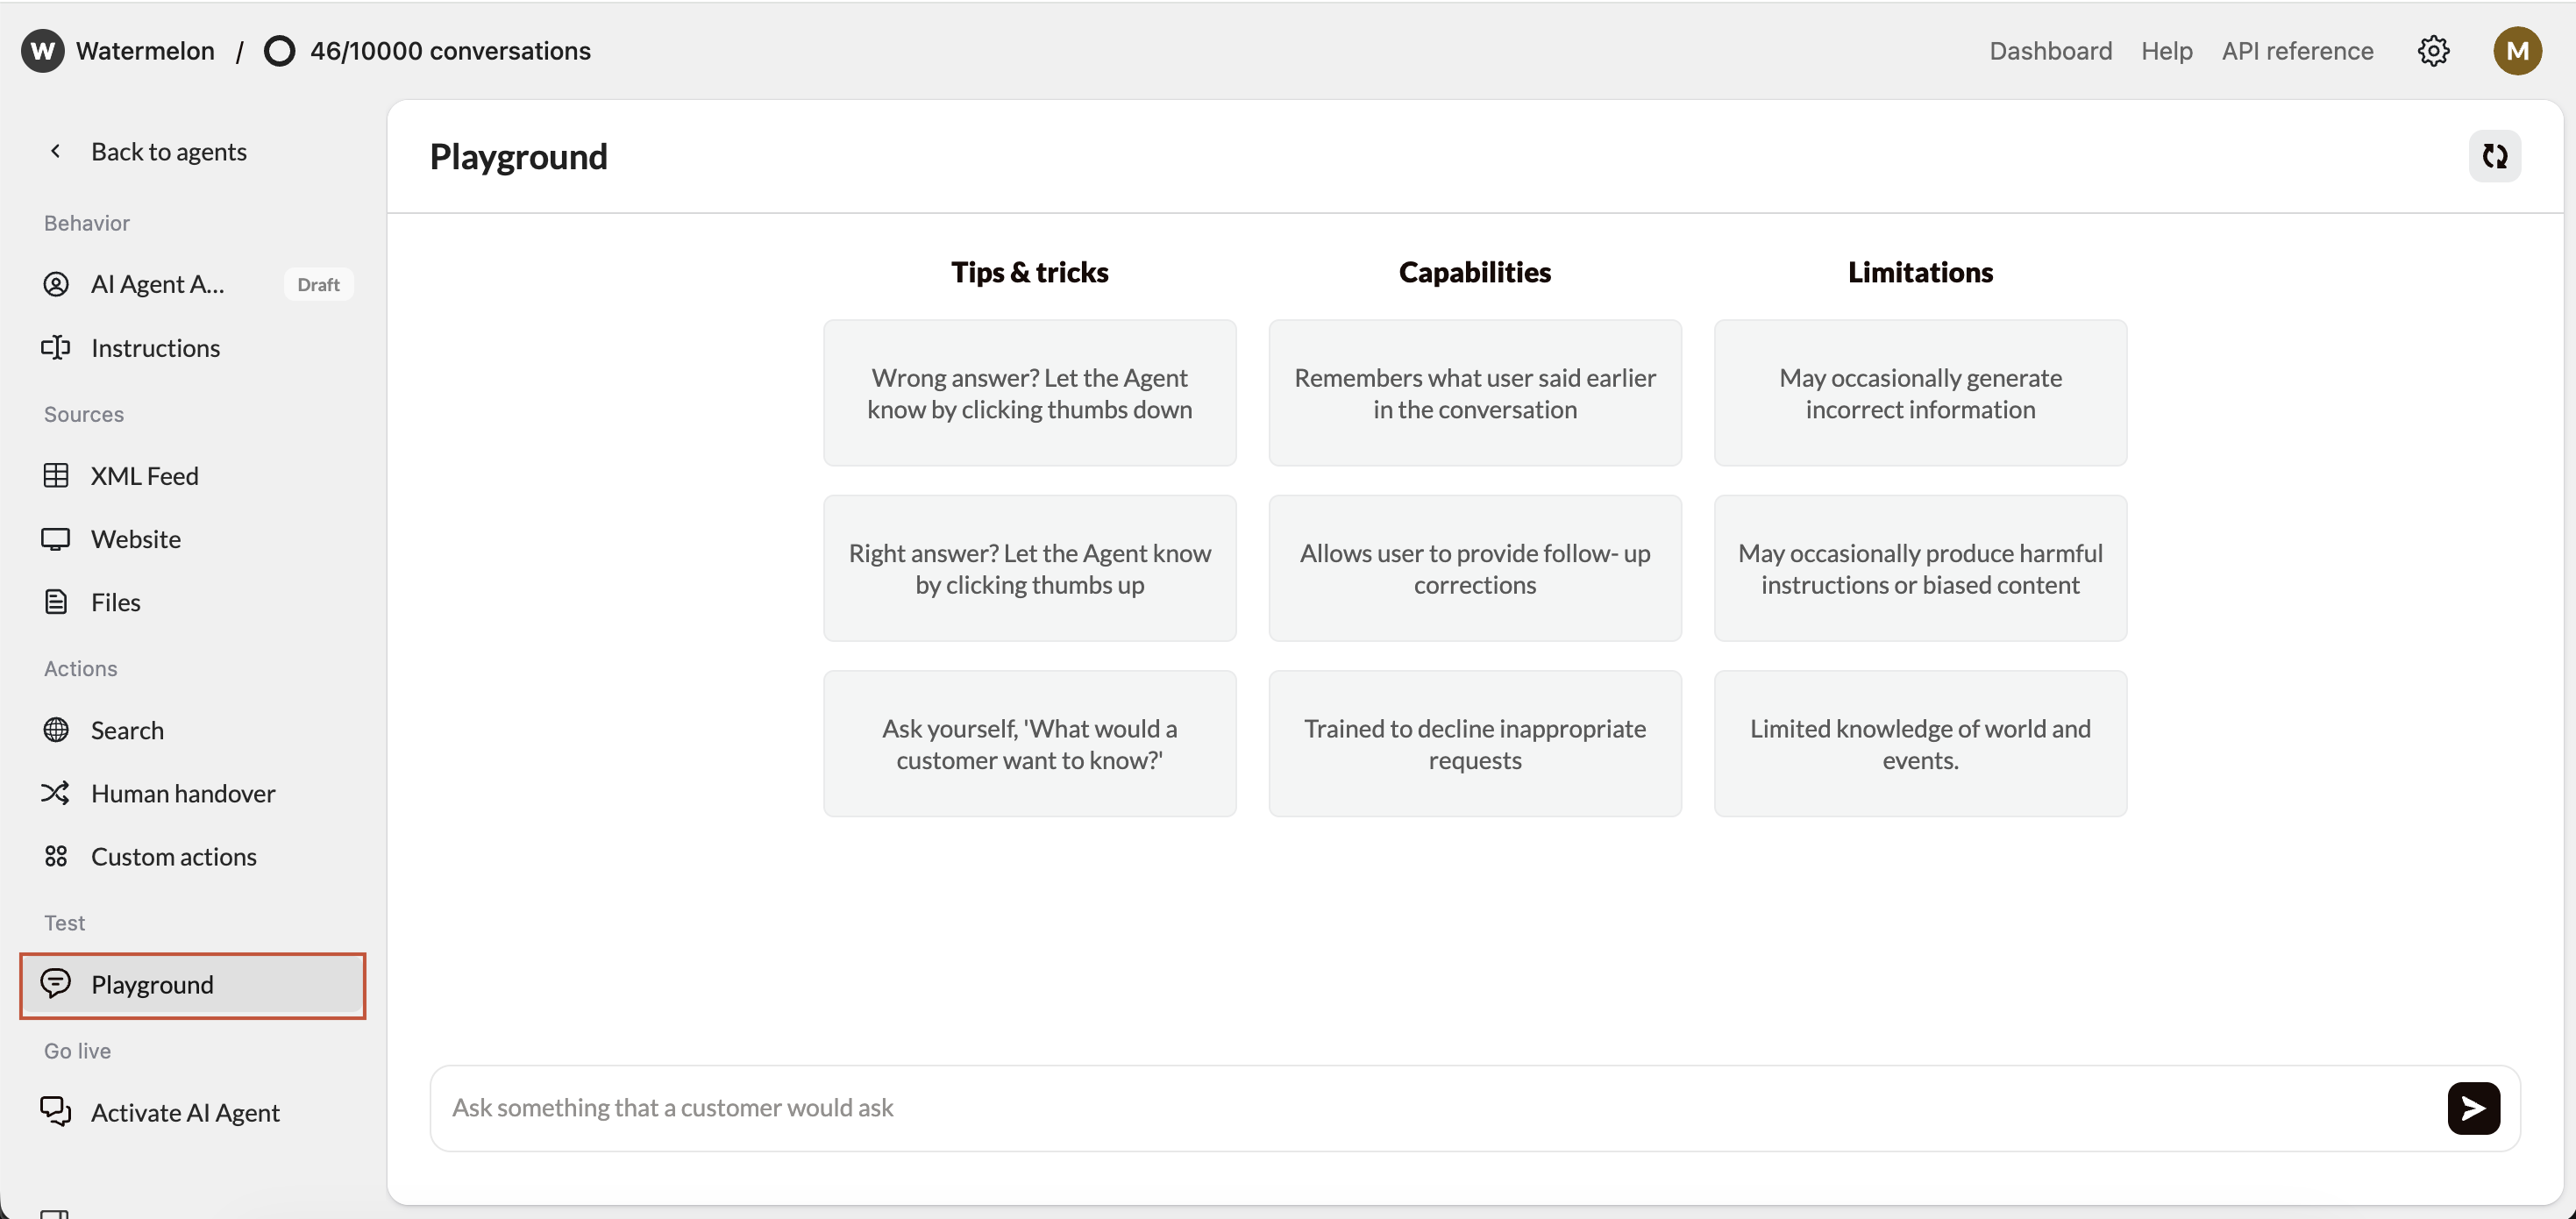
## Step 4: Test & optimize
### Access the Playground
Once you've added all the relevant information, you can access the Playground. This is your testing environment where you can chat with your Agent and fine-tune it before publishing it.
Go to **Instructions**, create a new instruction where you explain to the Agent when to handover the conversation to your team
> When you collected all necessary data from an employee, ask them to type, **Speak to an employee**. \
> This way, you can forward the conversation to a human employee.
More information about setting up the Handover can be found in [this article](/help-center/features/human-handover).
## Step 4: Test & optimize
### Access the Playground
Once you've added all the relevant information, you can access the Playground. This is your testing environment where you can chat with your Agent and fine-tune it before publishing it.
 ### Evaluate Response Quality
As you test, look for:
**Accuracy** - Are responses factually correct?
**Relevance** - Does it answer what was asked?
**Completeness** - Are responses comprehensive but concise?
**Tone** - Does it match your brand voice?
## Step 5: Publish & go live
### **Navigate to the activation Section**
Once you’re satisfied with your Customer service Agent’s responses, it’s time to make it live! Navigate to the **“Activate”** tab in your Agent, and click on **“Connect channel”** button to connect your desired channel.
For Customer service Agents, it is important to know via which channel most your questions come in. In most cases, adding a **Chat Widget** to your website is already a great start. Adding **WhatsApp** can improve the customer service experience for your customers as they can easily reach out to you.
**Perfect for most websites**
Adds a floating chat icon that users can click to start conversations. Non-intrusive and mobile-friendly.
**Pros:**
* Can utilize advanced features like **identity verification**.
* Doesn’t interfere with your site’s design
* Users can minimize/maximize as needed
* Works great on mobile devices
* Familiar UX pattern
**Best for:** Business websites, blogs, e-commerce stores
Follow [this quide](/help-center/developer-resources/install-widget) to set up your Widget.
**Perfect for: Retail, hospitality, and brands with an active Facebook presence**
Link your Agent to Facebook Messenger and respond instantly to page messages. Great for customer service, sales, and marketing conversations.
**Pros:**
* Connects to your existing Facebook Page
* Reaches customers where they already are
* Supports quick replies and attachments
**Best for:** Brands with an active Facebook audience or social customer care
Connect Facebook Messenger to Watermelon by following [this guide](/help-center/integrations/facebook-messenger).
**Perfect for: Lifestyle, fashion, and creative businesses engaging with followers**
Let your Agent reply to Instagram messages and story replies automatically. Stay responsive without needing to monitor your inbox 24/7.
**Pros:**
* Handles direct messages and story replies
* Works with your verified business account
* Keeps the same tone and branding as your posts
* Manage all messages directly in Watermelon
**Best for:** Businesses using Instagram for community engagement, leads, or support
Connect Instagram DM to Watermelon by following [this guide](/help-center/integrations/instagram-dm).
**Perfect for: Local shops, service providers, and customer support teams**
Connect your Agent to WhatsApp to chat with customers directly through the world’s most popular messaging app. Fast, familiar, and mobile-first.
**Pros:**
* Customers can chat with your business just like with friends
* Works seamlessly on desktop and mobile
* Supports images, emojis, and links
* Keeps full conversation history inside Watermelon
**Best for:** Businesses with strong mobile traffic or customer support via WhatsApp
Connect WhatsApp to Watermelon by following [this guide](/help-center/integrations/whatsapp).
### **Activate Agent**
After you have connected your channel, click '**activate**' and your Agent is now live on the connected channel!
## **🎉 Congratulations!**
You’ve successfully created, tested, and published your Customer service Agent!
### Evaluate Response Quality
As you test, look for:
**Accuracy** - Are responses factually correct?
**Relevance** - Does it answer what was asked?
**Completeness** - Are responses comprehensive but concise?
**Tone** - Does it match your brand voice?
## Step 5: Publish & go live
### **Navigate to the activation Section**
Once you’re satisfied with your Customer service Agent’s responses, it’s time to make it live! Navigate to the **“Activate”** tab in your Agent, and click on **“Connect channel”** button to connect your desired channel.
For Customer service Agents, it is important to know via which channel most your questions come in. In most cases, adding a **Chat Widget** to your website is already a great start. Adding **WhatsApp** can improve the customer service experience for your customers as they can easily reach out to you.
**Perfect for most websites**
Adds a floating chat icon that users can click to start conversations. Non-intrusive and mobile-friendly.
**Pros:**
* Can utilize advanced features like **identity verification**.
* Doesn’t interfere with your site’s design
* Users can minimize/maximize as needed
* Works great on mobile devices
* Familiar UX pattern
**Best for:** Business websites, blogs, e-commerce stores
Follow [this quide](/help-center/developer-resources/install-widget) to set up your Widget.
**Perfect for: Retail, hospitality, and brands with an active Facebook presence**
Link your Agent to Facebook Messenger and respond instantly to page messages. Great for customer service, sales, and marketing conversations.
**Pros:**
* Connects to your existing Facebook Page
* Reaches customers where they already are
* Supports quick replies and attachments
**Best for:** Brands with an active Facebook audience or social customer care
Connect Facebook Messenger to Watermelon by following [this guide](/help-center/integrations/facebook-messenger).
**Perfect for: Lifestyle, fashion, and creative businesses engaging with followers**
Let your Agent reply to Instagram messages and story replies automatically. Stay responsive without needing to monitor your inbox 24/7.
**Pros:**
* Handles direct messages and story replies
* Works with your verified business account
* Keeps the same tone and branding as your posts
* Manage all messages directly in Watermelon
**Best for:** Businesses using Instagram for community engagement, leads, or support
Connect Instagram DM to Watermelon by following [this guide](/help-center/integrations/instagram-dm).
**Perfect for: Local shops, service providers, and customer support teams**
Connect your Agent to WhatsApp to chat with customers directly through the world’s most popular messaging app. Fast, familiar, and mobile-first.
**Pros:**
* Customers can chat with your business just like with friends
* Works seamlessly on desktop and mobile
* Supports images, emojis, and links
* Keeps full conversation history inside Watermelon
**Best for:** Businesses with strong mobile traffic or customer support via WhatsApp
Connect WhatsApp to Watermelon by following [this guide](/help-center/integrations/whatsapp).
### **Activate Agent**
After you have connected your channel, click '**activate**' and your Agent is now live on the connected channel!
## **🎉 Congratulations!**
You’ve successfully created, tested, and published your Customer service Agent!