> ## Documentation Index
> Fetch the complete documentation index at: https://watermelon.ai/docs/llms.txt
> Use this file to discover all available pages before exploring further.
# How to generate an XML feed
With an XML feed, your Agent stays up to date with your latest product information.
If you’re using tools like **Channable, WooCommerce, or Shopify**, you can generate an XML feed in just a few steps. In this guide, we’ll show you exactly how to do it.
Choose your platform below and follow the steps. The setup usually takes just a few minutes.
**Your XML feed must include:**
* product ID
* title
* description
* product URL
* price
* availability
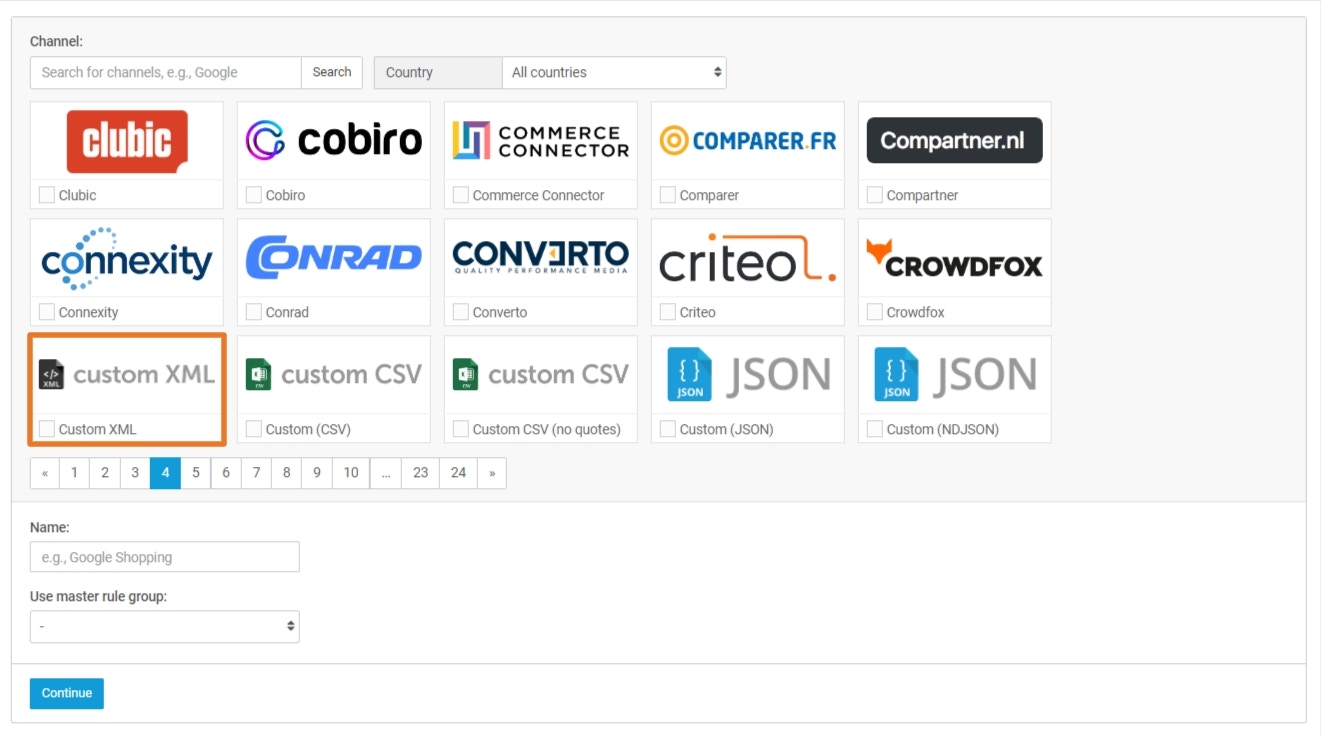
If you use Channable, you can generate an XML feed by creating a **Custom XML channel**. This allows you to export your product data in XML format and fully control the structure of your feed. The setup starts in **\[Your project] > Channels**, where you can create and configure your XML feed step by step.
Go to **\[Your project] > Channels** and click **+ Create channel**. Select **Custom XML**.
 Choose whether you want to use **default XML tags (standard labels like `
- ` and ``)** or define your own structure.
</Step>
<Step title="Optimize your data (optional)">
Use **Rules** if you want to clean up or adjust your product data before exporting.
</Step>
<Step title="Add the fields to your feed">
In the **Mapping** step, select the product fields you want to include in your XML feed.\\
<Frame>
<img src="https://mintcdn.com/watermelon/8QEtOwnalwA18Z4A/images/channablestep4.jpeg?fit=max&auto=format&n=8QEtOwnalwA18Z4A&q=85&s=c77178974d79fb433f8b09f91f3e65d3" alt="Channablestep4" width="1307" height="119" data-path="images/channablestep4.jpeg" />
</Frame>
Make sure to include at least:
* product ID
* title
* description
* product URL
* price
* availability
</Step>
<Step title="Activate your feed">
* Go to **Settings** and click **Activate project**.
* Go to **Feeds > Your custom XML feed > Preview** and click **Activate feed**.
* Once you activate your project and feed, the feed URL will show.
<Frame>
<img src="https://mintcdn.com/watermelon/8QEtOwnalwA18Z4A/images/channable-step-5-1.png?fit=max&auto=format&n=8QEtOwnalwA18Z4A&q=85&s=57c93cfa1a3742c875af7cf9589d20d3" alt="Channable Step 5 1" width="513" height="432" data-path="images/channable-step-5-1.png" />
</Frame>
<Note>
For more detailed information, we recommend consulting the [Channable documentation.](https://helpcenter.channable.com/list-advertise/list-on-channels/set-up-a-feed/setting-up-a-custom-xml-feed)
</Note>
</Step>
</Steps>
</Tab>
<Tab title="WooCommerce">
If you use WooCommerce, you can generate an XML feed with the **Product XML Feeds for WooCommerce** plugin by WPFactory. The plugin is available in the WordPress plugin directory, and WPFactory’s setup flow starts in **WooCommerce > Settings > Products > Product XML Feeds** after installation and activation.
<Steps>
<Step title="Install the plugin">
In your WordPress dashboard, go to **Plugins > Add New** and search for [**Product XML Feeds Manager for WooCommerce** ](https://wpfactory.com/item/product-xml-feeds-woocommerce/)by WPFactory. Install and activate the plugin. WPFactory also offers a Pro version, but the free version can already be used to create basic product XML feeds.
After downloading the plugin from your [**<u>WPFactory</u>**](https://wpfactory.com/) account, upload it to your WordPress site.
<Frame>
<img src="https://mintcdn.com/watermelon/8QEtOwnalwA18Z4A/images/WooCommerce-download.png?fit=max&auto=format&n=8QEtOwnalwA18Z4A&q=85&s=1fd9e8e1258cb53d8b3d014928193100" alt="Woo Commerce Download" width="1277" height="903" data-path="images/WooCommerce-download.png" />
</Frame>
</Step>
<Step title="Open the XML feed settings">
In WordPress, go to **WooCommerce > Settings > Products** and click the **Product XML Feeds** tab. This is where you create and manage your feed.
<Frame>
<img src="https://mintcdn.com/watermelon/8QEtOwnalwA18Z4A/images/Woocommerce-step2.png?fit=max&auto=format&n=8QEtOwnalwA18Z4A&q=85&s=0cee431d6a396cb344ccd256700e3240" alt="Woocommerce Step2" width="1910" height="923" data-path="images/Woocommerce-step2.png" />
</Frame>
</Step>
<Step title="Enable the plugin and create a feed">
Turn on **Product XML Feeds for WooCommerce**. Then choose how many XML feeds you want to create in **Total XML files (feeds)**. If you only need one feed for Watermelon, one feed is enough. After that, click **Save changes**.
</Step>
<Step title="Open your feed settings">
After saving, open the tab for your feed, for example **Feed #1**. There you can:
* enable or disable that specific feed,
* add an **Admin Title** for internal reference,
* and define the XML structure with **XML header**, **XML item**, optional **Variation XML item**, and **XML footer**.
<Frame>
<img src="https://mintcdn.com/watermelon/8QEtOwnalwA18Z4A/images/WooCommerce-step4.png?fit=max&auto=format&n=8QEtOwnalwA18Z4A&q=85&s=8cf70f63d3bf2e26983ddb22f37b137b" alt="Woo Commerce Step4" width="1910" height="923" data-path="images/WooCommerce-step4.png" />
</Frame>
</Step>
<Step title="Add the product fields to your XML template">
In the **XML item** section, you build the product structure with WPFactory shortcodes. WPFactory provides shortcodes for core fields such as:
* product name: `[alg_product_name]`
* product description: `[alg_product_description]`
Its shortcode library also covers pricing, stock, images, attributes, taxonomies, and custom fields.
<Frame>
<img src="https://mintcdn.com/watermelon/8QEtOwnalwA18Z4A/images/WooCommercestep5.png?fit=max&auto=format&n=8QEtOwnalwA18Z4A&q=85&s=b104c95c1eb6cbdcc09fa83e0c8841b8" alt="Woo Commercestep5" width="1910" height="923" data-path="images/WooCommercestep5.png" />
</Frame>
For Watermelon, your feed should at minimum map these fields:
* product ID
* title
* description
* product URL
* price
* availability
</Step>
<Step title="Set the feed URL">
In the **General Settings** for the feed, choose the **XML file path and name**. You can set a custom path such as `/products.xml`, or use **Use Site Address (HOME\_URL)** so the plugin generates the feed path based on your website URL.
This is important, because Watermelon needs a **public feed URL** that you can paste into the XML feed connection.
<Frame>
<img src="https://mintcdn.com/watermelon/8QEtOwnalwA18Z4A/images/Step-6-WooCommerce.png?fit=max&auto=format&n=8QEtOwnalwA18Z4A&q=85&s=c288a43b834fa9acae24861610ef2912" alt="Step 6 Woo Commerce" width="1889" height="610" data-path="images/Step-6-WooCommerce.png" />
</Frame>
<Note>
For more detailed information, we recommend consulting the [WooCommerce documentation.](https://wpfactory.com/item/product-xml-feeds-woocommerce/)
</Note>
</Step>
</Steps>
</Tab>
<Tab title="Shopify">
If you use Shopify, you can generate an XML feed using an app from the Shopify App Store. These apps allow you to export your product data in XML format. Depending on the app, you can choose a plan that fits your needs.
<Steps>
<Step title="Go to the Shopify App Store">
Search for **“XML feed”** in the Shopify App Store.
<Frame>
<img src="https://mintcdn.com/watermelon/8QEtOwnalwA18Z4A/images/XML-feedshopify-1.png?fit=max&auto=format&n=8QEtOwnalwA18Z4A&q=85&s=680a434e45689804931c0f5a0652baaa" alt="XML Feedshopify 1" width="2880" height="1458" data-path="images/XML-feedshopify-1.png" />
</Frame>
</Step>
<Step title="Choose an app and set up your XML feed">
Select an app from the Shopify App Store that can generate an XML product feed. We don’t specifically recommend one, as many apps offer different features and pricing (often with paid plans). Choose the app that best fits your product catalog, budget, and required integrations.
Install the app and follow its setup instructions to generate your XML feed. Once completed, make sure the feed is available via a **public URL** so Watermelon can access and fetch the data.
</Step>
</Steps>
</Tab>
</Tabs>
## Upload your feed in Watermelon
In Watermelon, go to the **Product Feed** and paste the feed URL into the input field, then click Add feed.
After the feed is added, click **Crawl** so your data becomes part of the agents knowledge base. After crawling, you can use **also Crawl** a specific product feed if you want to refresh the data manually. Watermelon supports **XML only**, not JSON feeds or sitemaps, and the maximum file size is **50 MB per XML feed**.
<Frame>
<img src="https://mintcdn.com/watermelon/fmbfF-SvGOUVYjus/images/options-product-feed.png?fit=max&auto=format&n=fmbfF-SvGOUVYjus&q=85&s=a8022ffadd5cc0ff91c51ba0dda3920b" alt="XML Feedsync 3" width="1441" height="731" data-path="images/options-product-feed.png" />
</Frame>