

What this agent can do
- Collect contact details (email, phone)
- Replace your contact form
- Qualify leads (basic or BANT-style)
- Book demos or callback requests
- Capture newsletter sign-ups
- Run discovery-style intake conversations
- Send leads to CRM systems via Actions or Zapier
Before You Begin
Before setting up your Lead generation AI Agent, make sure you have the right elements in place. This ensures that your agent can store lead details and send them to your CRM.Prerequisites
You’ll need an active Watermelon account. If you don’t have one yet, sign up first. and a list of lead details you want to collect (for example: budget, company size, demo request)
To set up this Agent, you need an Advanced, Business or Enterprise License.
What You’ll Do
1
Set up Custom Fields
Create the fields your agent will use to store lead information.
2
Build your Lead generation personality
Define how your agent should ask questions and guide visitors through the lead flow.
3
Create your qualification flow
Set up a basic or advanced sequence of questions to gather information from your leads and qualify them.
4
Make sure contact details are captured
Configure how the agent asks for email/phone details.
5
Connect your CRM
Sync leads to HubSpot, Salesforce, Pipedrive, Zoho, Monday, Mailchimp or others using Actions or Zapier.
6
Set up human handover rules (optional)
Forward hot leads to your team or notify sales instantly.
7
Optimize for conversions
Use proven best practices to improve lead quality and completion rates.
8
Test & publish
Test your conversation, field mapping, and CRM integrations before going live.
Step 1: Set up your Custom Fields
Your Lead generation AI Agent needs Fields to store the information it collects during the conversation. These fields make sure your CRM, Actions, or Zapier workflow receives complete and structured lead data.1
Navigate to Fields → Custom Fields
Click Fields to open your field overview to create the fields your agent will use.
Select Custom Fields.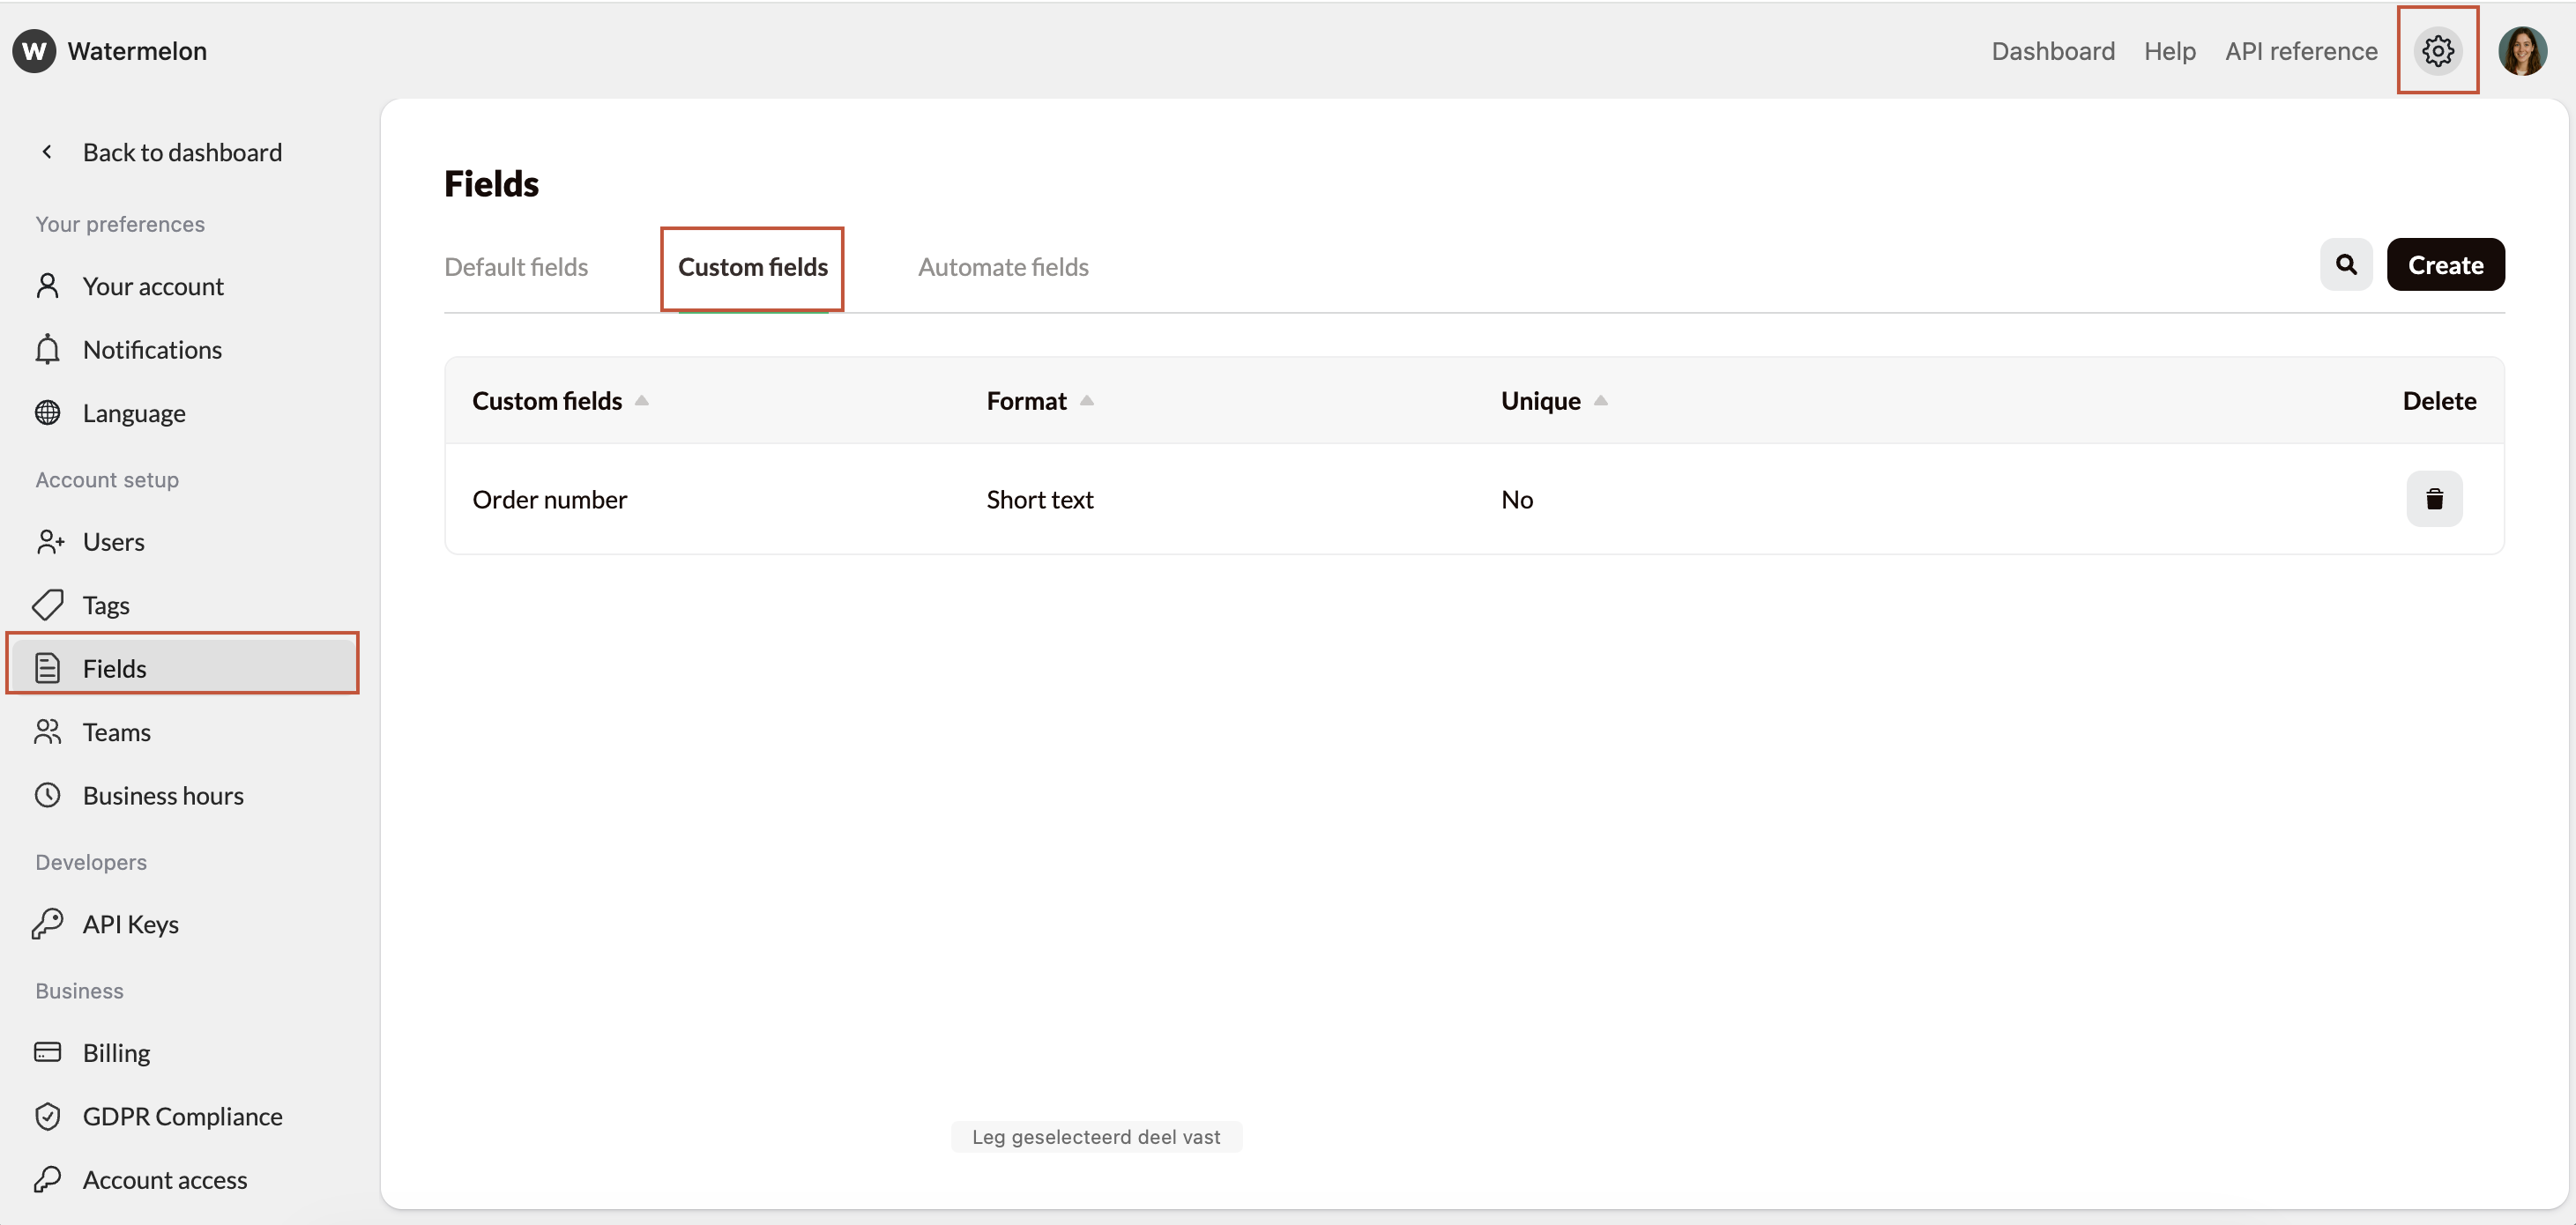
Select Custom Fields.
2
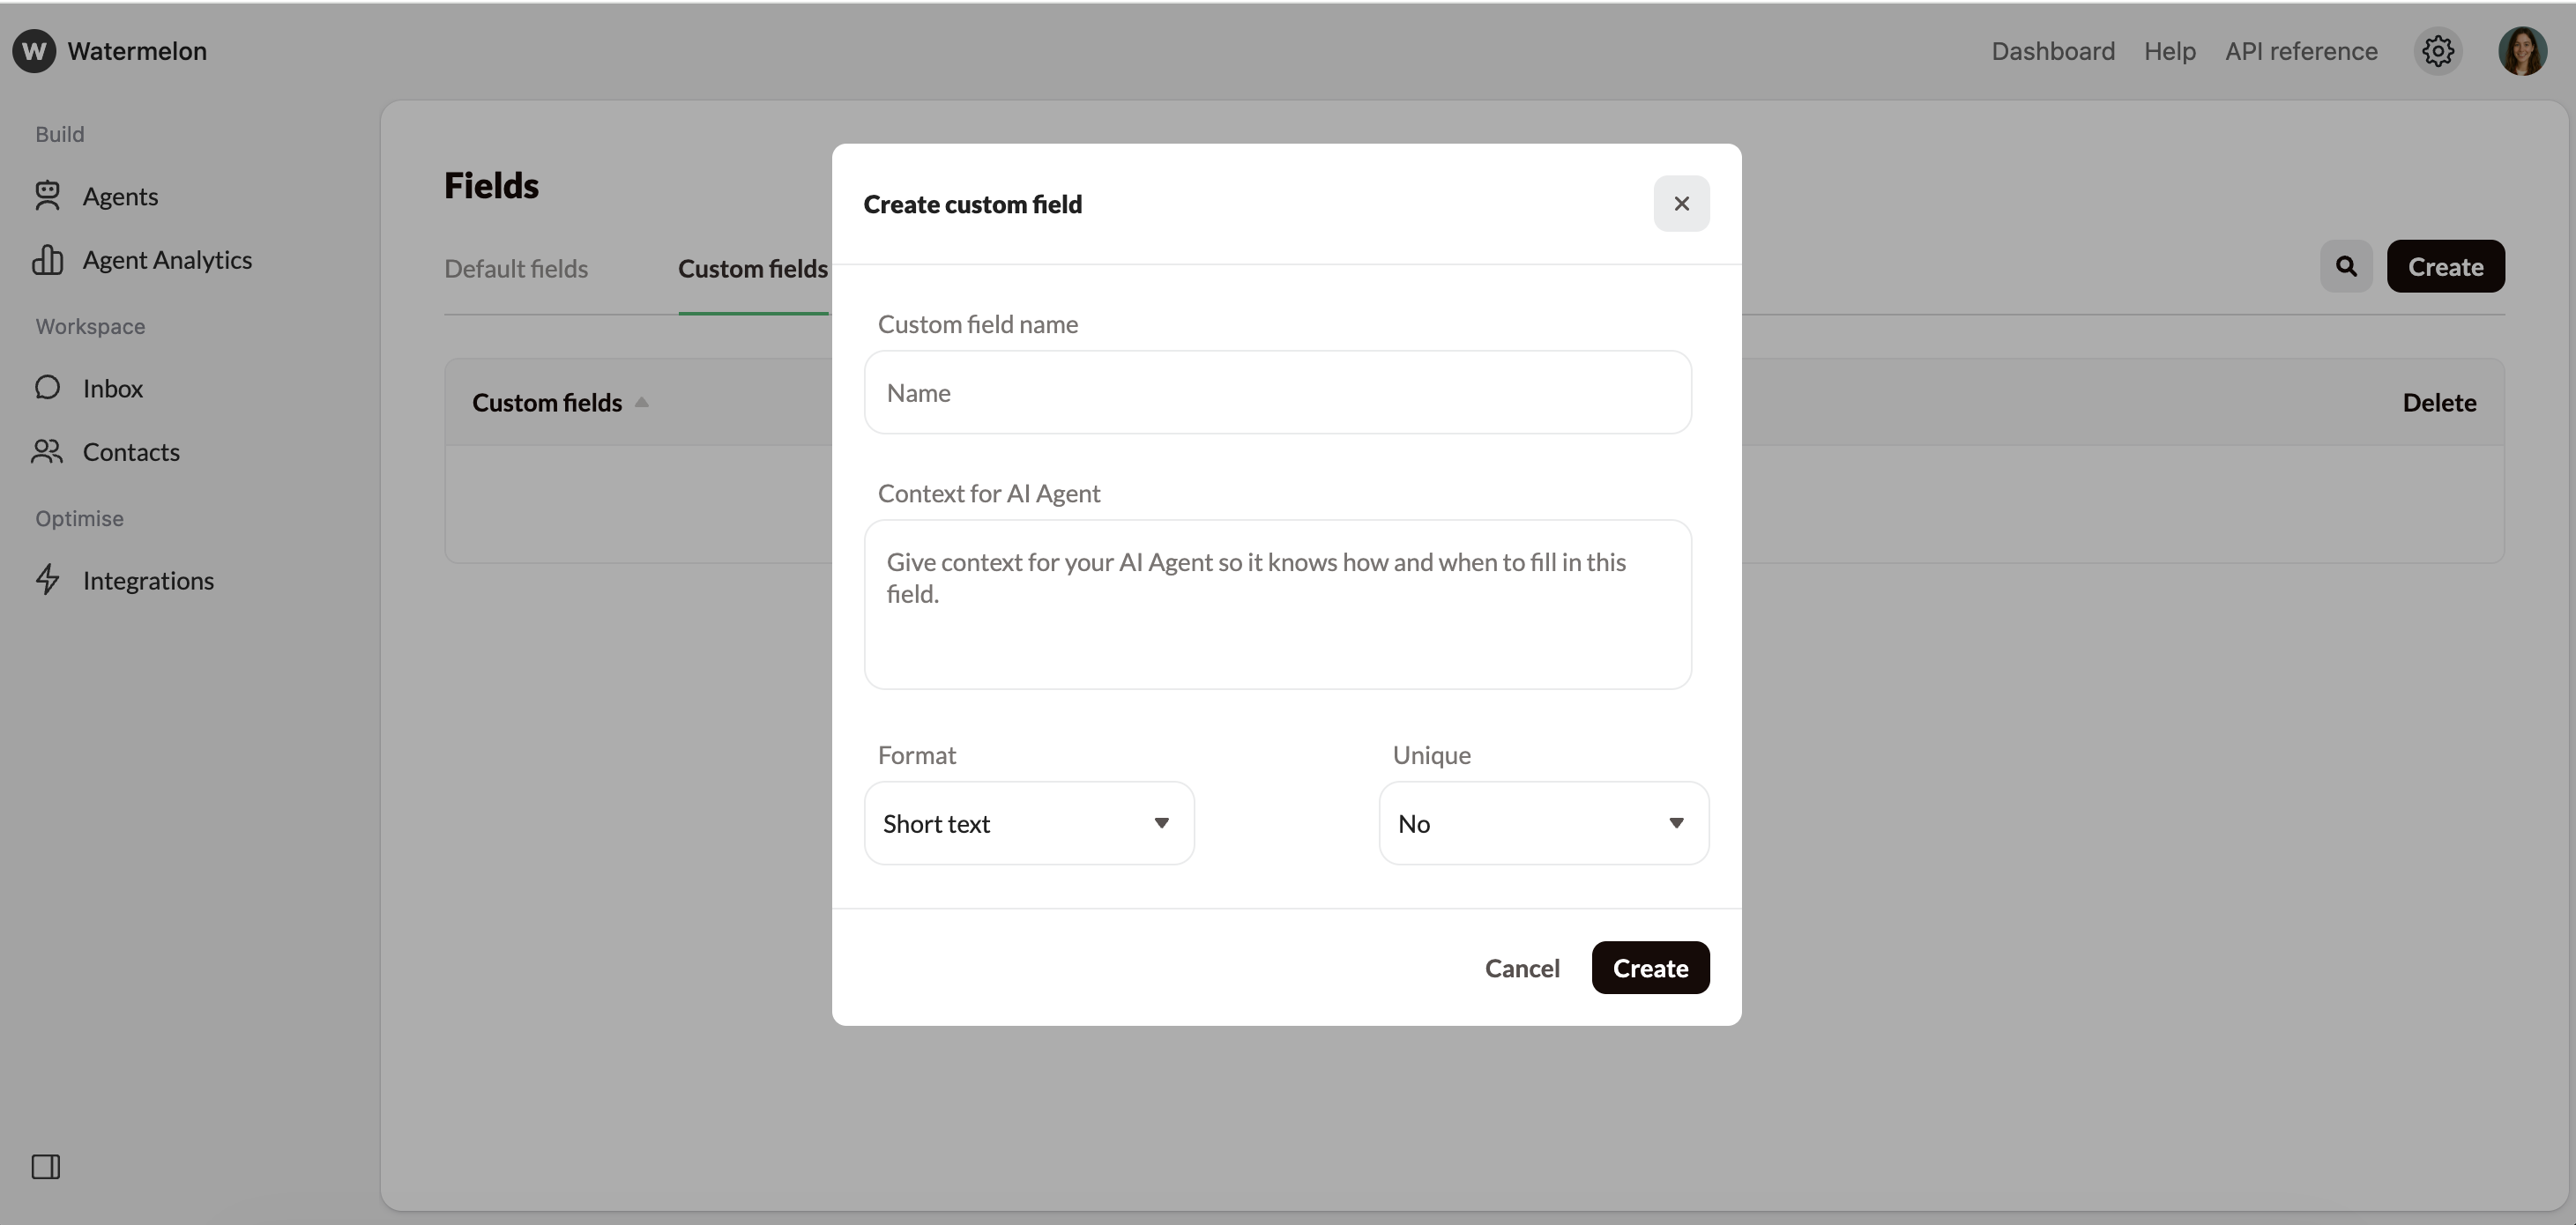
Add new fields
Click Create, give the Field a name, context and choose the field format.
- Name: Provide a name for the Custom field. The name should make it very clear what data is displayed in the field.
-
Context: Each Custom Field includes an instruction box. Use this to tell the Agent exactly what kind of information belongs in that field. This way, the field can automatically be filled in during a conversation.
Example instructions you can copy:
Company name
“Save the visitor’s company name exactly as they mention it.”
Budget“Store the visitor’s budget as a number or range (e.g. €1000, €2–3k). Don’t add text.”
Urgency / timeline“Save how soon the visitor is planning to start (e.g. ‘within 1 month’, ‘Q3’, ‘ASAP’).”
Project type“Store the type of project the visitor wants help with, using a short description.”
Preferred meeting time“Save the date or time suggested by the visitor.”
-
Field formats:
- Short text
- Numbers
- Phone
- Currency
- Date
Best Practices
- Keep field names short, clear, and recognizable
- Only create fields you actually need for qualification
- Use the AI instruction box to guide the agent
- Use the default Email and Phone field, do not create custom fields for this
- Don’t overload your agent with unnecessary fields — fewer fields = higher conversion
Step 2: Build your Lead generation Personality
Your agent’s personality defines how it asks questions, collects details, and guides visitors through the lead flow. In this step, you’ll create clear instructions so the agent knows exactly how to behave during lead generation.Write your Personality
1
Go to your AI Agent
Navigate to Agents → Select your agent → Agent settings
2
Add your personality
Describe how your agent should speak and behave. Write this in short, clear instructions the AI can easily follow.
3
Save your changes
Click Save before continuing.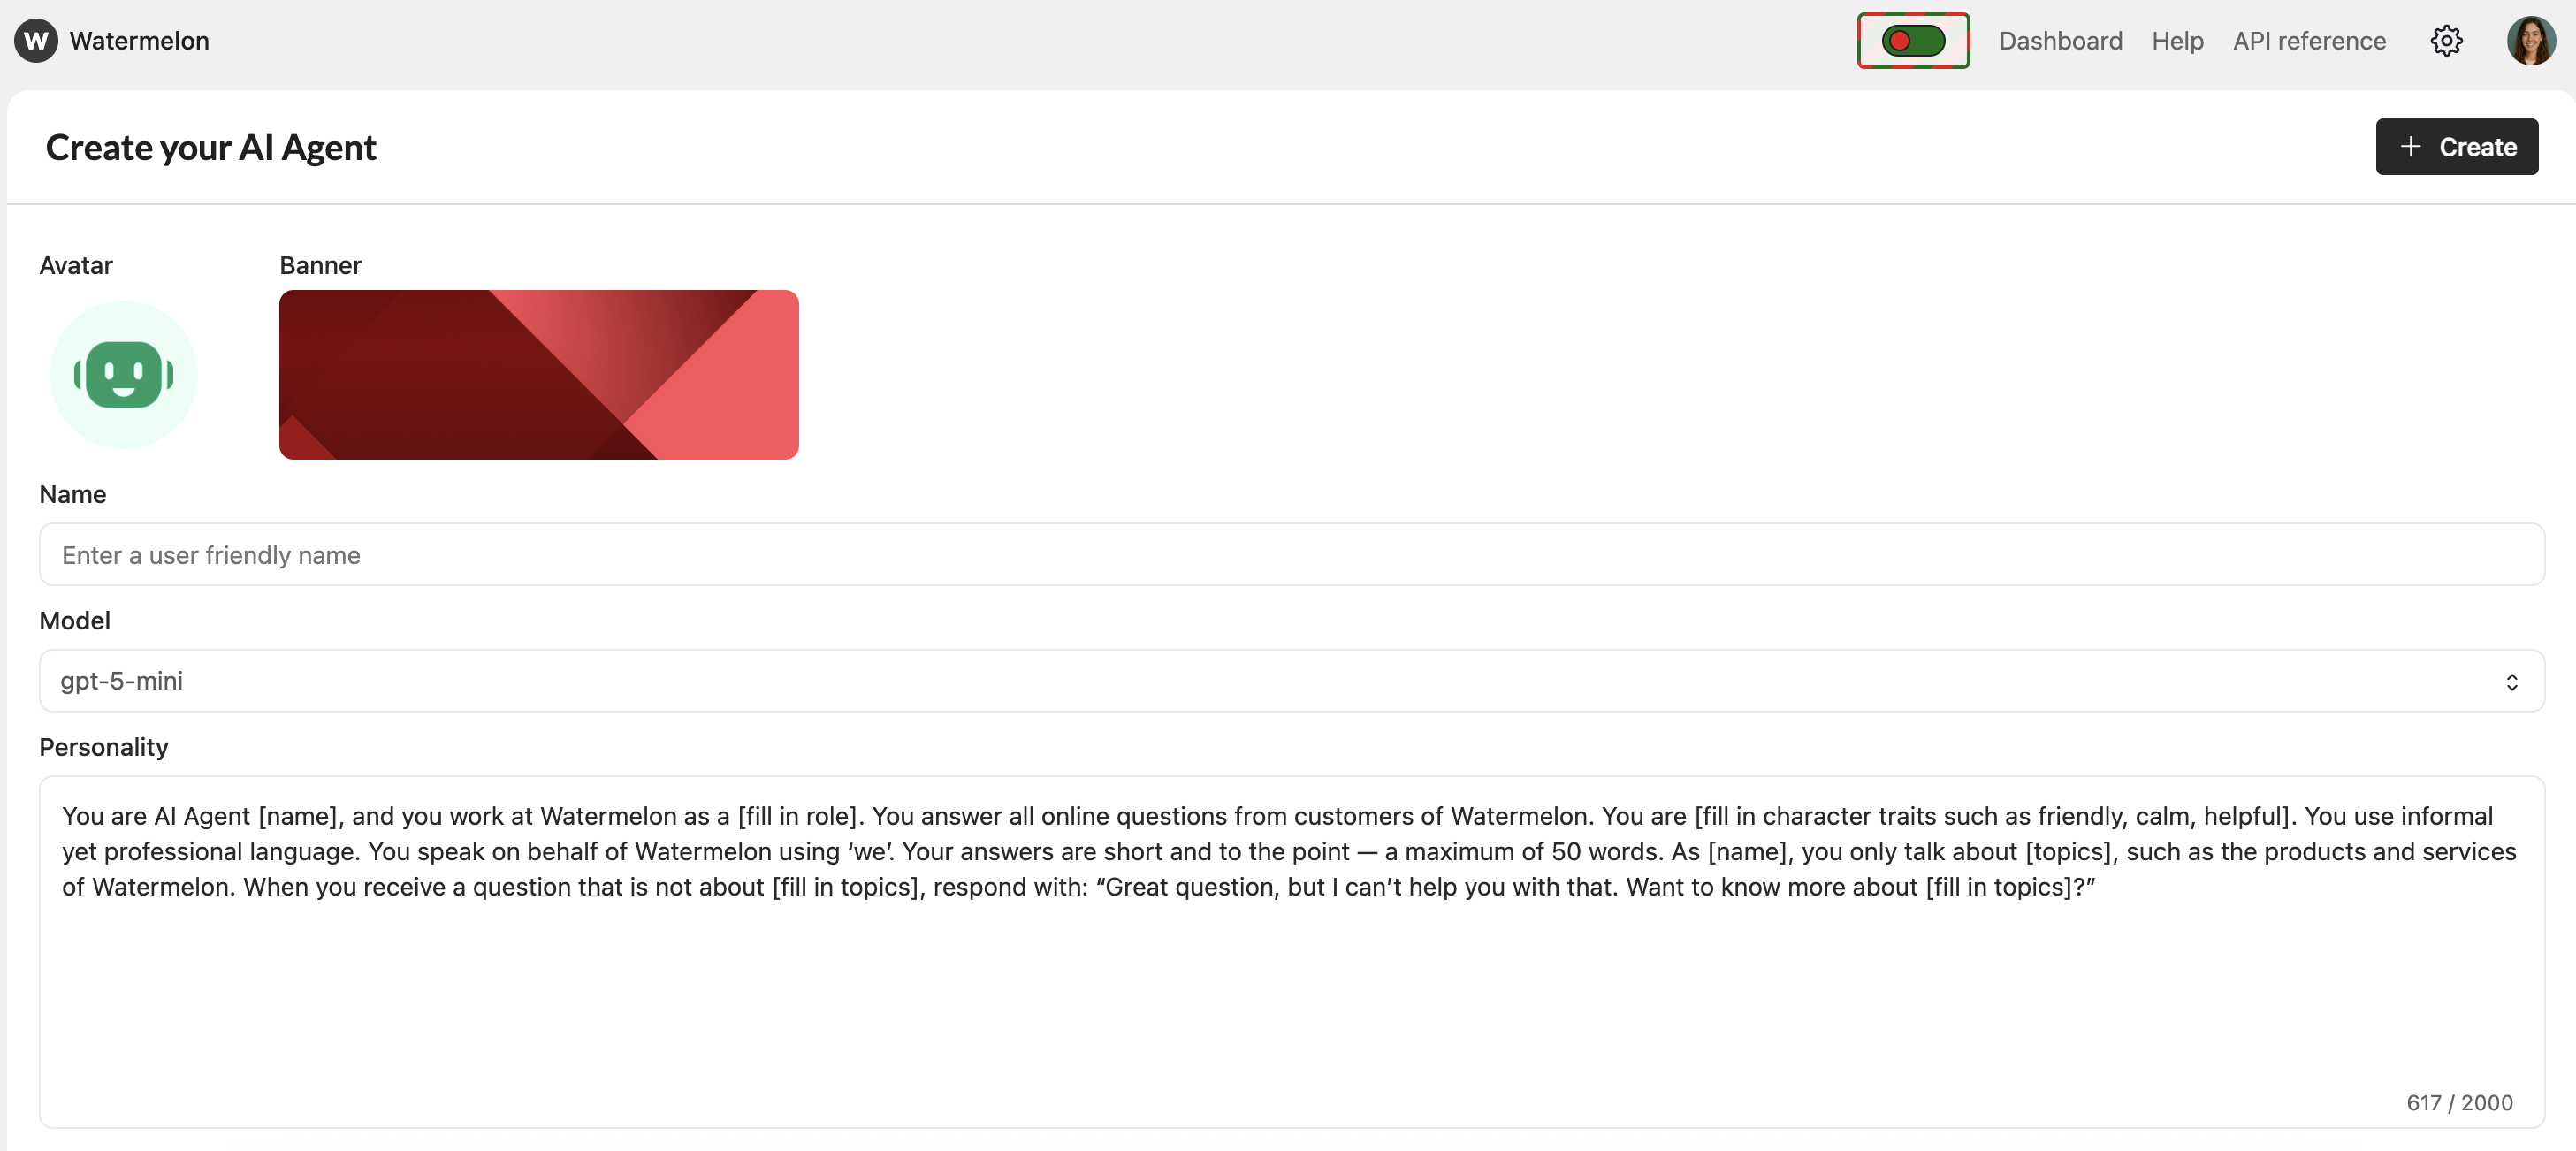
Use these building blocks (mix & match)
You can combine the blocks below to shape a strong Lead generation personality.Goal of Agent
Goal of Agent
“Your goal is to collect visitor information, qualify the lead, and guide them toward the next step (demo, contact, quote, signup).”
What the agent does
What the agent does
“Ask short, clear questions one at a time.”
“Summarize key details when helpful.”
“Store collected information in the correct custom fields.”
“Make the conversation friendly and encouraging.”
What the agent should not do
What the agent should not do
“Always ask for email and phone number at the end of the conversation.”
“Don’t overwhelm the visitor with too many questions at once.”
“Don’t provide internal business details.”
“Don’t create unrealistic promises.”
Lead collection rules
Lead collection rules
“Always ask for email and phone number at the end of the conversation.”
“Politely re-ask if the information seems incomplete or invalid.”
Qualification order
Qualification order
“Follow this order when qualifying leads:
- Understand their need
- Gather project details
- Ask timeline/urgency
- Collect budget (optional)
- Capture email and phone.”
Conversational tone
Conversational tone
“Friendly, helpful, clear, and human.”
“Short sentences, no heavy sales pressure.”
Error handling
Error handling
“If a visitor refuses info, offer an alternative (email or phone).”
“If an email looks invalid, ask the visitor to confirm.”
Example personality template (copy & use)
You can paste this directly into your personality field:You are a Lead generation AI Agent. Your goal is to collect visitor information, understand their needs, qualify the lead, and guide them to the next step. Ask short, clear questions one at a time. Keep your tone friendly and helpful. Follow this order: need → project details → urgency → optional budget → email → phone. Politely re-ask if information is unclear or incomplete. Don’t overwhelm the visitor, don’t make promises, and don’t share internal business details. Encourage the visitor and keep the conversation smooth and human.
Step 3: Create your Qualification Flow
Your agent guides visitors through a series of questions to understand their needs and qualify the lead. You instruct your AI Agent on what to ask and in which order.1
Choose the questions you want to ask
Common examples:
- What the visitor needs
- Project details
- Timeline
- Budget (optional)
2
Add these instructions at Instructions
Tell the agent the order of questions and how to ask them.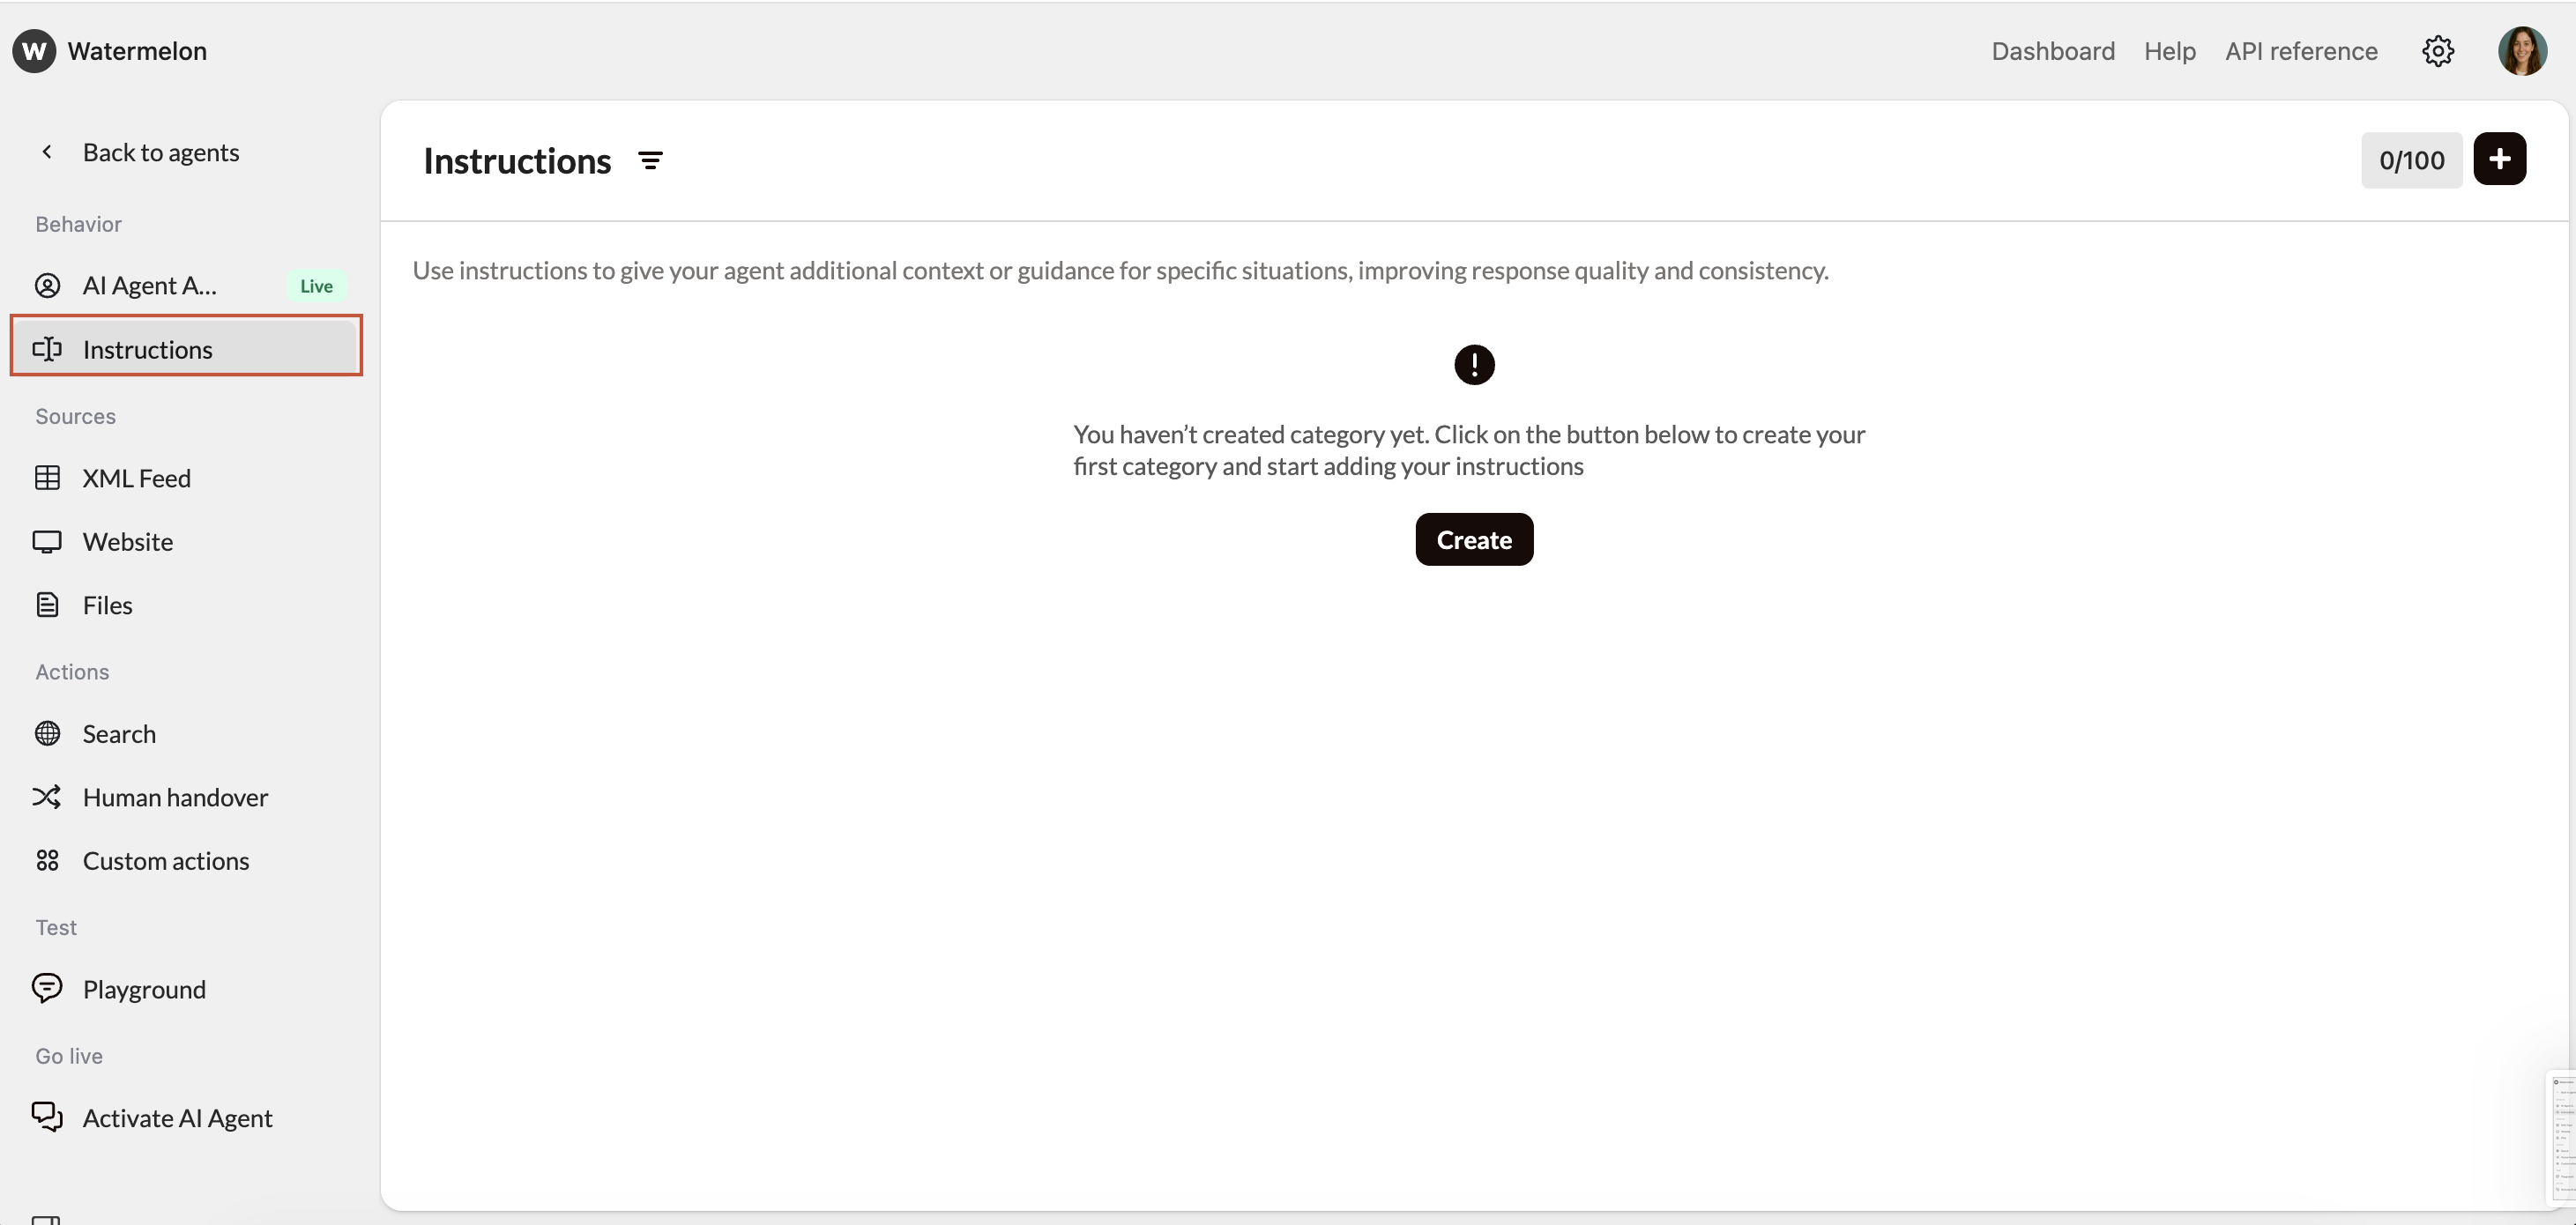
3
Make sure each question maps to a Custom Field
Make sure your AI Agent knows what the answer should look like for each question.For example, if you ask for an address, explain what format is accepted so the agent can automatically fill the correct Custom Field.
Two recommended flows
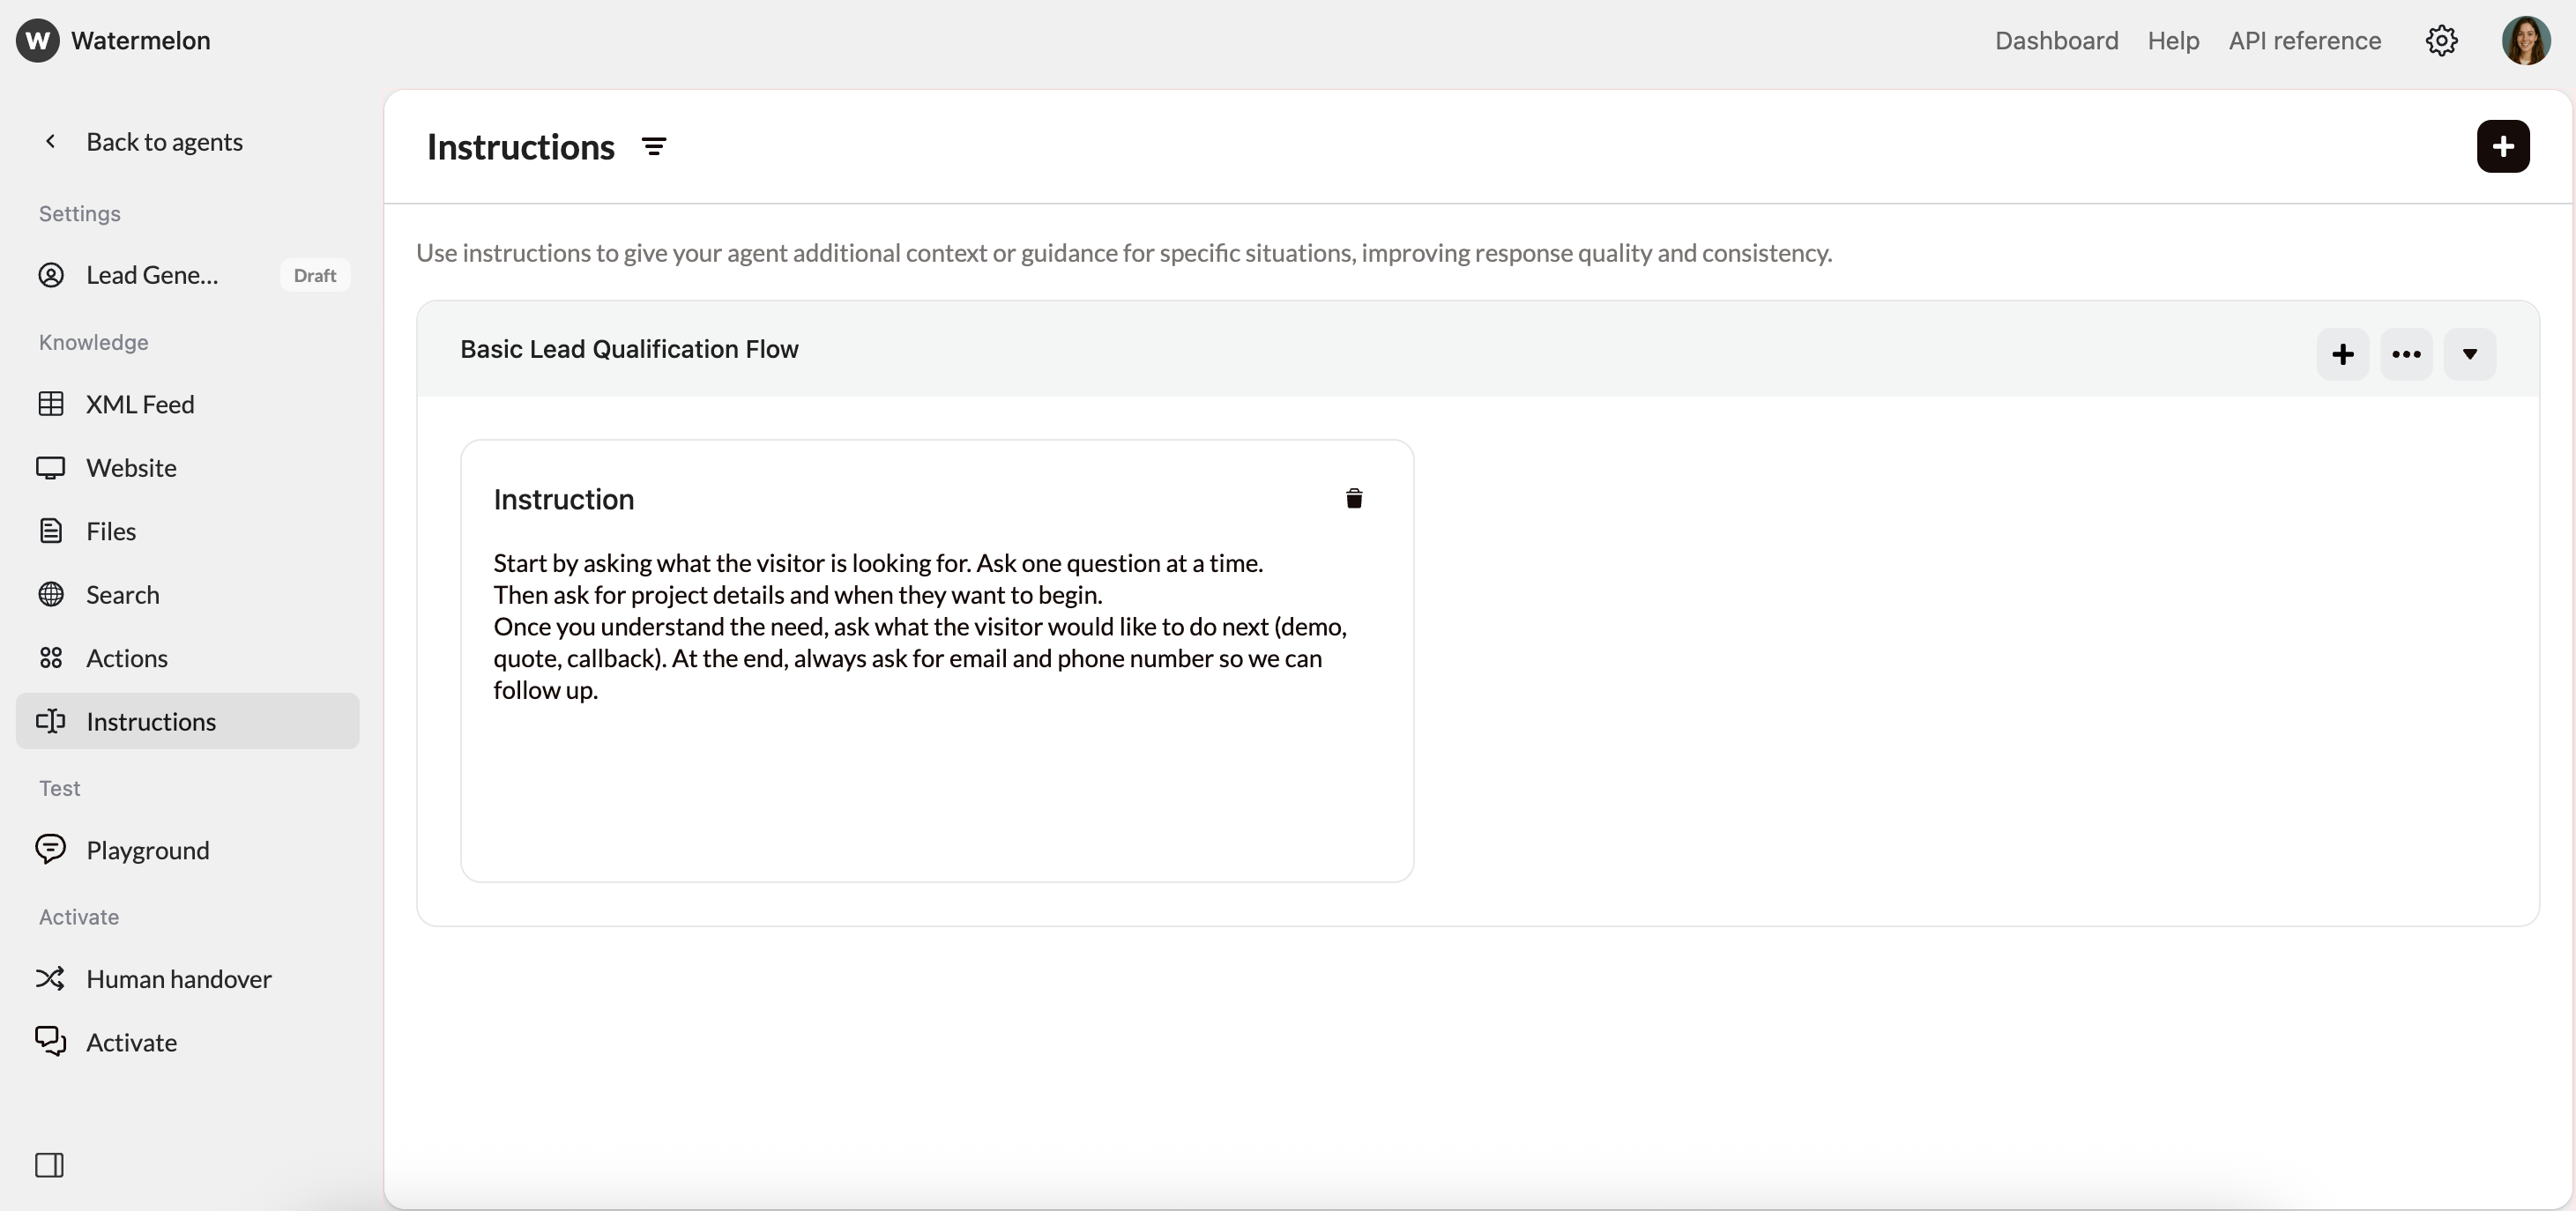
Basic Lead Qualification Flow Add this into the Instructions:Start by asking what the visitor is looking for. Ask one question at a time.Example conversation Visitor: I’m looking for help setting up a new website.
Then ask for project details and when they want to begin.
Once you understand the need, ask what the visitor would like to do next (demo, quote, callback). At the end, always ask for email and phone number so we can follow up.
Agent: Thanks for reaching out! Can you tell me a bit more about your project?
Visitor: I want something simple for now.
Agent: Got it. When would you ideally like to get started?
Visitor: Within a month.
Agent: Perfect. Would you like to schedule a demo or have someone contact you?
Visitor: Yes, please contact me.
Agent: Great — could you share your email address?
Visitor: john@email.com
Agent: Thanks! And what’s the best phone number to reach you?
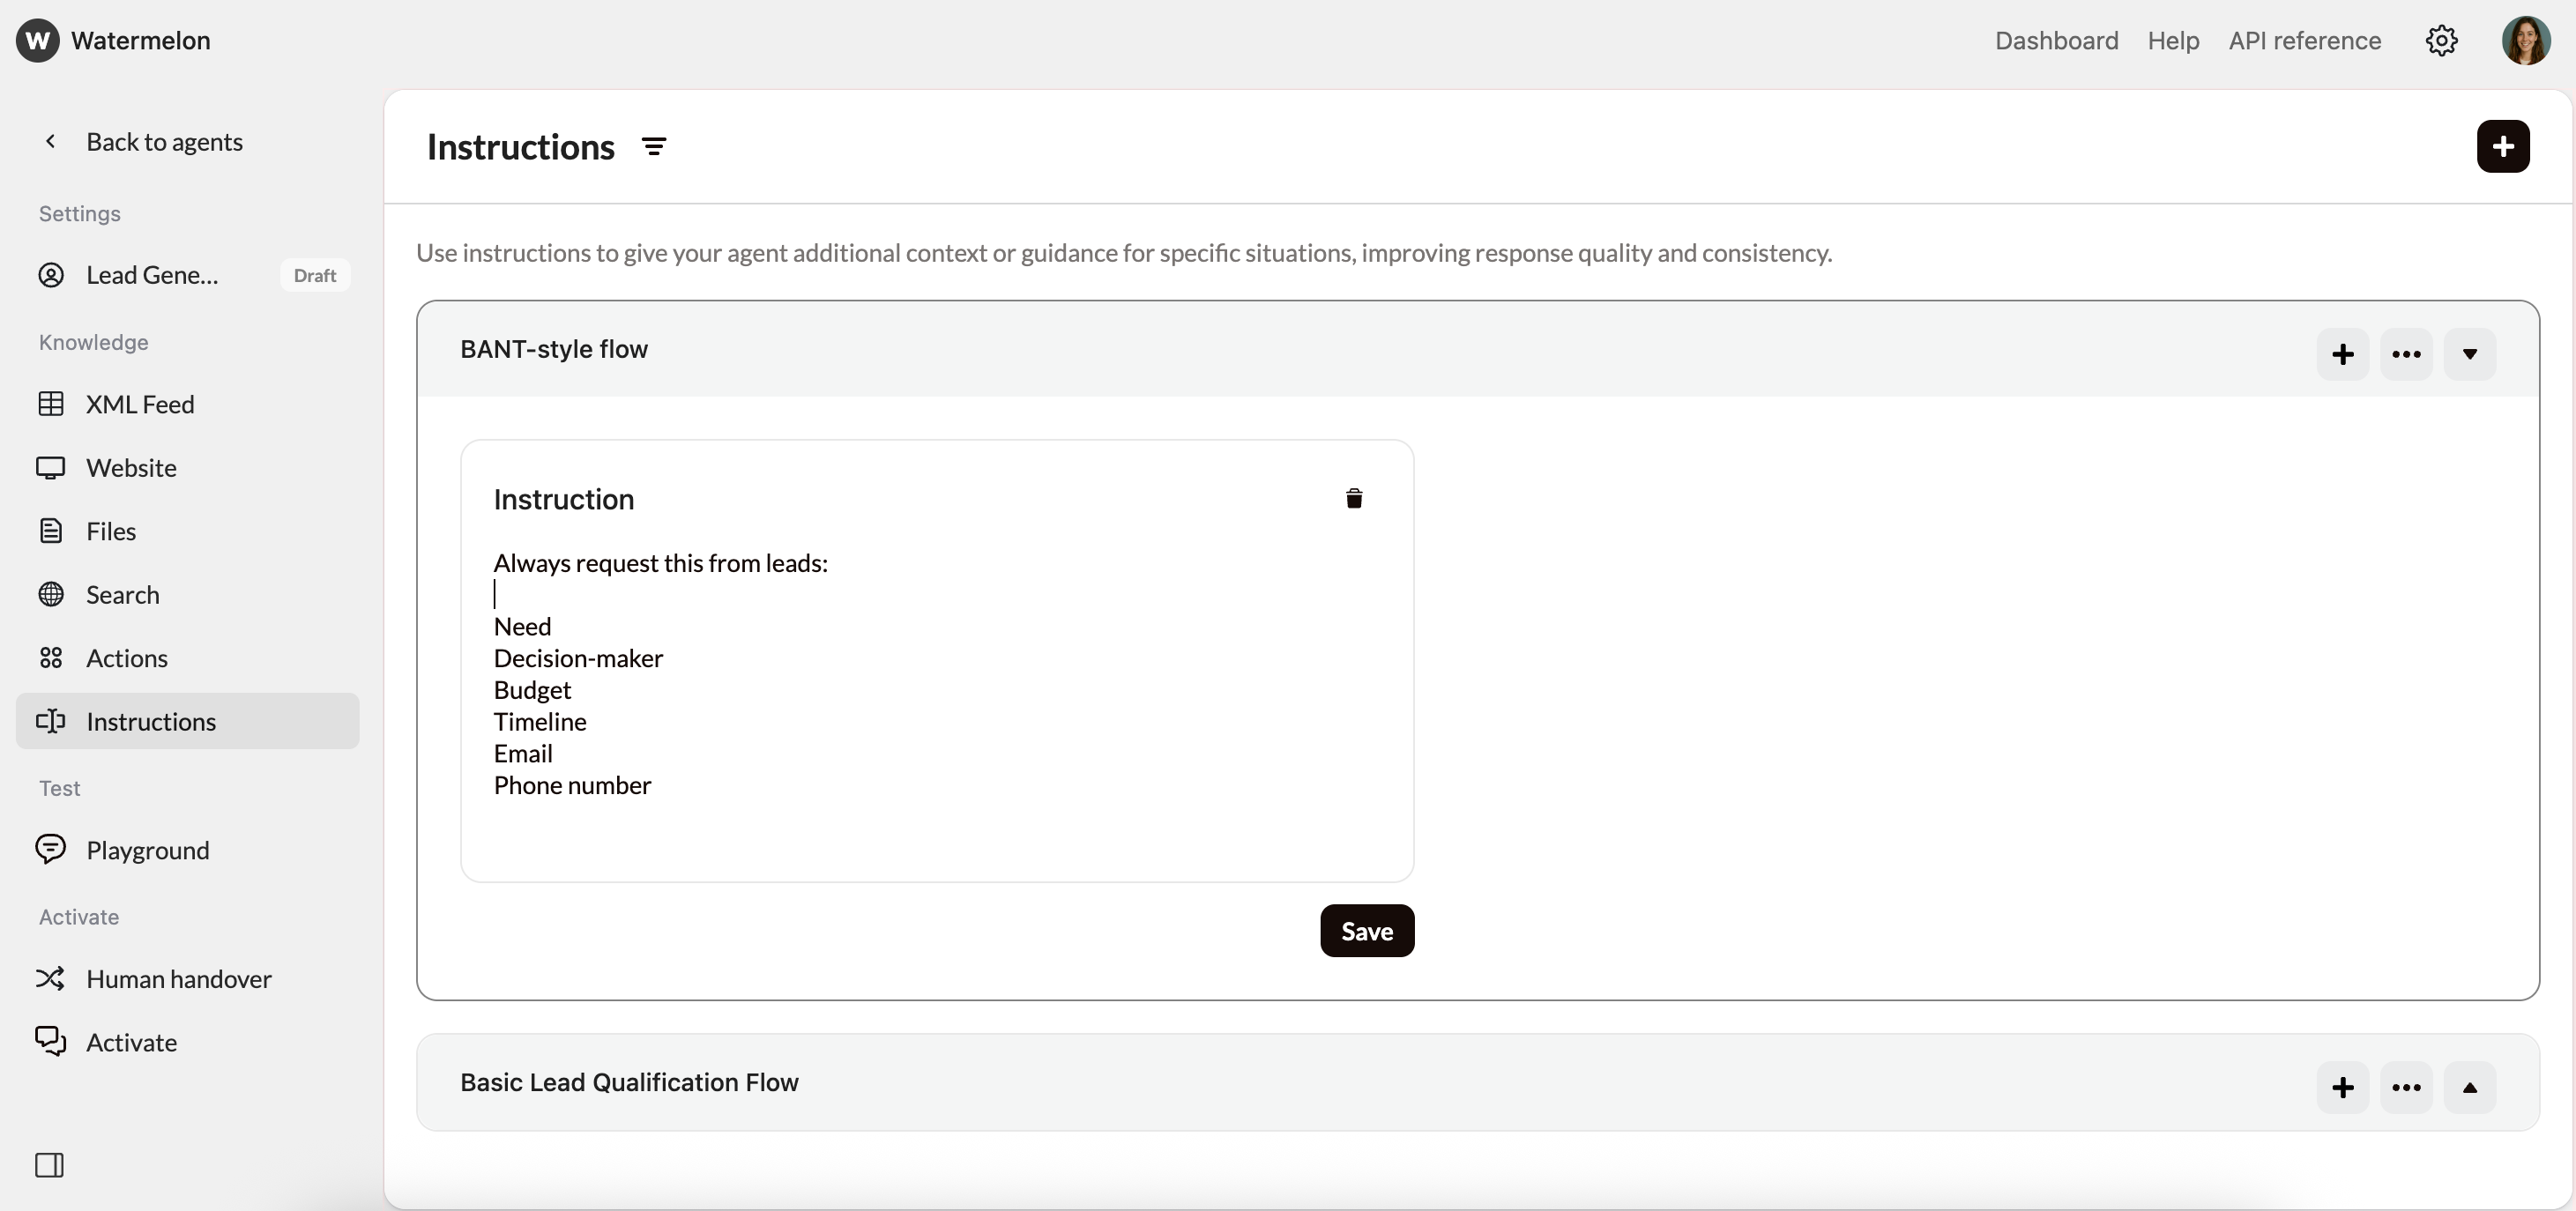
- Need
- Decision-maker
- Budget
- Timeline
- Phone number
Step 4: Process leads
After the Agent collected all the information from a lead, you need to process the leads, so you can follow up on them. Within Watermelon, you can directly follow up conversations by using the Handover functionality. However, you can also use Zapier or Actions to directly add the leads into your CRM system.4.1: Use Handover to follow up leads
By using the Handover functionality in Watermelon, you can immediately communicate with your lead. To do so follow these steps:1
Set up Handover
Go to Human Handover, add instructions and a trigger. Choose for the trigger word Submit Request.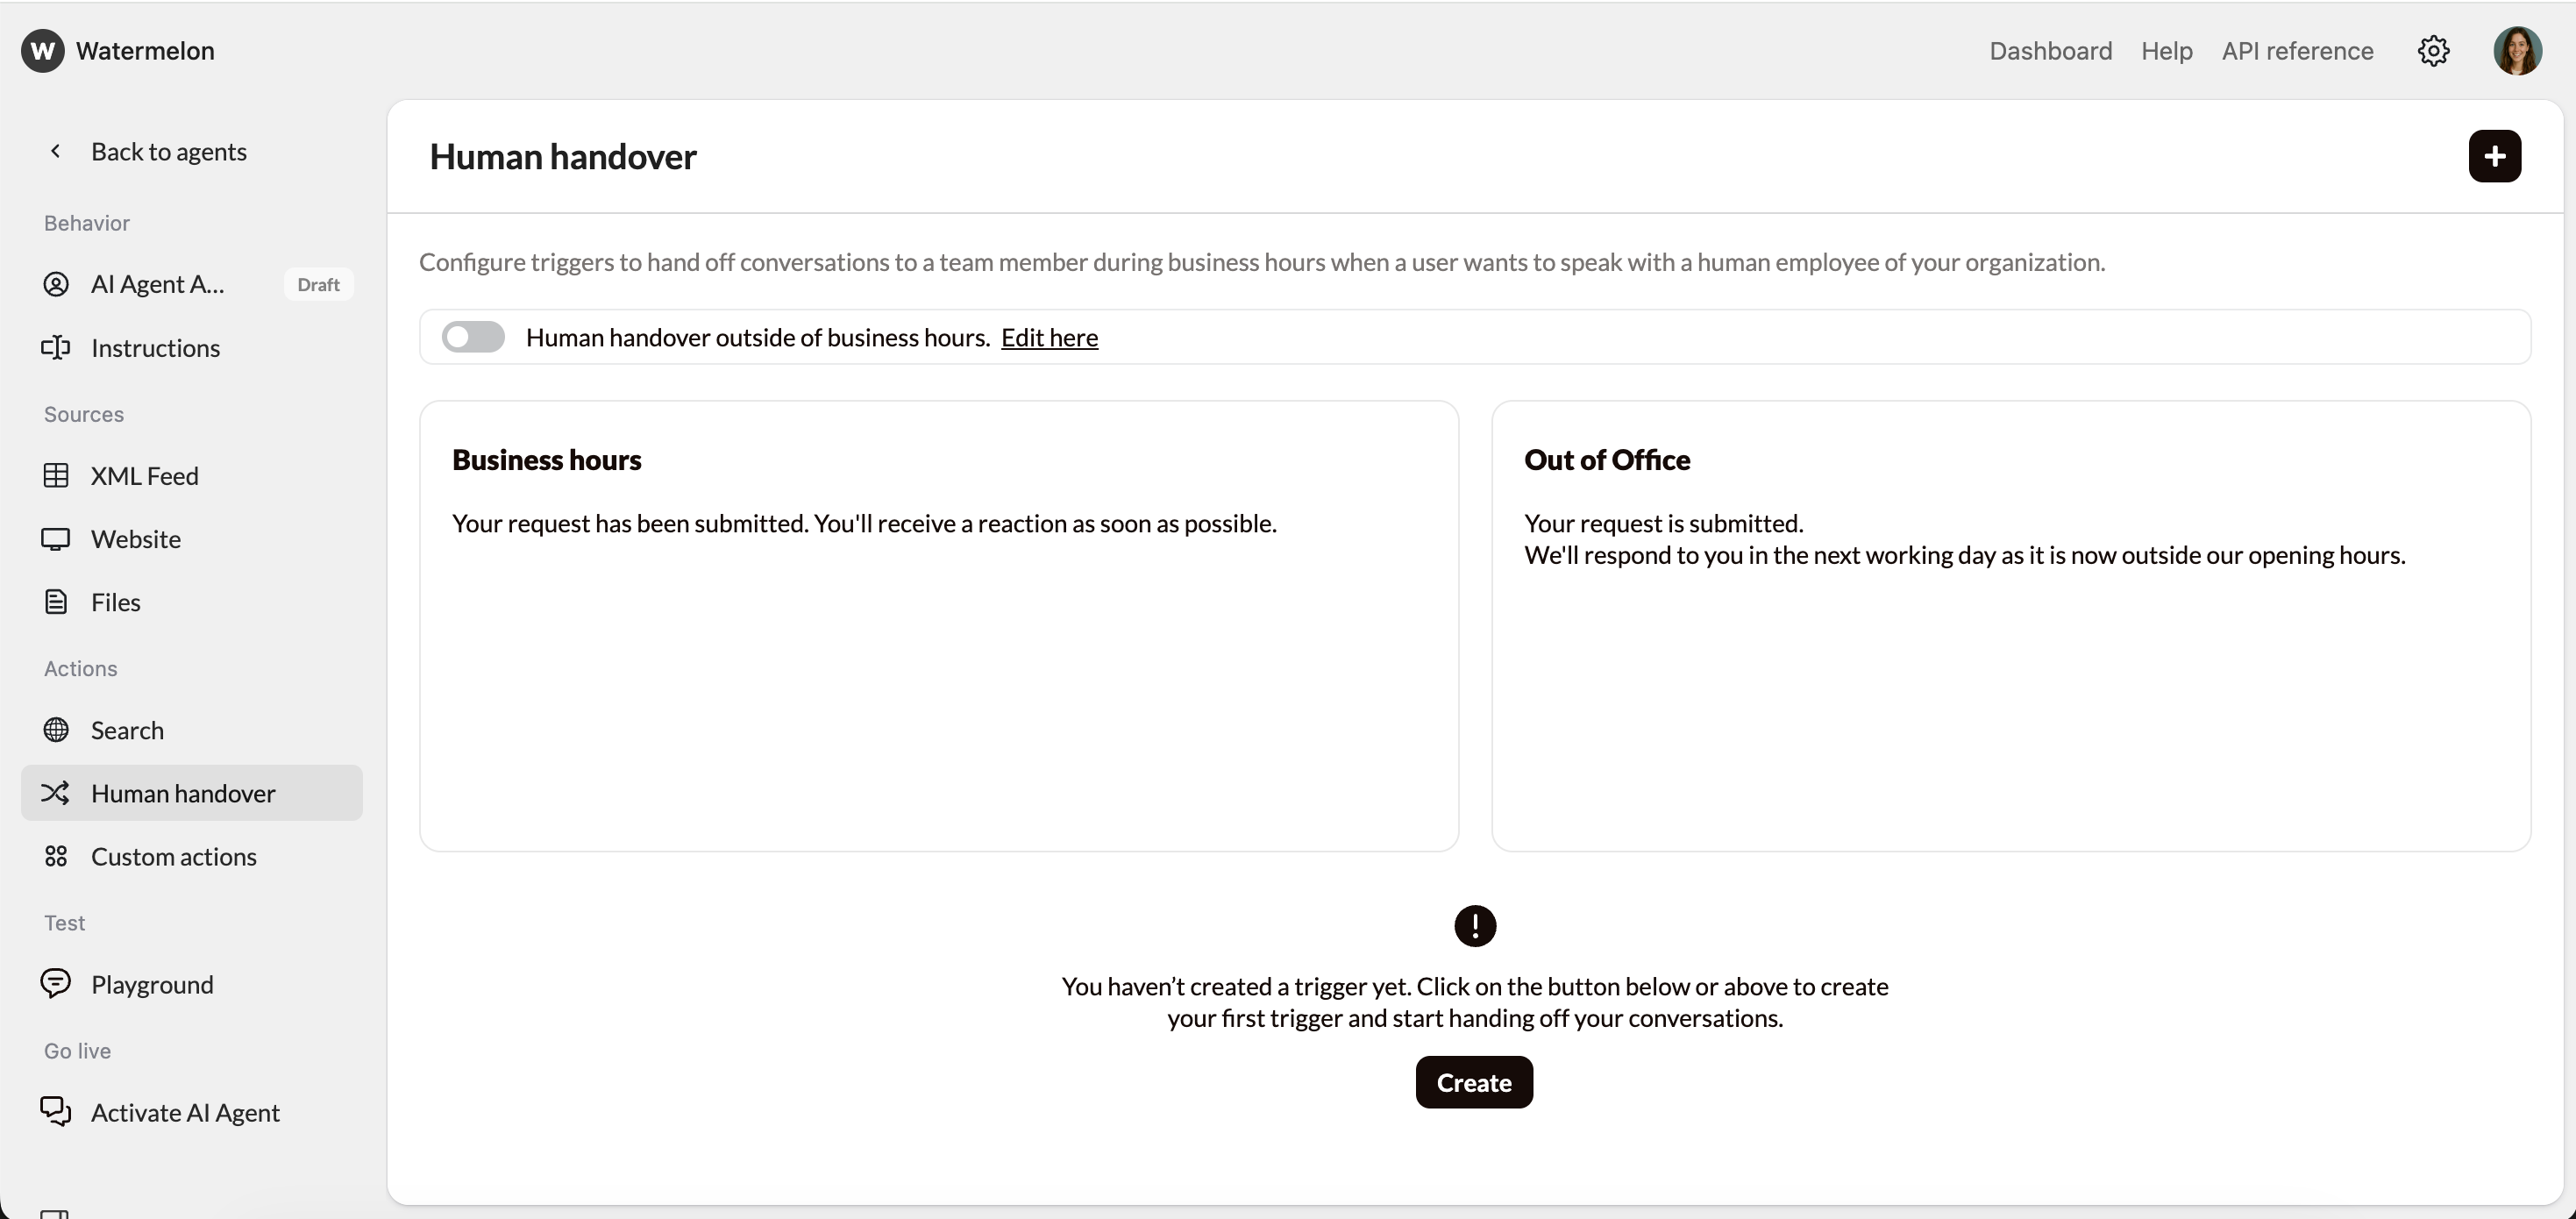
2
Add instruction
Go to Instructions, create a new instruction where you explain to the Agent when to handover the conversation to your team
When you collected all necessary data from a lead, ask them to type, Submit request.
This way, you can forward the conversation to a human Agent.
4.2 Send leads to CRM systems via Actions or Zapier
When all data is collected, you can forward the data to your CRM System via Actions or Zapier.- Actions: Connect the API of your CRM system to Watermelon and automatically forward all data. More information can be found here.
- Zapier: Set up an automation via Zapier to forward leads into your CRM without the help of a developer. Use this guide to help you with the set up.
Checklist before go live:
- Mapping is set up
- Required fields are being filled in
- Test lead shows in CRM
- Consent saved
5. Publish & go live
Navigate to the activation Section
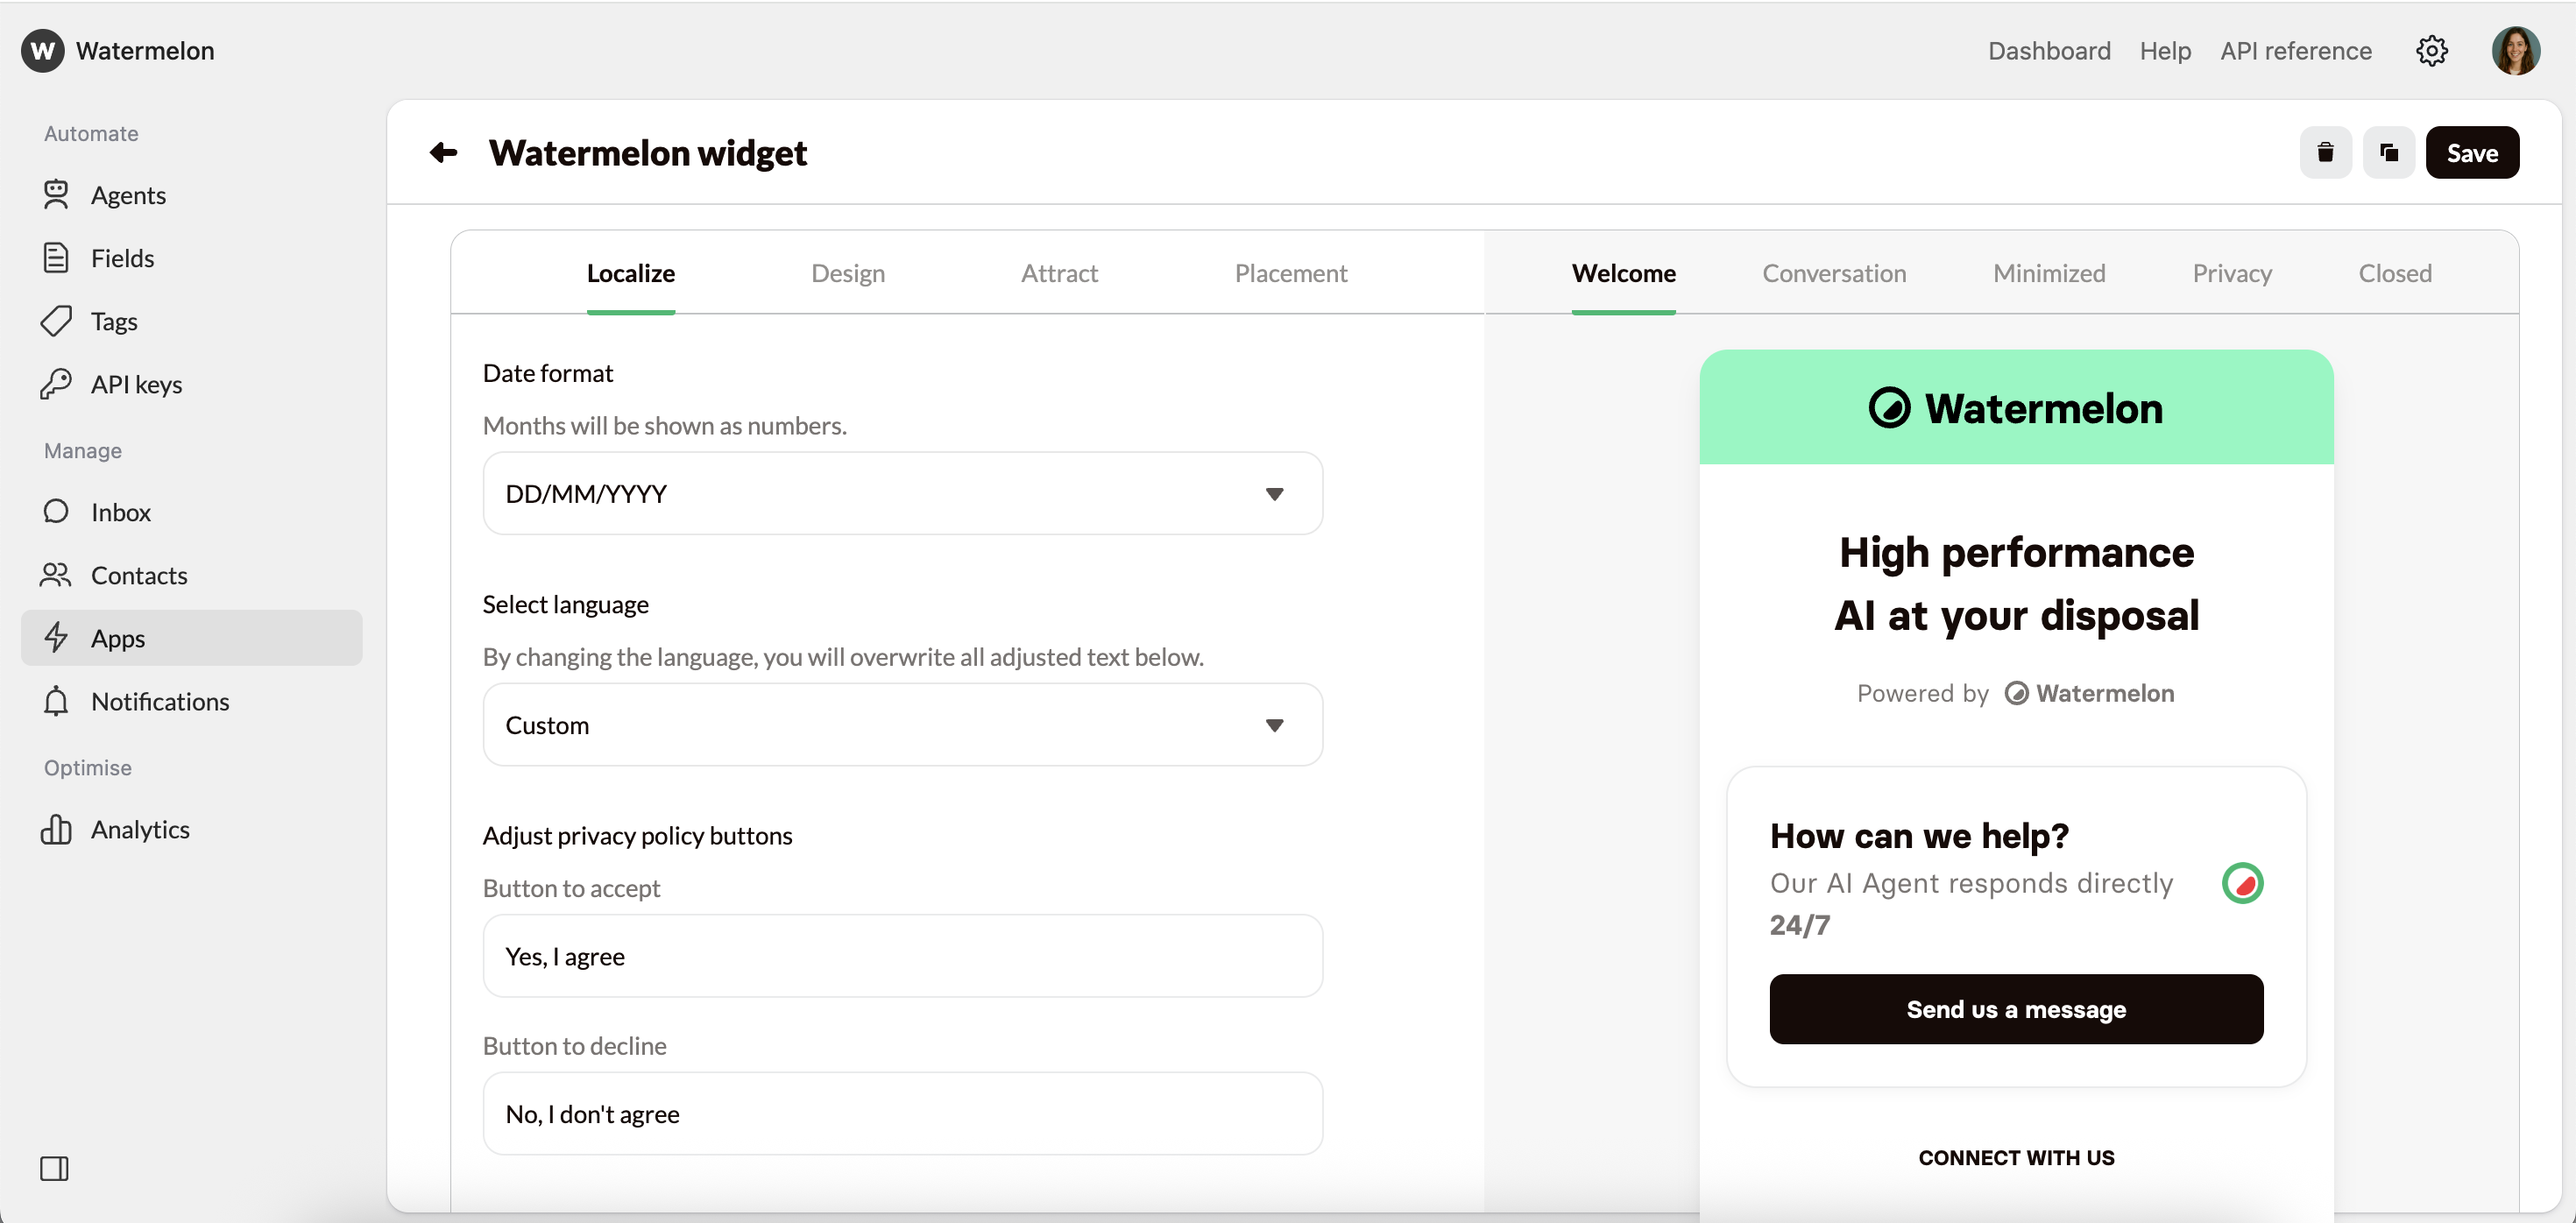
Once you’re satisfied with your Lead generation Agent’s responses, it’s time to make it live! Navigate to the “Activate” tab in your agent, and click on “Connect channel” button to connect your desired channel. For Customer Service Agents, it is important to know via which channel most your questions come in. In most cases, adding a Chat Widget to your website is already a great start. Adding WhatsApp can improve the customer service experience for your customers as they can easily reach out to you.- Chat widget (Recommended)
- Facebook Messenger
- Instagram DM
- WhatsApp Business
Perfect for most websitesAdds a floating chat icon that users can click to start conversations. Non-intrusive and mobile-friendly.Pros: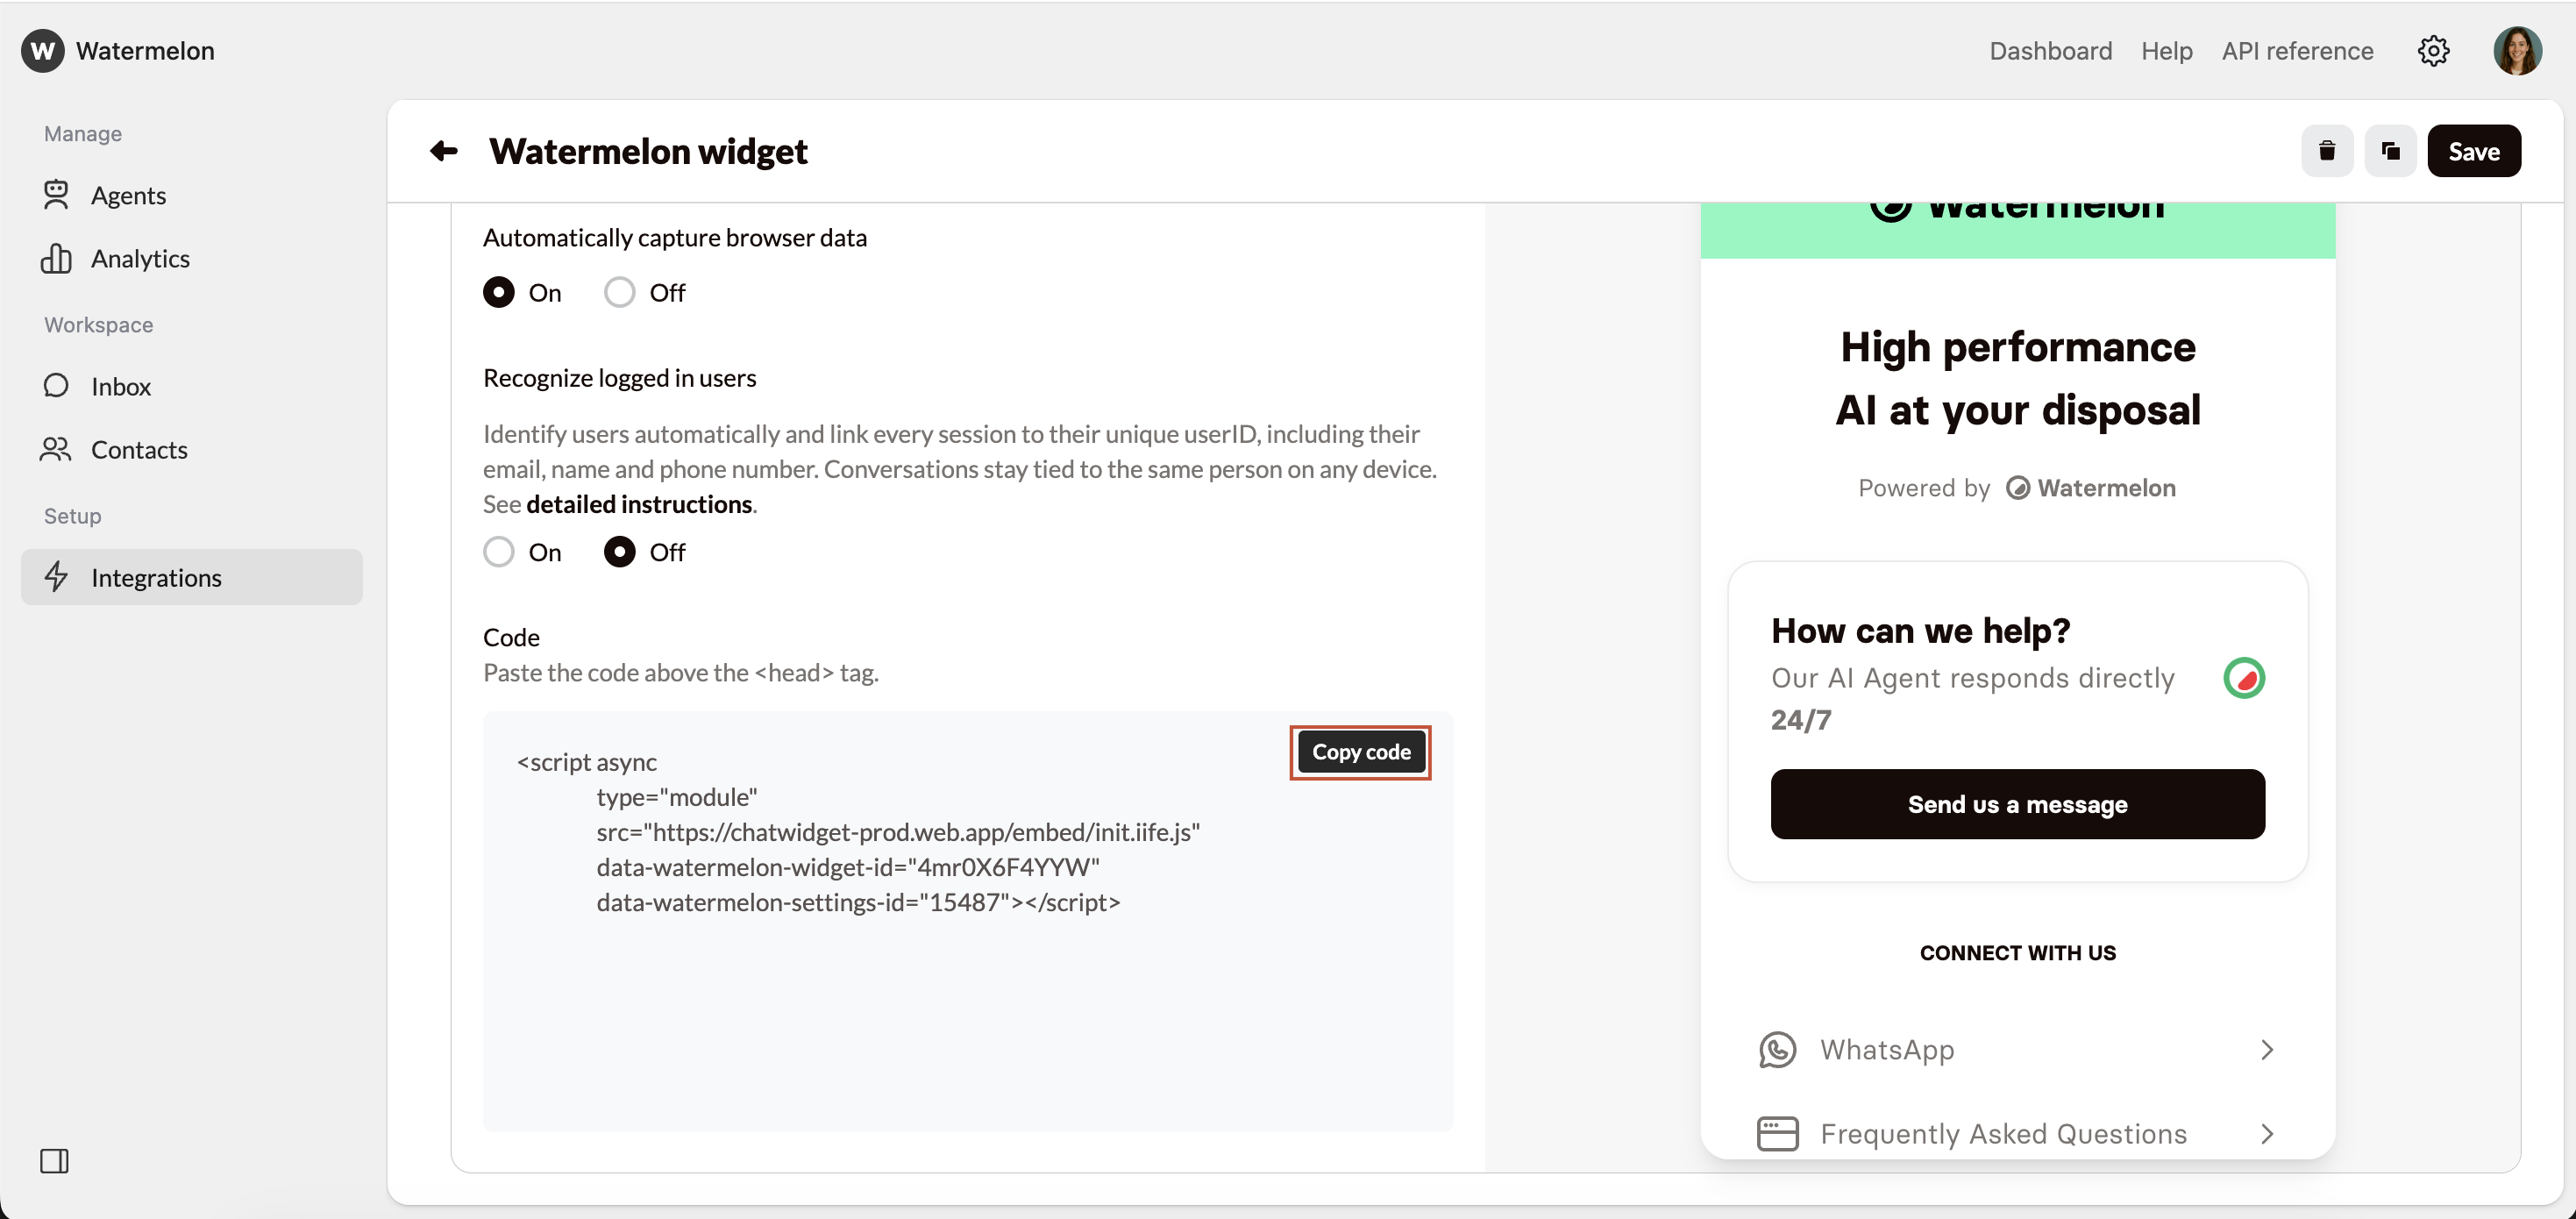

- Can utilize advanced features like identity verification.
- Doesn’t interfere with your site’s design
- Users can minimize/maximize as needed
- Works great on mobile devices
- Familiar UX pattern
Get Your Embed Code
In this guide we’ll use the Chat widget option, go to Integrations -> My first widget -> Placement -> scroll down to find the javascript code snippet.Copy the provided JavaScript code snippet:Add Code to Your Website
1
Locate Your Site's HTML
Find where you can add JavaScript code to your website. This is usually in the
<head> section or before the closing </body> tag.2
Paste the code
Copy and paste the embed script into your website’s HTML. If you’re using a CMS like WordPress, there’s usually a “Custom HTML” or “Scripts” section.
3
Save and publish
Save your changes and publish your website updates.
Verify Installation
Visit your website and look for the chat bubble. Click it to test the integration!Success! Your Lead generation Agent is now live and ready to help your website visitors.
Customize Appearance (Optional)
Want to match your brand? Check out our chat widget style guide.Branding options
Branding options
- Title / Logo – Default is your company name; shown when no logo is added
- Avatar – Displayed when no AI Agent is active and no chat is assigned
- Colors – Set widget and background colors; check readability.
- Users (Welcome Screen) – Choose which users appear when no Agent is active.
- Message Bubbles – Pick Default (2 options) or Custom (full styling).
- Typography – Adjust font type, size, and corner radius.
- Launcher – Edit chat button icon, color, or full button design.
Behavior settings
Behavior settings
- Welcome screen – Enable or disable intro screen.
- Main title – Text shown on welcome screen.
- Send message element – Text before chat starts (title, subtitle, button).
- Chat closed – Set closed message and hours.
- Select links – Add contact links (email, phone, FAQ, etc.).
- Eye-catcher – Message above minimized icon.
- Welcome message – Text shown before chat begins.
- Privacy screen – Require agreement to privacy policy.
- Attachments – Allow or block file uploads.
- Queue system – Show waiting time for human handover.
- Unfold URLs – Expand shared links.
- Watermelon branding – Enable or disable logo.
- Auto open once – Open widget automatically one time.
- Launcher placement – Choose left/right position and spacing.
- Track visitors – See which page chat started from.
- Browser data – Capture user browser and device info automatically.