

Overview
The Email integration allows your AI Agent to manage conversations via email, just like it does in chat channels.How it works
- When you create the email channel, Watermelon generates a unique email address for you
- Emails sent or forwarded to this address are received in Watermelon, and can be handled by your AI Agent
- The Agent replies automatically:
- From the default Watermelon email, or
- From your own email address (after DNS setup)
Prerequisites
Before setting up email:- You are on a paid plan (Starter or higher)
- Access to your email provider settings (for forwarding)
- Access to your DNS settings (only for custom domains)
Connecting email
Follow the steps below to connect email to Watermelon:1
Open Email in Integrations
Go to Integrations and click on Email.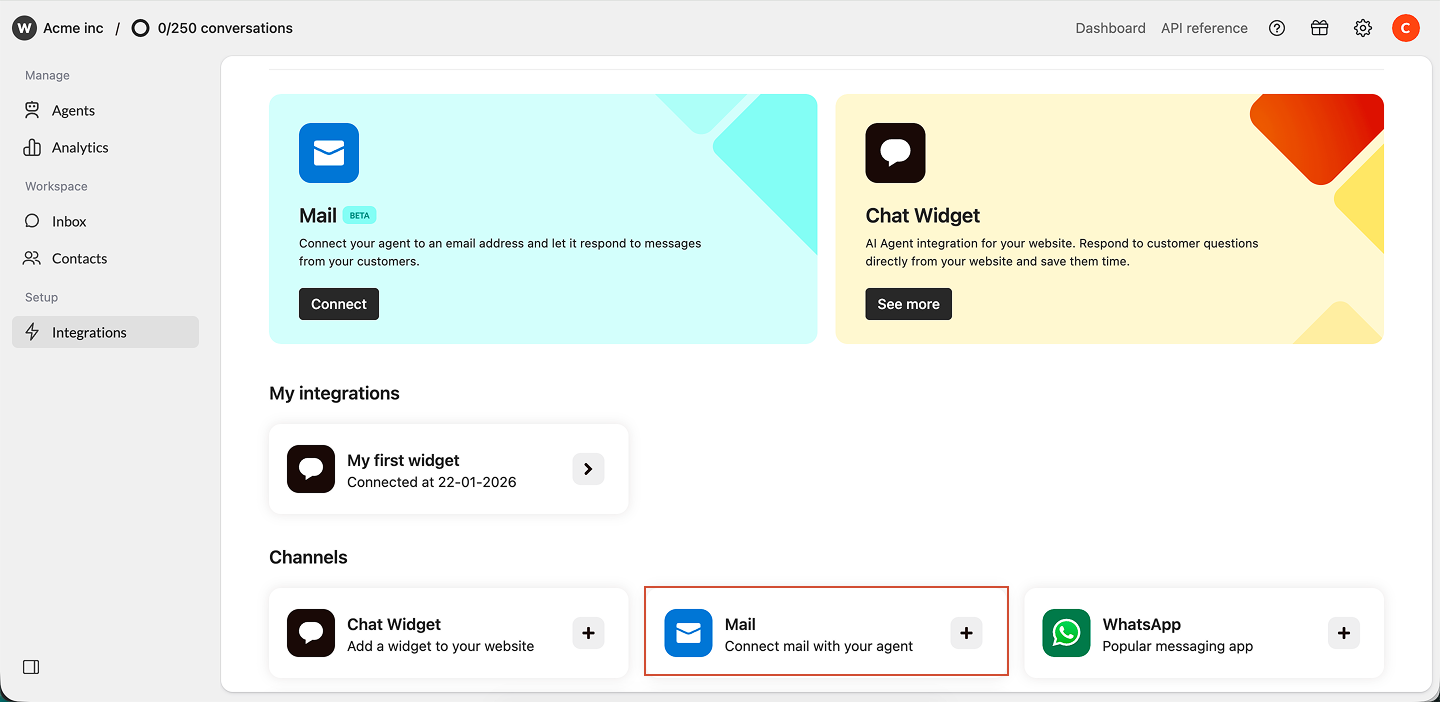
2
Connect Email
Click on Connect to generate your email address.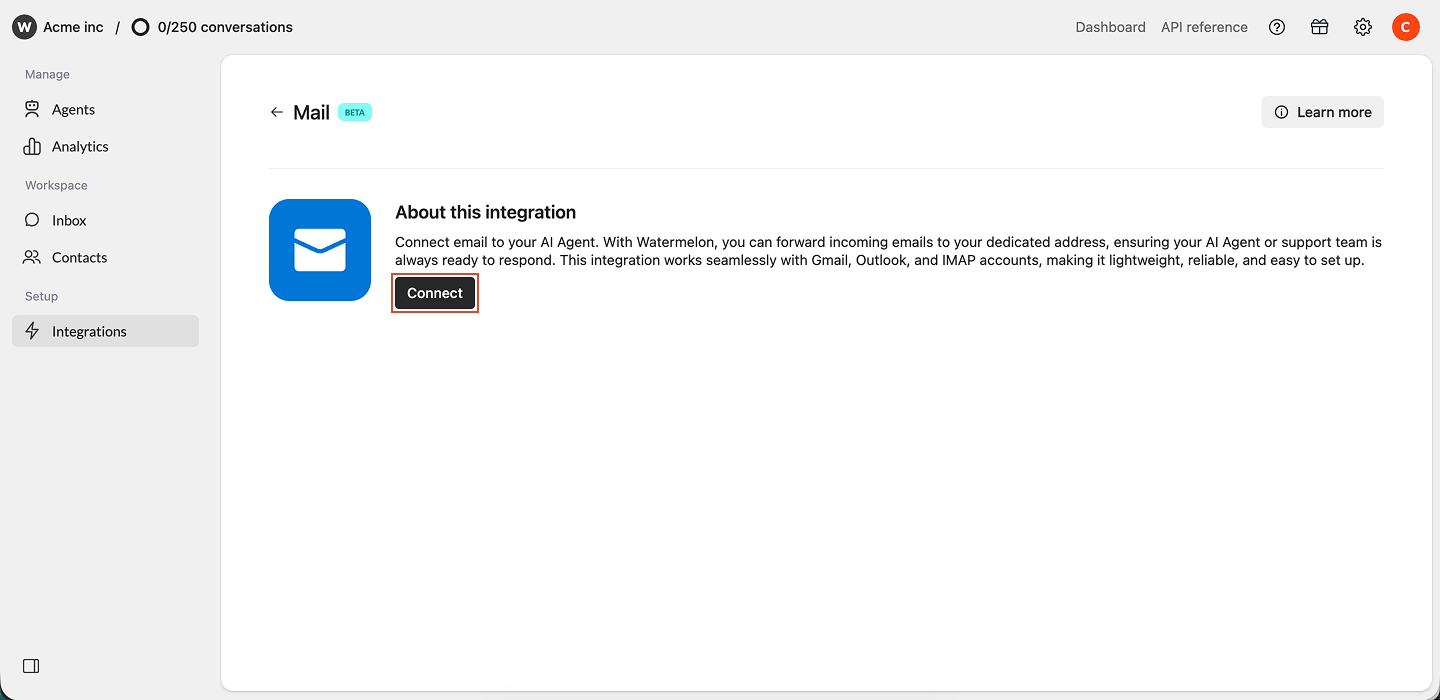
3
Locate the generated email address
Your generated mail adres will feature a unique random-id. This can be found underneath Agent email address. [random-id].agent@watermelon-mail.com
Using the agent email directly
You can start using email immediately — but first, make sure your AI Agent is active on the mail channel, if you want to automatically answers emails via your AI agent.Your AI Agent must be published on the mail channel before it can reply to emails. See: Publish your agent on mail
Forwarding flow
To use your own email address (e.g. support@company.com), you need to set up automatic forwarding.How forwarding works
- A customer emails
- Your email provider automatically forwards the message to your agent email
- The AI Agent processes the email
- A reply is sent back to the customer
Your AI agent will not respond to no-reply mail addresses, automatic messages and newsletters. These mails will not count as received conversations.
- Forward emails → to your agent email
- The AI Agent replies → from the generated Watermelon email
- You can also manually forward an e-mail to this mail address
Step 1: Add a custom sender email
After forwarding is set up, add your email address in Watermelon.1
Click “New email address”
In Email configuration, click the New email address button to start the setup process.
2
Enter your email address
Enter the email address you want to use (for example, support@watermelon.ai). This will be the sender address for all outgoing emails from this mail channel.
3
Continue to forwarding setup
Click Continue to proceed to the email forwarding configuration step.
Step 2: Set up forwarding in your email provider
The exact steps depend on your provider, but generally:- Go to your email provider settings
- Find Forwarding, Rules, or Filters
- Create a rule to automatically forward emails to your agent email
- Confirm verification if required
Configure email forwarding in Google Workspace (Admin Console)
This approach is recommended for Google Workspace because it doesn’t have rate limits and doesn’t require creating a mailbox for the address you’re forwarding.You need Google Workspace administrator access to complete these steps.
1
Open the Google Workspace Admin Console
Sign in to the Admin Console.
2
Go to Gmail routing settings
Navigate to Apps → Google Workspace → Gmail. Go to Default routing, then click Configure or add another rule to create a new routing rule.
3
Create a routing rule for your support address
When adding the setting: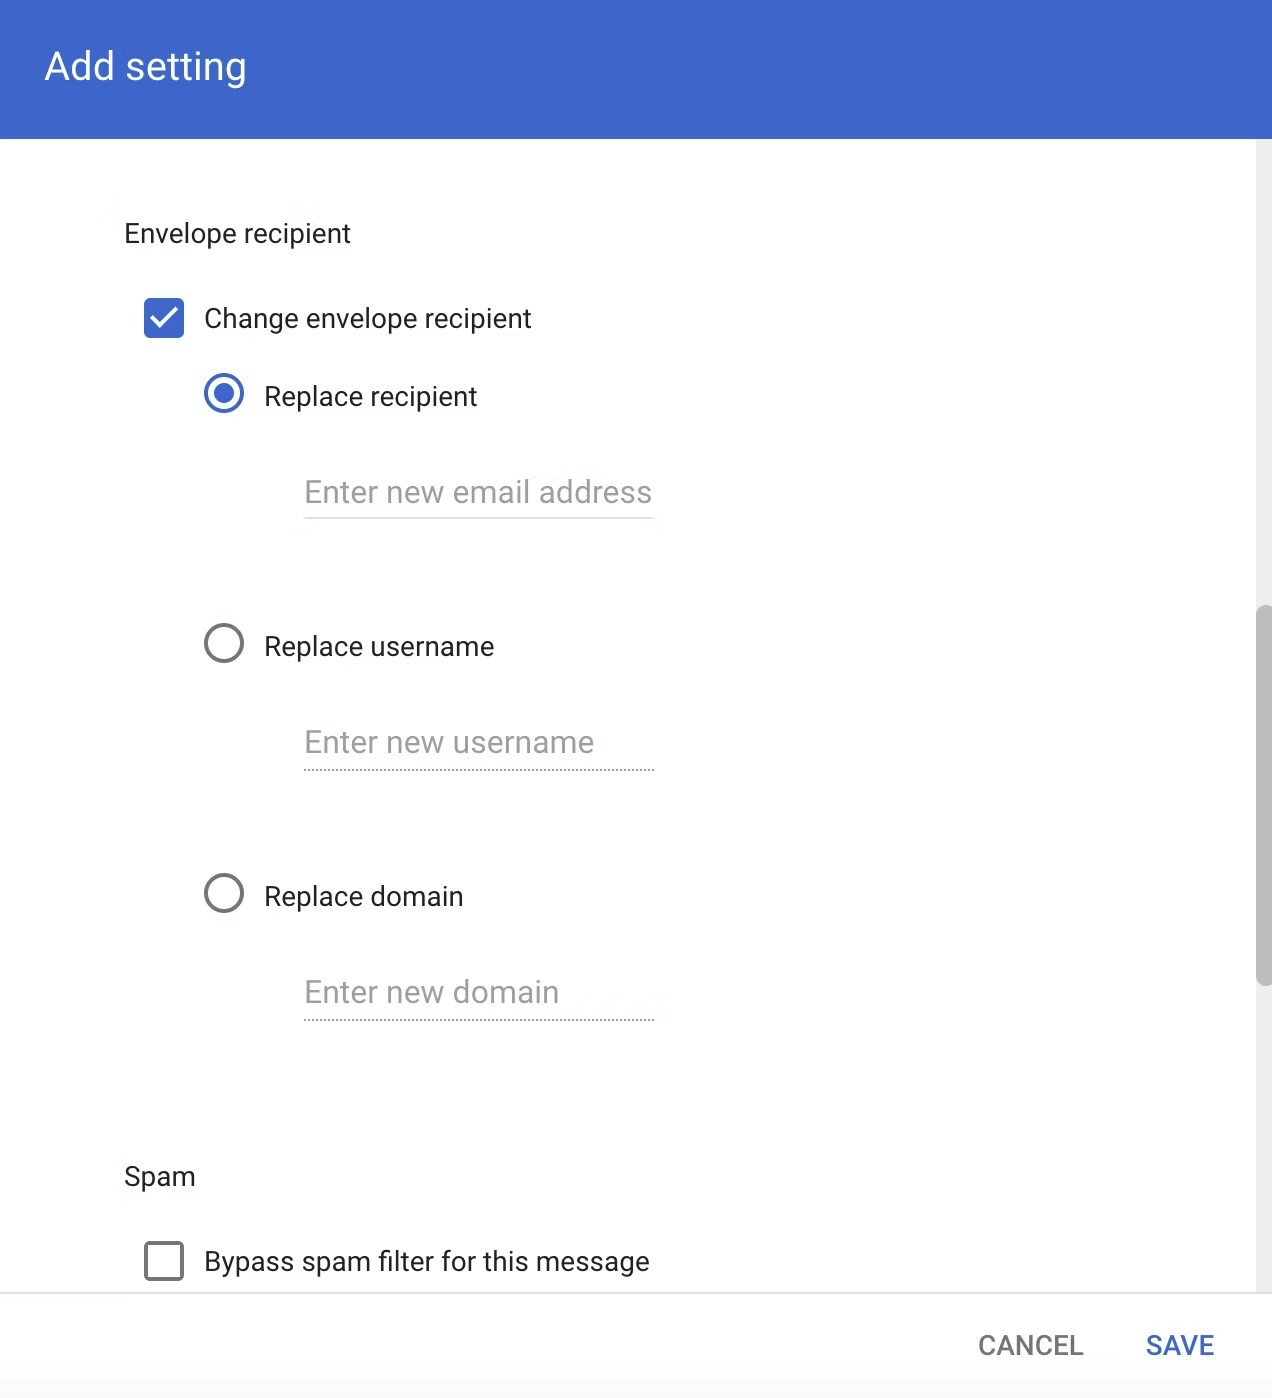
- Set Envelope Recipient to the email address you want customers to use (for example,
support@yourdomain.com). - Under Envelope Recipient, select Change Envelope Recipient.
- In Replace Recipient, enter your Watermelon email address (for example,
random-id].agent@watermelon-mail.com).
4
Save the rule and enable it for recognized + unrecognized addresses
Before saving, make sure the option is set to: Perform this action on non-recognized and recognized addresses and save your changes.
5
Verifiying in Watermelon
Return to Email configuration in Watermelon and click Verify.
Configure email forwarding in Gmail
1
Go to Gmail
Navigate to Gmail and sign into the account that you want to forward emails from.
2
Go to Settings
In the top right, click Settings → All settings. Click the Forwarding and POP/IMAP or Forwarding tab.
3
Setup forwarding settings
In the ‘Forwarding’ section, click Add a forwarding address. Enter the email address that you want to forward messages to.
4
Verification email
In Watermelon’s inbox, you will now receive a verification link via mail. Select this mail and click on the verification link. Return to the ‘Settings’ page in Gmail and refresh your browser.
5
Final steps
Click again on the Forwarding and POP/IMAP or Forwarding tab. In the ‘Forwarding’ section, select Forward a copy of incoming emails to. Choose what you want to happen with the Gmail copy of your emails. It’s recommended that you select Keep Gmail’s copy in the inbox.At the bottom of the page, click Save changes.
Configure email forwarding in Outlook
This guide explains how to setup forwarding for the new Outlook. Looking for help to set this up in the old outlook? Click here.1
Go to Outlook
Navigate to Outlook and sign into the account that you want to forward emails from.
2
Go to Settings
At the top window of the new Outlook, select Settings (the cog icon)Select Mail > Forwarding and Imap.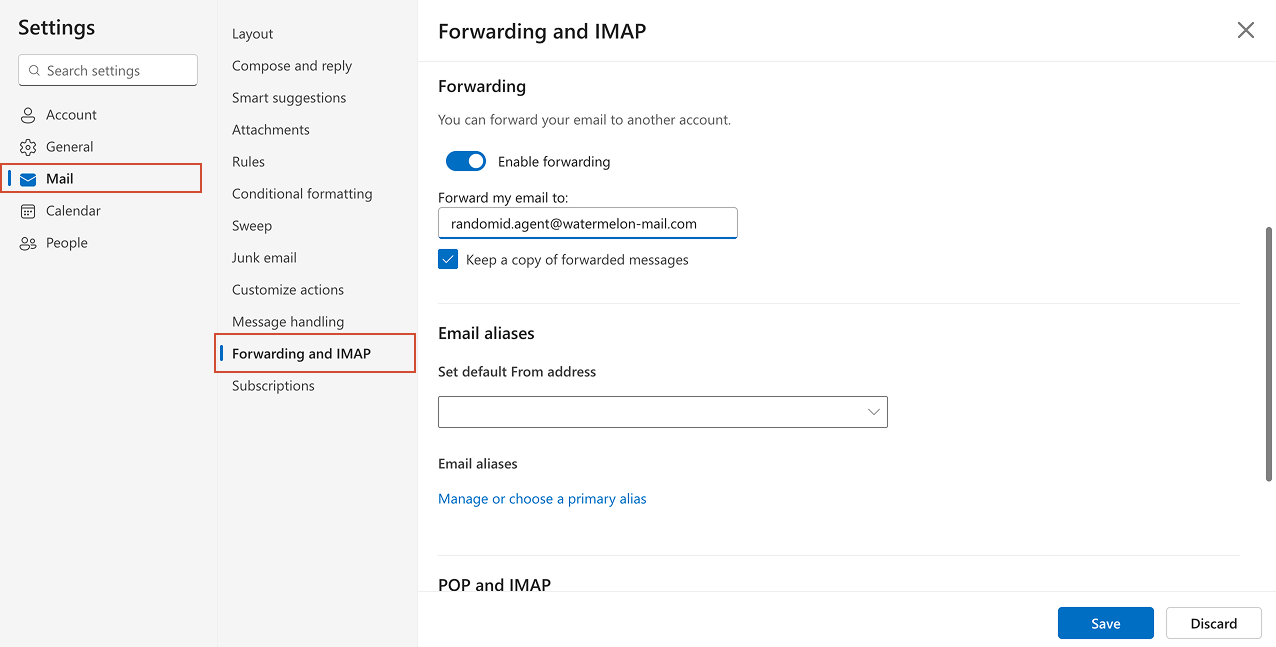
3
Forwarding configurations
Toggle the Enable forwarding switch, enter the forwarding email address, and select Save.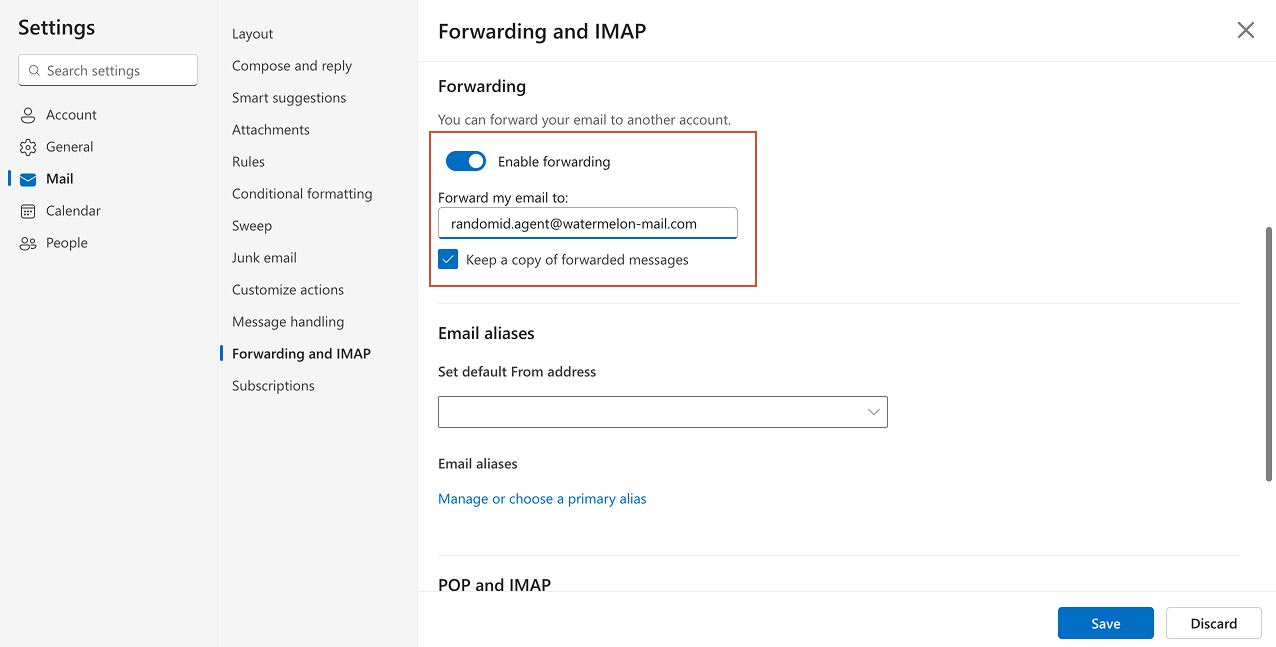
**Note: **If you want a copy of the original message to remain in your mailbox, select Keep a copy of forwarded messages.
Other providers
Search for:- “email forwarding”
- “mail rules”
- “routing”
Step 3: Authenticate your domain (DNS)
Once we detect automatic forwarding, you’ll be able to proceed to DNS authentication. This step allows Watermelon to send emails on your behalf from your custom domain.View your DNS records
After forwarding is verified, you’ll see the DNS records you need to add. These show in in the pop-up at step 3. These include 3 CNAME records and 1 TXT record Copy these exactly as shown.Add records to your DNS provider
- Log in to your DNS provider
- Open DNS settings
- Add the records exactly as shown
- Save changes
Provider specific DNS guides
DNS hosting providers
- Google Cloud DNS → This article explains how to set it up.
- Amazon Route 53 → This article explains how to set it up.
- Azure DNS → This article explains how to set it up.
- Cloudflare → This article explains how to set it up.
Domain registrars
- GoDaddy → This article explains how to set it up.
- TransIP → This article explains how to set it up.
- Hostnet → This article explains how to set it up.
- Mijndomein → This article explains how to set it up.
- Yourhosting → This article explains how to set it up.
Verify your domain
- Return to Watermelon
- Click Validate. This can be done either in the pop-up, or in the table later on if you closed the pop-up.
DNS changes can take time to propagate (usually a few minutes, sometimes up to 24 hours).
Adding and managing email addresses
- Each email integration supports one email address
- You can create multiple integrations (also on the same domain)
- If a domain is already verified:
- You will skip the DNS step
- The email will appear directly in the table
Testing your setup
- Send a test email to your connected address
- Check if:
- The email appears in Watermelon
- The AI Agent replies
- The sender matches your configuration
Mail settings & Instructions
Mail settings
Configure how your emails look and behave. You will find these options there.1
Channel name
Internal name for your team
2
Email display name
This name shows to recipients in the “From” field of your emails. You see a preview of this on the right of the settings screen.
3
AI disclaimer
A message shown in every email indicating AI usage. Per default this is already filled in for you. Required (cannot be empty due to regulations like the EU AI Act)
4
Watermelon branding
Show or hide Watermelon branding in emails.
Available in Business and enterprise plan or via add-on €99 on the advanced plan
5
Email signature
Signature shown at the bottom of every email.
Instructions
Define how your AI Agent writes emails.1
Base instructions (recommended)
Pre-configured behavior optimized for email:
- Clear structure
- Professional tone
- Easy to read
2
Custom instructions
Use this if you want more control over how emails are written.
For example:
For example:
- Adjust tone (formal, friendly, sales-driven)
- Add formatting rules
- Define how specific types of emails should be handled
Custom instructions override the default email behavior, but your agent still uses its existing knowledge and training.
Troubleshooting
Emails not appearing in Watermelon- Check forwarding rules
- Verify the correct agent email
- Confirm forwarding verification
- Check spam or filters in your email provider
Replies not arriving in your inbox
- Check your spam folder
- Verify the recipient email address
- Make sure the correct email integration is used
- Confirm your AI Agent is active on the mail channel
Emails going to spam
- Make sure DNS records are correctly configured (SPF, DKIM, DMARC)
- Avoid spam-like wording (too many links, caps, etc.)
- Check your domain reputation → https://mxtoolbox.com/
DNS verification fails
- Double-check record values (no typos)
- Make sure records are added to the correct domain
- Wait for propagation (can take up to 24 hours)
- Remove conflicting or duplicate records